• Welcome to RCCrawler Forums.

    It looks like you're enjoying RCCrawler's Forums but haven't created an account yet. Why not take a minute to register for your own free account now? As a member you get free access to all of our forums and posts plus the ability to post your own messages, communicate directly with other members, and much more. Register now!

    Already a member? Login at the top of this page to stop seeing this message.

Hulksta Berg w/DeLux precision

Ah, finally
Thursday the links showed up....scared the crap out of the wife...I'm in the man cave and hear this guy talking broken English and Farsi walking up the cul de sac about 8pm...talking very loud and proceeds to bang on my front door, dog's loosing it, wife yells at him to go away, I open the garage door to this very tall middle eastern gentleman who shoves this small package in my face and asks if I am "Gary" Now, I saw the pic of the package from Mr. Links down under and I recognized it right away and nodded. He was dressed in a bright blue parka with a hoodie and minor's head lamp....a blinding headlamp at that...had to sign his signature pad, quite intimidating. I suppose it didn't help that the wife was watching this crap that happened in San Bernardino.

ANYWAY ,!!

Got springs and batteries on Friday ....a good week for parts

868fce9650746dff487b6bf6c42b56fa_zpszy7qvb0w.jpg


I cut this much off the barrel of the shock, used the scx10 shafts with 3 O-rings as inside limiters. The springs are Losi Mini-t rears...slightly longer and bigger round than their famous front pink sisters. After feeling these in action, not sure I like them...not as smooth as I'd like. I compare these to big bores...my go to shock. These Egressor's are light though. We'll at least see how they work on the rocks

8320a839aafb2b2933503f490e6d9206_zps9mz8dnij.jpg


About .4" shock ends up at 85mm, or 3.4" no pre-load whatsoever on the springs...50wt oil all around
 
Well, that was premature thread post...

I spent Friday night twisting rod ends on to links and shock shafts and today putting this all together. Sitting at parade rest and the link mounts all the way out, we're at 12" straight up wb. I'll probably pull the rear link mounts inboard a bit, that should add some length...I'd really like to be closer to 12.5"

44d312d2f4e59a5dfe4d087605defb9b_zpsytgjrdnv.jpg


000639862c106ff28068fedc9a91d2d2_zpsl8qi1zub.jpg


So, visiting a good friend tomorrow that has a nice shop set-up and get this servo mounted/axle drilled, let's drill some holes in these nice axles bull s#!t. Is this normal for berg axles??? I think I can handle the link mount taps by hand.

Don't the links look nice "thumbsup"....they were worth the wait. They have bends I would never attempt. Mr. Links comes thru, he knew exactly what I needed.

If anyone needs a set of XR links for this chassis, don't order them without talking to me, I'm sure we'd work something out.

More pics tomorrow
 
I'm no expert on these axles but it looks like the front is clocked up a little too much. I would think The bottom of the gear box should be close to or even with the lower links. Also if you need to you can trim up some jato rod ends to get your 12.5 WB.
 
Now that you have the crawler together you have to take it apart.
Mount your motors
1. Remove link mounts drill and tap two holes (to 3mm) as close to 180* apart.
1a. Remove axle shafts
2. Put the link mounts back on
3. Use 4 of the provided set screws and pick top or bottom (i suggest top) lightly put in set screws to hold link mounts in place (be extremely careful not to strip out your 3mm threads in your link mounts.)
4. Double check the height of your motors you may want to rotate upper link mount forward and bring that motor down.
5. Adjust incrimentally one link mount at a time. Aim for the rig to be square and the shock angle to be the same.
6. Flip the rig upsidedown use tape measure to get 12.5in wheelbase (measure center of axle tube to axle tube)
7. Once you've got everything set drill the bottom holes into the tubes tap and then use set screws to lock in the link mounts
8. Flip back over remove set screws drill and tap top holes.
9. Set caster for chubs. Use angle finder to make sure they match. Drill and tap
10. Once those are set then move to servo use vise grips to hold servo and mount in place drill outside holes then move to center 3.

Take your time .....go slow
 
So after sleeping on this I'll fool around with the geometry a bit today.
I'll hold off Dean and the axle drilling for another day....but that equates to next weekend at best.

The Jato rod ends would work if nothing else does...."thumbsup"

I need to be patient
Started this some time ago and there's been a fair amount of head scratching and mind changing between this berg and the XR I started with. I like this direction though and will stay this course.

Do you ever feel like you bare your soul when you do a build thread? And all your stupidness shows?

Thanks for watching this
 
Now that you have the crawler together you have to take it apart.
Mount your motors
1. Remove link mounts drill and tap two holes (to 3mm) as close to 180* apart.
1a. Remove axle shafts
2. Put the link mounts back on
3. Use 4 of the provided set screws and pick top or bottom (i suggest top) lightly put in set screws to hold link mounts in place (be extremely careful not to strip out your 3mm threads in your link mounts.)
4. Double check the height of your motors you may want to rotate upper link mount forward and bring that motor down.
5. Adjust incrimentally one link mount at a time. Aim for the rig to be square and the shock angle to be the same.
6. Flip the rig upsidedown use tape measure to get 12.5in wheelbase (measure center of axle tube to axle tube)
7. Once you've got everything set drill the bottom holes into the tubes tap and then use set screws to lock in the link mounts
8. Flip back over remove set screws drill and tap top holes.
9. Set caster for chubs. Use angle finder to make sure they match. Drill and tap
10. Once those are set then move to servo use vise grips to hold servo and mount in place drill outside holes then move to center 3.

Take your time .....go slow

Now see....that makes all the sense in the world...."thumbsup"
Perfect Curt "thumbsup". Thanks for that detailed answer...I'll let you run this when it's done :mrgreen:

That's a great help Curcal, thanks man
 
This has been a nasty month for me, no time for this project, or any other rc for that matter. I am still in progress....would hate to not be ready for skins by the time I get them...need more hours n the day.

Skins look phenomenal Michelle "thumbsup""thumbsup"
 
Time for an update....
I've been real busy lately, work, life, XMas...not much time for this or any other rig. Finally have a couple weeks off for the holidays...so

I bet I took this apart and re assembled it 6 times. Marking, drilling, tapping, measuring....repeat and re-repeat. Damn if it didn't turn out all square and shit. Pretty happy with that...

c6c77589c6a03b614e73974eed45a9d2_zpsetr9iz4g.jpg


94ac97c787370b612e3f4d52a9d6d77e_zpsxetq4ofc.jpg


Yes, I switched out the shocks, these are more than 3mm shorter and I like the way it brought the overall height down about 1/4".... The only thing that is a bit of negative is the springs...they are pink...that's why there is red in my skins :mrgreen::mrgreen: thanks for being flexible Michelle "thumbsup"

31cde7658d0f7efd11e2d5eedd108645_zpsqduaa8kz.jpg


7a12db45917056bd10f9b2f7e4fdc411_zpstmkf2par.jpg


I have changed my mind on the motor choice. I had these 16t HH hand wounds in my other chassis. They sit in here now. Nasty motor, might be too much for this chassis. It will be lbs lighter than the Mantis.

I have just a little rant...motor mounting is no piece of cake with these axles. Would like to have seen a two piece motor plate similar to an XR...or at least Eric's thought process on why he did it like this....probably hashed out somewhere in another thread I'm sure. It took forever to get a good gear mesh...and yes, I have a cheater hole...but it could be the size of my thumb :mrgreen:

I got a nice 30* clock on both sides

7a4ae9bf5c9d0c8a96a0a4c23d85c801_zpsjojzm3um.jpg


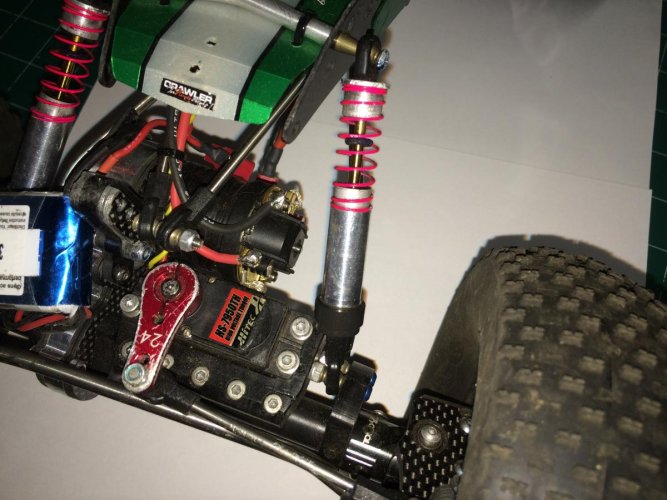
Only thing I need to change is the shock spacing...off by a nut space for the damn servo mount. Need to come up with something for the upper spacer...not jazzed with the length now.

317c20d71042a12f1b333a9eae23daa5_zpsx1wpryft.jpg


Thanks for looking....
 
You could always thread that shock into the side of the servo mount. Depending on where it hits with your servo screw..

You could try a set of Dlux shock mounts, if you don't want to do the cap mod or reverse cap mod, and get a little "lean" on your shocks. (From the chassis, out to your shock link mounts)

Another suggestion, would be: get with BDN of BmachineRC and get some shock sliders, so your shocks aren't just hanging out there waiting to catch a rock and snap or bend your shock screw..
Which could also lead to breaking your chassis..

Motor guards look good.. Even if they are cut for a XR.. ;) [emoji106]
 
Thanks for those suggestions sir, not familiar with shock sliders....would take a little lean, but not much. Cap mod probably would eleviate that at least a little.

More searching....thanks Troy

Btw...you sold me those motors...I'm pretty sure they are 16t...maybe 13t, they had 6* labeled on them, I can't remember....
 
Here's the BmachineRC, shock sliders..
2189327252f2303611a16e46b1c12afc.jpg


Check Stephan's XR thread.. He has some wide offset ones Bruce did for him.

Reverse cap mod would give you the benefits of the cap mod, but not the height gained by the cap mod.

Like this.. (Don't mind the quick throw together).. Lol.. I run scx shocks.. ;)
aadba9df03afe01e17e0f29a1903daed.jpg


It would be your off set and your cap mod..
96fff83cbd95723ce4fe55550282ad84.jpg


Better pic..
0cf05bd914209cac59aeefac4ecf4144.jpg


I couldn't tell ya what motors I sold ya.. Lol.. I believe they are 16t.. But without taking them apart and looking on the armature, it's only a memory...
Dozens of motors sold since.. ;)

Lmk when your ready to upgrade! [emoji41]
 
Lol, ya, my memory is toast these days...these motors should do the trick, at least for now.

I think the cap mod is the way to go...I did see the sliders, but they need to be bigger, taller, nobody sells a cap mod do they?
 
Whay are you spacing the shock away from the mount? Your shock can ahve a lean to it. Just make sure that it doesnt bind. Flex then give it a twist. If it moves freely on the hallow balls you're good to go. Btw its looking sweet!
 
Last edited:
The spacing is tight on that front shock next to the servo mount but it does fit. I ran my front shocks upside down to take advantage of the cap mod and cut my mounting screw so it just comes a hair short of the end of the m3 nut. You can buy the caps all modded from Dlux for the Big Bores. I know it's a different chassis but here is a pic of that shock if it helps. Rig is looking Awesome too!!
 

Attachments

  • image.jpg
    image.jpg
    135.5 KB · Views: 276
Whay are you spacing the shock away from the mount? Your shock can ahve a lean to it. Just make sure that it doesnt bind. Flex then give it a twist. If it moves freely on the hallow balls you're good to go. Btw its looking sweet!

Thanks man, nice to get some encouragement "thumbsup". I've always liked my shocks as close to vertical as I can get. After looking at it today, I'm going to have to live with some lean. Cap mod is in my future as well. I think I saw them on Dlux 's web site...I'll go look again

My spacing looks like Blandon's after I took out the spacer in the bottom. I don't have any binding either....but I don't like the space on the top mount, seems like a weak point. If I take that spacing out I get binding. We can't have any binding :shock:

It's like everything else on this rig...a work in progress
I like it more every day....I couldn't say that a month ago....

Thanks for checking it out
 
Back
Top