-
Welcome to RCCrawler Forums.
It looks like you're enjoying RCCrawler's Forums but haven't created an account yet. Why not take a minute to register for your own free account now? As a member you get free access to all of our forums and posts plus the ability to post your own messages, communicate directly with other members, and much more. Register now!
Already a member? Login at the top of this page to stop seeing this message.
You are using an out of date browser. It may not display this or other websites correctly.
You should upgrade or use an alternative browser.
You should upgrade or use an alternative browser.
SSD Trail King ruins (or is the highlight of) my beach vacation
- Thread starter new2rocks
- Start date
new2rocks
I wanna be Dave
Time for a look at the all new transmission. Here are the components laid out:
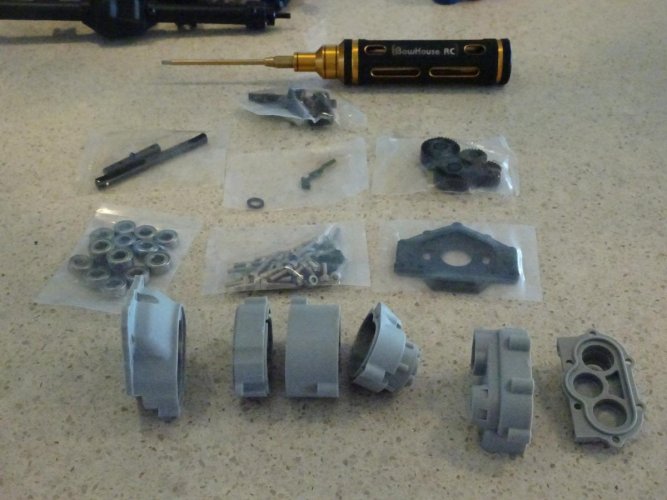
Gears are all hardened steel, which should make them plenty durable. The transmission provides 11.8:1 gear reduction. Combined with the axles, the total drivetrain gear reduction is a very healthy 44.2:1 (more than a 10.2 or TRX-4 Sport, almost as much as an Ascender).
Here are some tips for installing the motor, setting the mesh, etc., starting with a pic:
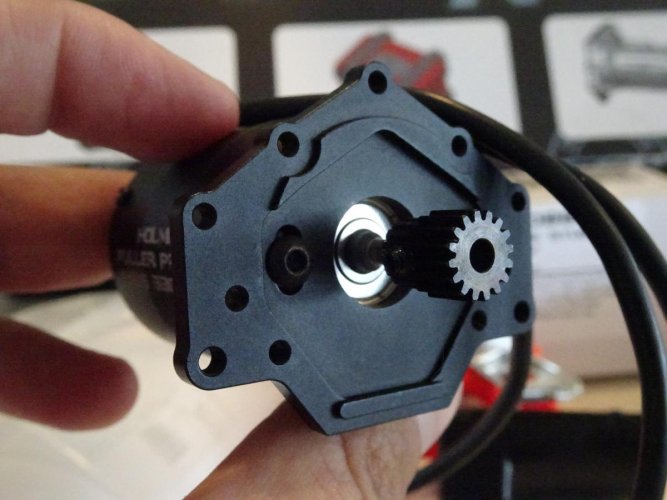
If you have a motor with a flange around the output bearing, the flange should sit snugly in the hole at the center of the motor plate and lock the motor into the proper mesh position. If you motor doesn't have a flange, like the Holmes Hobbies Puller Pro Stubby 3300 kv that I picked for this build, get the mounting screws as close to centered in the slots as you can and tighten then until they are snug. Then press fit the motor plate to the first tranny section with step gear installed and hold the motor upright to test the mesh:
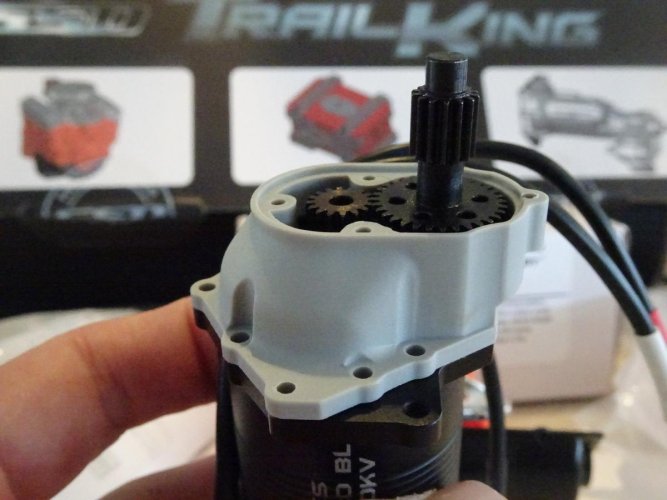
This is also the perfect time to test pinion placement on the motor shaft to make sure that the outer edge of the pinion doesn't extend past the edge of the input gear.
As a side note, the slotted motor plate was intended to allow for small variances in mounting hole placement on motors, but it has the theoretical benefit of allowing you to change pinions by a tooth or two in either direction if you want. I'm going to stick with stock gearing.
The rest of the transmission assembly is straightforward:
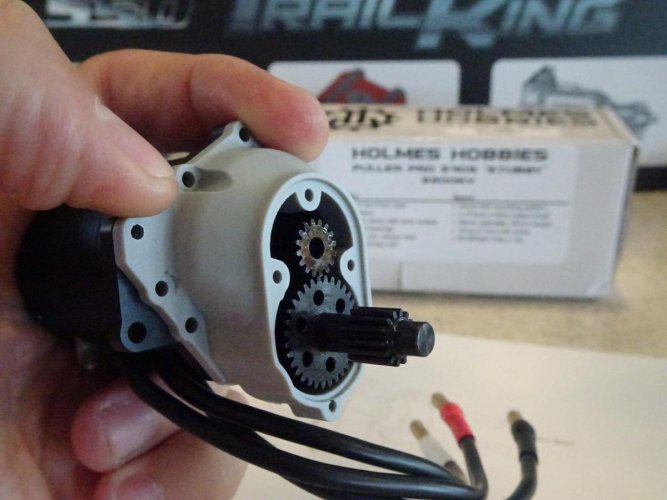
One thing to keep an eye out for is the different bearing sizes...pay attention to the instructions and you'll be fine:

This is what it looks like put together:
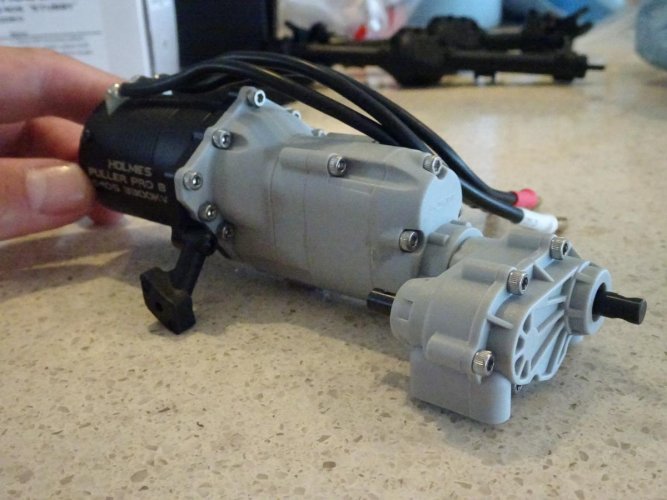
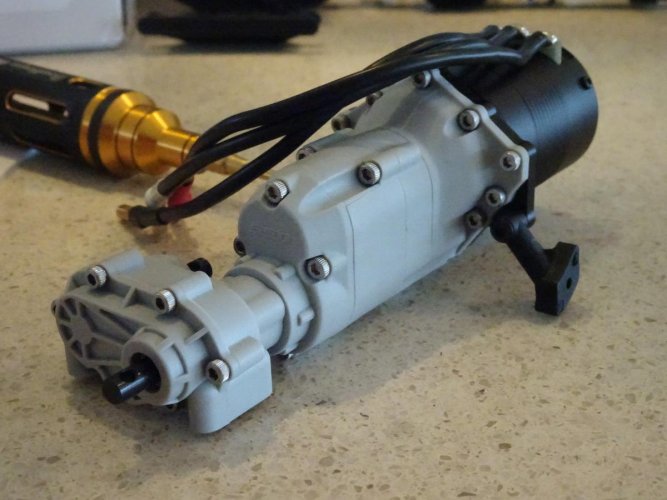
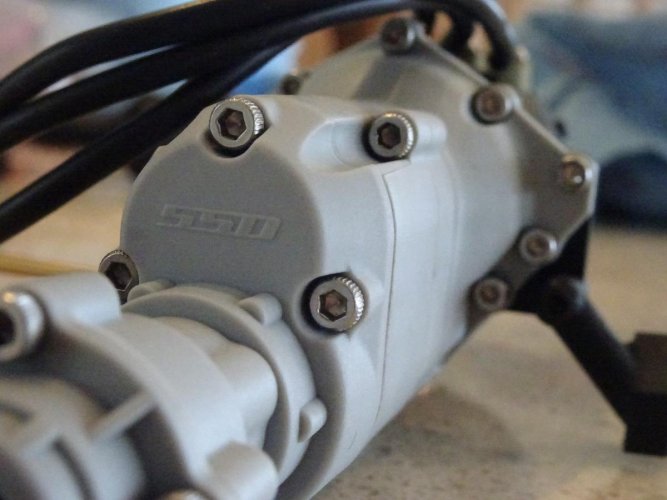
A final note on motor installation. If you are running a brushless motor and want to use the stock oil pan, install the motor with the tabs facing up (at 12 o'clock) and leads extending back across the top of the motor can. The back of the stock 3D motor intake includes a hole for the motor leads. If you don't care to use the stock oil pan or you are okay modifying it, you can install with the tabs facing down. If you are running a brushed motor, you would be fine either way.
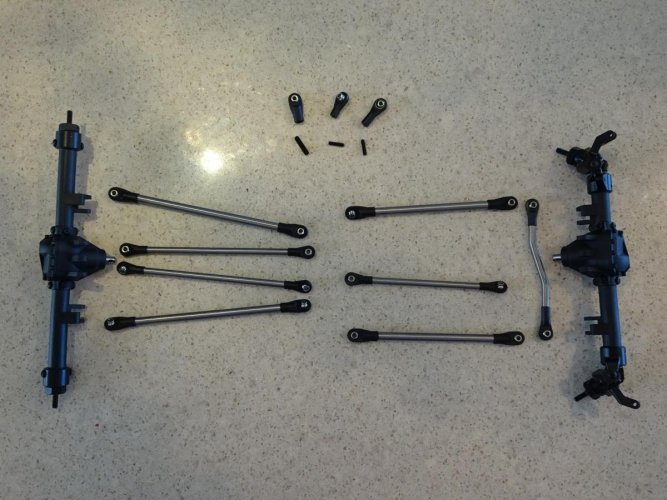
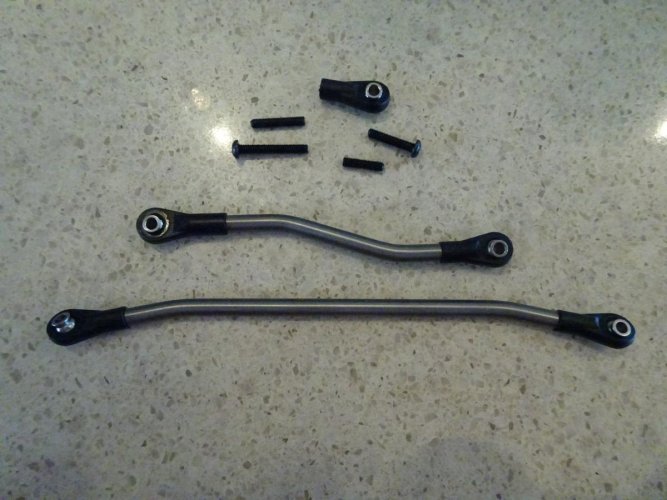
The titanium links come with extra rod ends (nice touch):
Chassis assembly is easy with the c-channel rails:
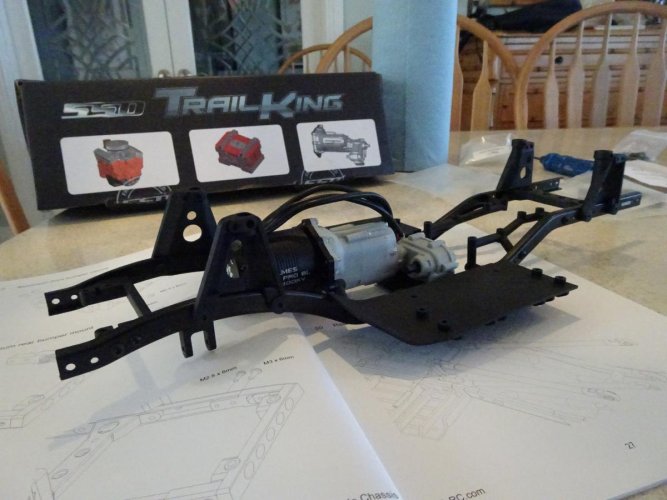
The rails are based on the SCX-10 geometry, which means that most 10/10.2 accessories will work on the Trail King.
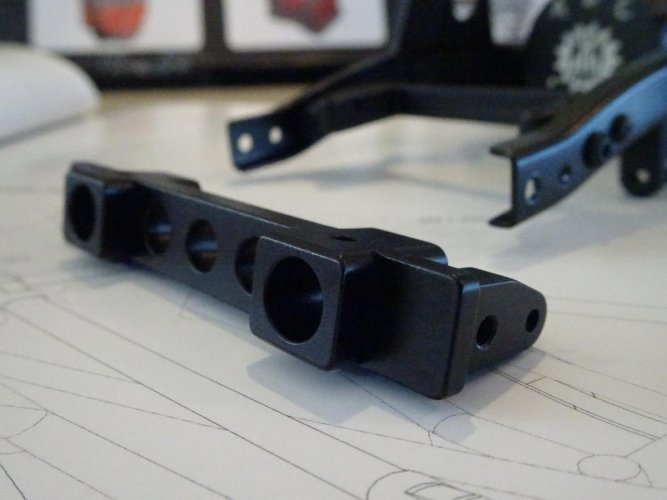
Bumper mounts are aluminum for strength, and the rear bumper includes extension brackets for more solid mounting with longer bodies. Front:
Rear:
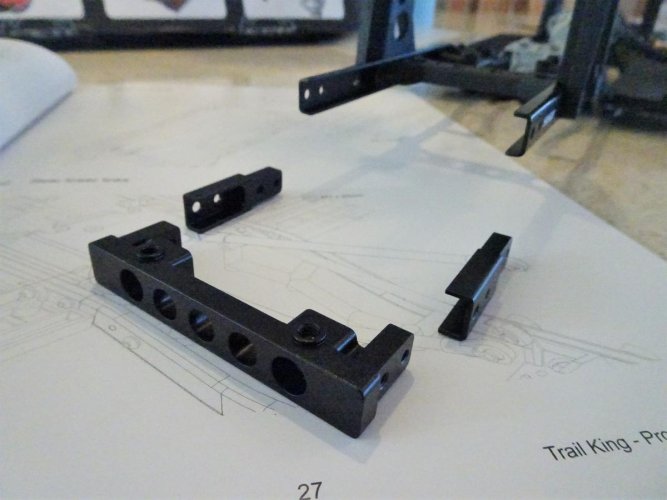
SSD even included a couple of extra holes in the rails to allow for different rear shock tower mounting positions.
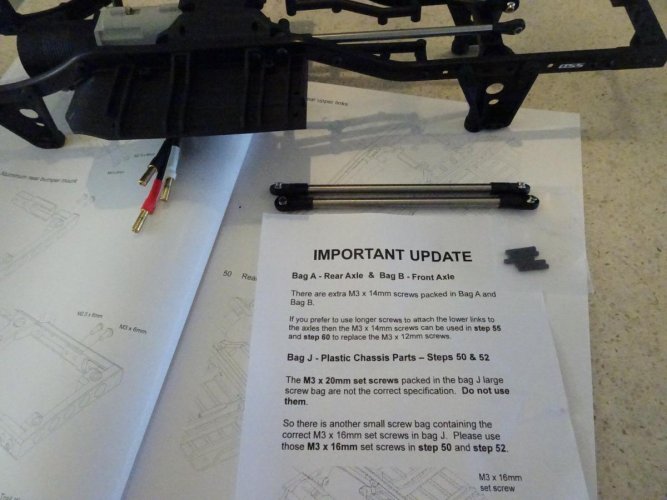
When installing the lower links, the insert reminds you to use the M3x16mm threaded rods (included in their own bag within bag J) rather than the M3x20mm rods shown in the instruction book:
With motor/tranny and axles installed, it looks something like this:
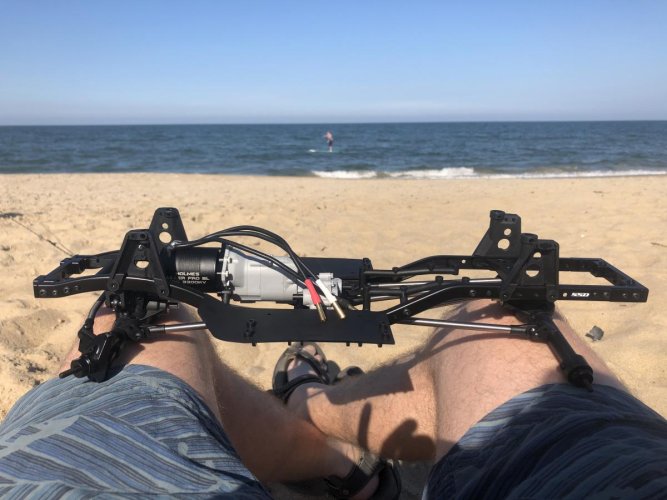
There you go, svt...ocean view and paddle board sold separately, of course. ;-)

Gears are all hardened steel, which should make them plenty durable. The transmission provides 11.8:1 gear reduction. Combined with the axles, the total drivetrain gear reduction is a very healthy 44.2:1 (more than a 10.2 or TRX-4 Sport, almost as much as an Ascender).
Here are some tips for installing the motor, setting the mesh, etc., starting with a pic:

If you have a motor with a flange around the output bearing, the flange should sit snugly in the hole at the center of the motor plate and lock the motor into the proper mesh position. If you motor doesn't have a flange, like the Holmes Hobbies Puller Pro Stubby 3300 kv that I picked for this build, get the mounting screws as close to centered in the slots as you can and tighten then until they are snug. Then press fit the motor plate to the first tranny section with step gear installed and hold the motor upright to test the mesh:

This is also the perfect time to test pinion placement on the motor shaft to make sure that the outer edge of the pinion doesn't extend past the edge of the input gear.
As a side note, the slotted motor plate was intended to allow for small variances in mounting hole placement on motors, but it has the theoretical benefit of allowing you to change pinions by a tooth or two in either direction if you want. I'm going to stick with stock gearing.
The rest of the transmission assembly is straightforward:

One thing to keep an eye out for is the different bearing sizes...pay attention to the instructions and you'll be fine:

This is what it looks like put together:


A final note on motor installation. If you are running a brushless motor and want to use the stock oil pan, install the motor with the tabs facing up (at 12 o'clock) and leads extending back across the top of the motor can. The back of the stock 3D motor intake includes a hole for the motor leads. If you don't care to use the stock oil pan or you are okay modifying it, you can install with the tabs facing down. If you are running a brushed motor, you would be fine either way.
The titanium links come with extra rod ends (nice touch):


Chassis assembly is easy with the c-channel rails:

The rails are based on the SCX-10 geometry, which means that most 10/10.2 accessories will work on the Trail King.
Bumper mounts are aluminum for strength, and the rear bumper includes extension brackets for more solid mounting with longer bodies. Front:

Rear:

SSD even included a couple of extra holes in the rails to allow for different rear shock tower mounting positions.
When installing the lower links, the insert reminds you to use the M3x16mm threaded rods (included in their own bag within bag J) rather than the M3x20mm rods shown in the instruction book:

With motor/tranny and axles installed, it looks something like this:

There you go, svt...ocean view and paddle board sold separately, of course. ;-)
Last edited:
new2rocks
I wanna be Dave
Super useful thread. Thanks for going to all the trouble.
Glad you like...thanks! "thumbsup"
Heads up to anyone about to build, the pic on step 58 of the instructions is mirrored. Don’t let it twist your brain.
Thanks for reminding me (I forgot to mention that in the last post). Funny thing...my brain was especially when I got to that step because I originally put the c-hubs on the wrong sides. You can imagine the neurological short circuits that ensued. But I got it straightened out and it's all good now.
Time for more buildy stuff. Like suspenders:
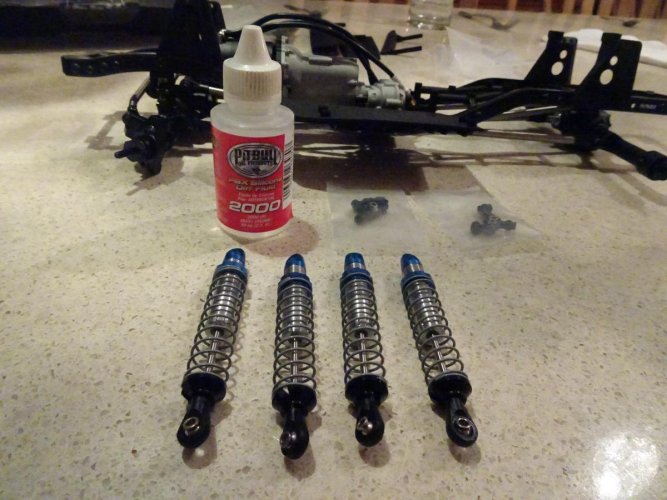
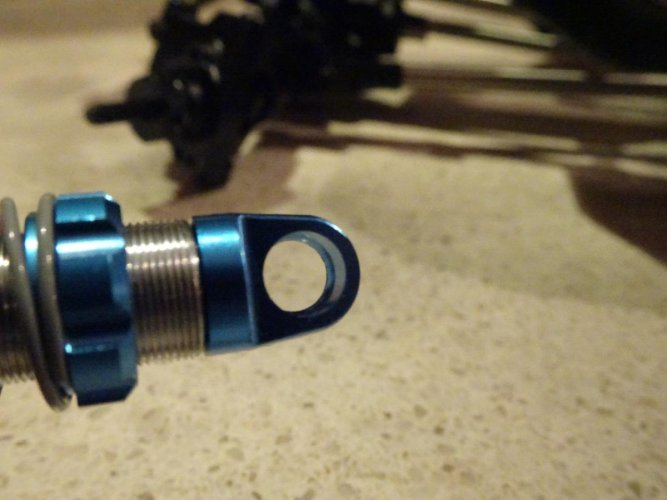
The SSD Pro Scale shocks have an aluminum cap with a lip that helps keep the ball in place once mounted:
I like that they are pre-assembled...shock assembly can be a bit tedious (esp. when e-clips make sudden escapes from the work bench, much to Roo's delight). When it comes to filling shocks, I tend toward thicker oil (usually diff fluid) in my shocks to get real dampening. As you might have seen from the first pic, I went with 2K diff fluid here, and I quite liked the feel once they were mounted up:

As with all emulsion style shocks, getting the right oil level is key. Too much oil, and you don't get full compression. Not enough and the shocks will skip when they hit large air pockets. The sweet spot on these seemed to be just enough oil to cover the piston when the shaft was within a couple mm of full compression. Once you figure out the right level on the first one, the rest go quickly.
The side plates and sliders are an interesting design. The side plates are very similar to stock 10.2 plates (minus the integrated receiver box found on the Axial version) and include the same slots to mount sliders for compatibility with aftermarket 10.2 sliders. But SSD has added a lower plate that makes a smoother surface and noticeably stiffens up the whole assembly:
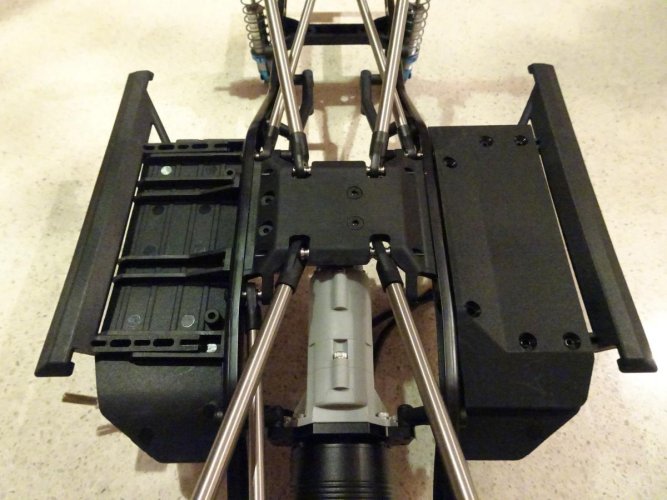
SSD also includes a set of streamlined sliders to finish it off. It's a nice evolution of the stock 10.2 design.
I was a bit curious to see how the tubular battery tray and receiver box mount would work. Here are the mounts:

I'm happy to report that, with the aluminum battery tray installed, the setup is solid as a rock. And about that receiver box...SSD obviously put some effort into the fuel cell design. Here's what you get in the bag:
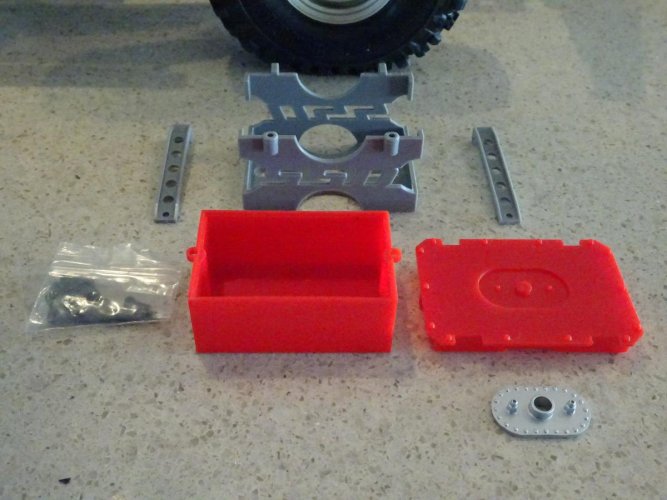
I like that SSD molded this in 3 different colors (even though most people reading this will go ahead and paint theirs anyway, lol). The fuel cell receiver box includes a nice wide slot for cables:
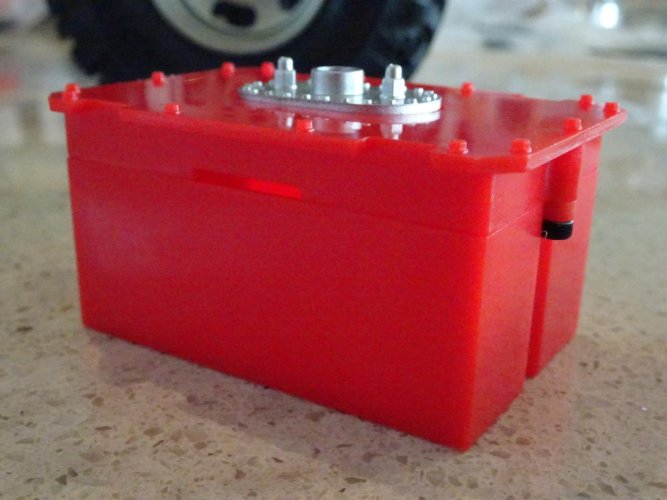
It looks like it should allow at least 4 wires, maybe more. I'll have to test that when I get back home.
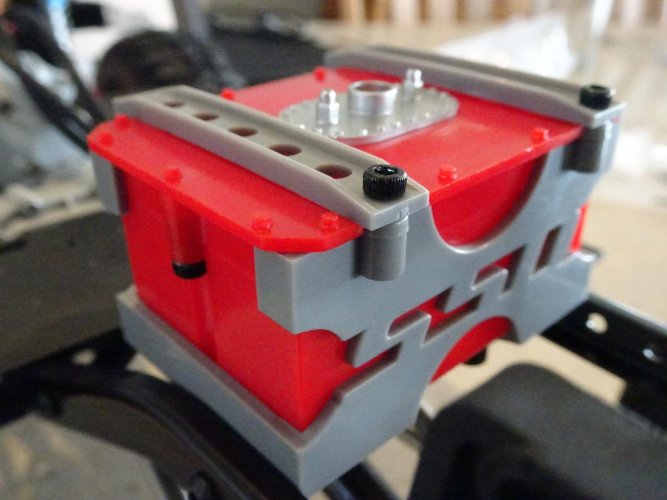
The fuel cell cage mounts to the chassis:

Followed by the fuel cell:
The Trail King includes a set of beefy steel driveshafts:

It's always good practice to mount with the female ends closest to the axle housing. In this case, that's a necessity in front to allow enough clearance between the driveshaft and transmission.

At this point, I was getting tantalizingly close to something that might look like a truck. So I decided to toss on wheels, tires, a front bumper and a body just to see how it looked.
Before I get to a spoiler pic, here are some notes on body mounting. The kit comes with two different sizes of body posts:
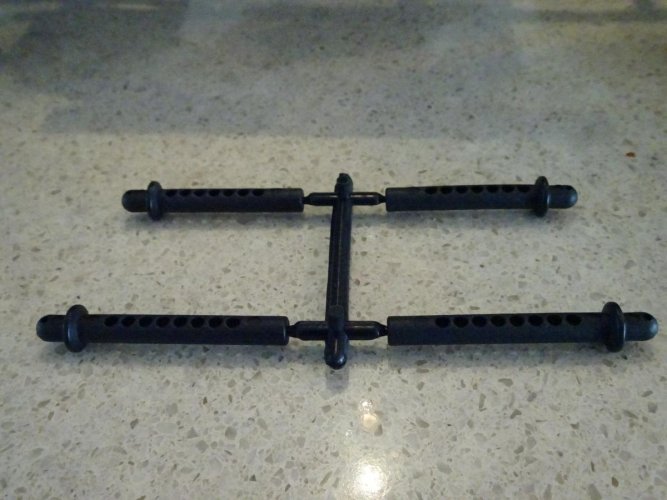
They are on the short side, so they won't work with larger bodies or in the back of SUV-style bodies. Fortunately, like most of the Trail King platform, body post mounts in the shock towers are compatible with SCX10/10.2 posts, so you can pick up an Axial body post parts tree if you want to use clips with a Lexan body. Or you can come up with your own clip-less mount (esp. if you're planning to use a hard body).
The rear shock towers are reversible, and SSD has included an extra set of holes in the back of the rails to allow different body and shock mounting positions that accommodate different wheelbases and bodies. Here are a couple of side view pix that show the difference, starting with stock:
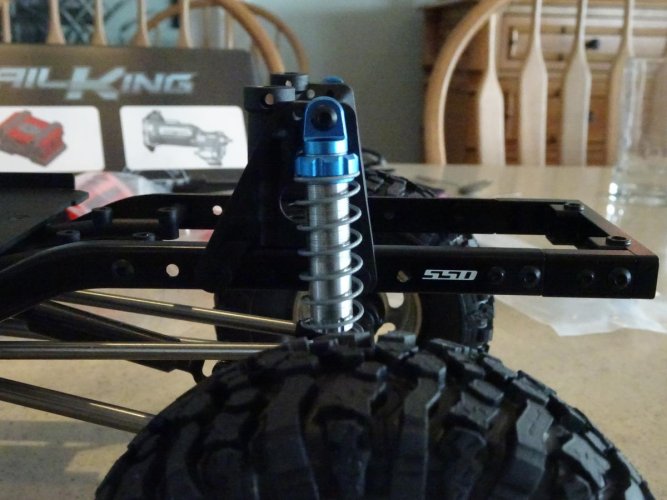
Here's what it looks like with shock towers flipped and mounted one hole back:
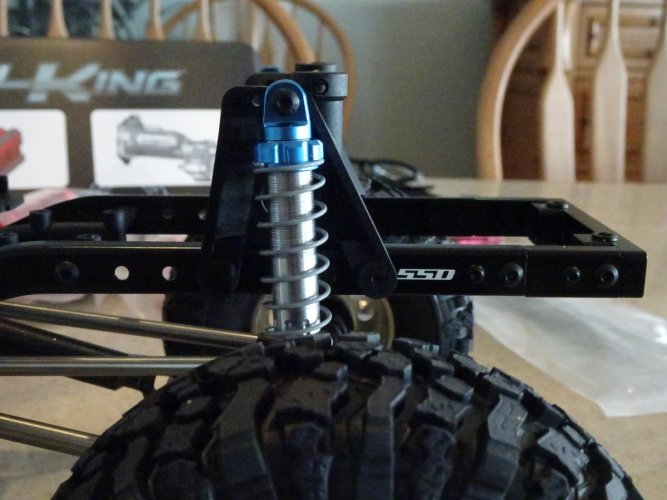
Note that for this setup, the body post has moved back, but I still get the same shock angle as before. You can also come up with multiple other variations of shock and body mount locations. It's a nice little touch that adds flexibility for different builds.
Now for the spoiler...for shoes, I chose the SSD silver slots with OG Pit Bull 1.9 Rock Beasts and SSD scale hubs. For the bumper, I went with (spoiler alert) SSD's front Bronco winch bumper, all of which looks creat under the Traxxas Bronco body:

And that's the spoiler. This is going to be a Bronco (not black), with a twist or two to come. Next update will be the 3d engine. Thanks for following along!
Last edited:
2mtech
RCC Addict
Haven't seen anything I don't like yet! Thanks for the further sacrifice of sand-in-the-crotch time and continued posting. "thumbsup"
I like it, but for the price it could have been package with portals. If this was priced mayve sub $400 I would have purchased one.
Also, why is this even allowed to exist here in the Axial area when clearly this is not an Axial product... it should have been properly posted in the scale rigs section or somewhere else appropriate, but not here.
Also, why is this even allowed to exist here in the Axial area when clearly this is not an Axial product... it should have been properly posted in the scale rigs section or somewhere else appropriate, but not here.
bikepilot
Pebble Pounder
I've been out the last couple days, now I'm caught up and GLAD!!!! Nice sacrifice, I appreciate it!! This looks great!!! Been waiting to see it in the wild too!!! Looks very solid! If it preforms as well as it looks it will be my next build!! And soon!!! Thanks!!!
brian
brian
new2rocks
I wanna be Dave
well its pretty much an unofficial (3rd party) scx10III. its all scx10 based just upgraded by every aspect.
(can i also say i would LOVE a leaf sprung variant???)
Exactly my reasoning in putting it here. Just about everything is cross compatible with 10.2 components. I'm sure leaf spring conversions will be available before too long, either from SSD or the after-aftermarket.
I've been out the last couple days, now I'm caught up and GLAD!!!! Nice sacrifice, I appreciate it!! This looks great!!! Been waiting to see it in the wild too!!! Looks very solid! If it preforms as well as it looks it will be my next build!! And soon!!! Thanks!!!
brian
Thanks...glad you're finding it helpful! I think you'll like it once you get yours.
I like it, but for the price it could have been package with portals. If this was priced mayve sub $400 I would have purchased one.
Also, why is this even allowed to exist here in the Axial area when clearly this is not an Axial product... it should have been properly posted in the scale rigs section or somewhere else appropriate, but not here.
Portals are nice, but they're not everyone's cup of tea. They also make the axles a fair bit wider. Considering the quality of the components, I think the $450 price is very fair. As for why I put it here, Shinchu got it right (see above).
Haven't seen anything I don't like yet! Thanks for the further sacrifice of sand-in-the-crotch time and continued posting. "thumbsup"
Happy to take one for the team, Wyatt. And yes...there's a lot to like here. "thumbsup"
The last thing to put together is the 3d engine. Here are the pieces:
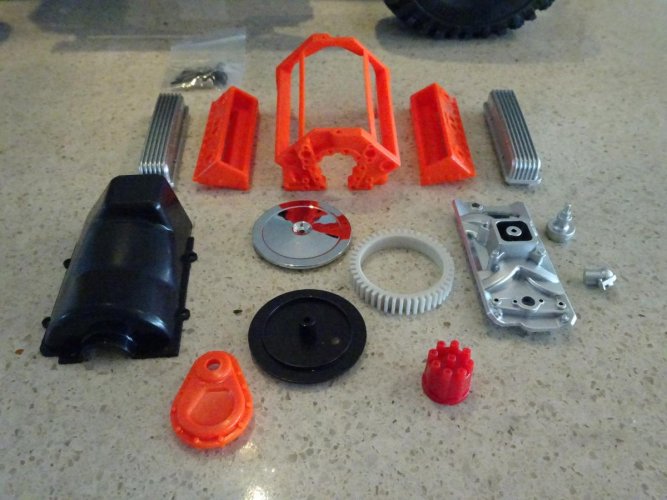
Initial impressions have to start with tipping my hat to SSD for investing the time and money to mold a 3d engine, not to mention doing it in 6 different colors (black, gray, orange, red, silver and chrome if you're counting). As best as I can tell, they are the first to do it for a scale trail rig, and they've obviously put a lot of effort into it.
Assembly is a breeze. The intake block and distributor cap include pins to locate them in the engine block:
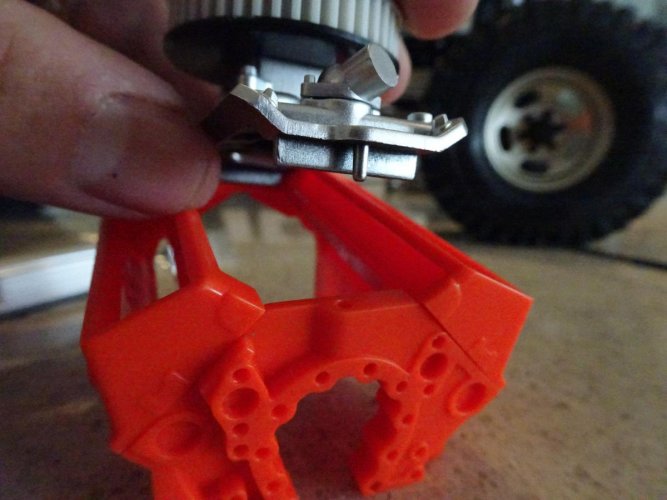
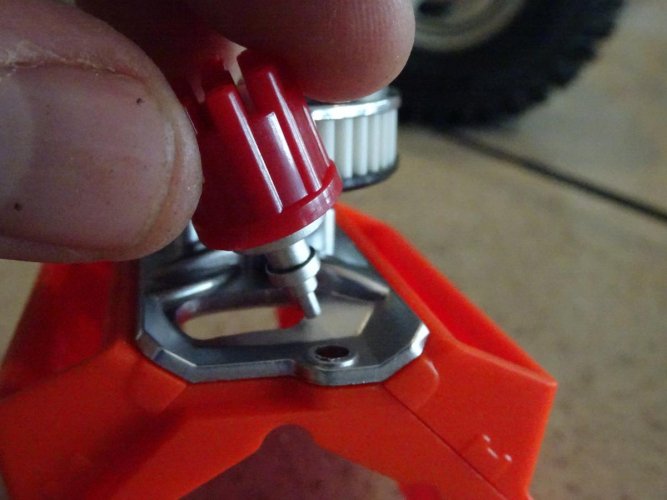
And everything fit just fine around the Holmes Hobbies Puller Pro Stubby 3300 brushless motor without requiring any modifications for clearance. This is how it looks assembled and installed for mock-up purposes:
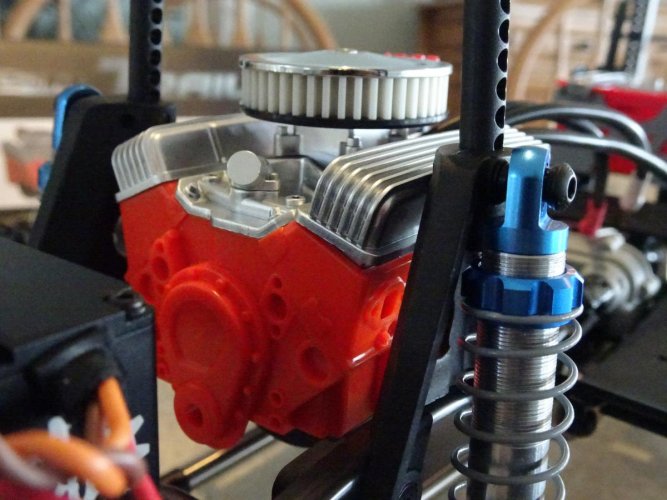
The motor leads fit nicely through the slotted hole at the back of the intake piece:
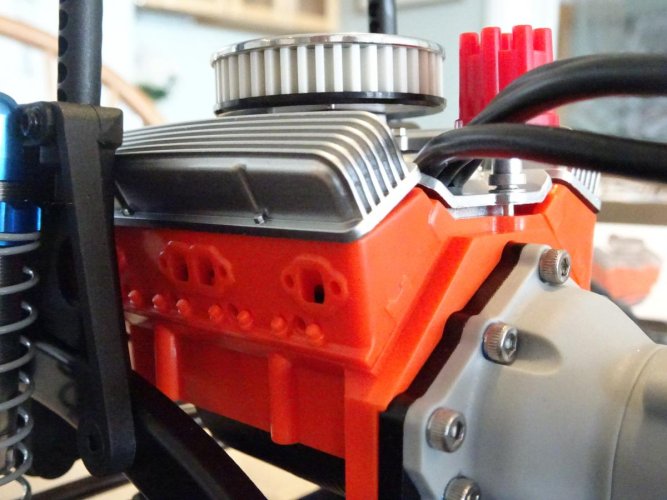
Here's a look from underneath:
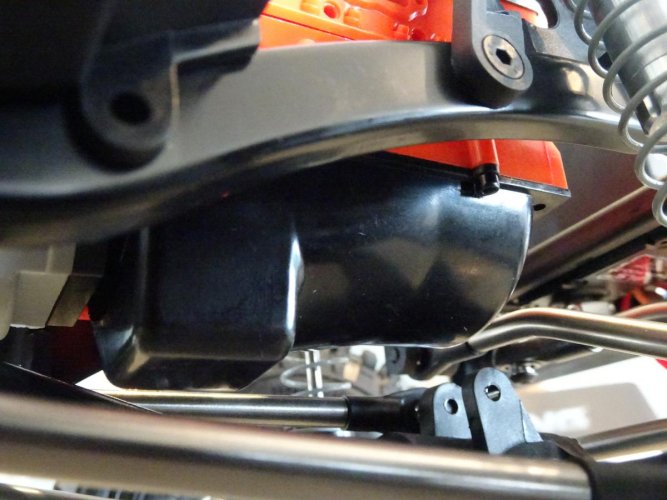
You can see that the engine block has exhaust ports that are screaming out for headers. I'm sure it won't be long before we see some header options from SSD and/or others.
As far as location is concerned, the stock location is lower and further back than an actual motor because of SSD's decision to keep the weight as low as possible in the truck. Here's a side view in the stock location:

Fortunately, SSD has already released 2 spacers that push the 3d engine forward and up. The 15mm version moves the engine up 6mm and forward 15mm. The 23mm version moves it up 12mm and forward 23mm. Here are the links:
https://www.thingiverse.com/thing:3752248
https://www.thingiverse.com/thing:3752244
I'll get pix of those up once I get home and can print them out.
One other note about the spacers: With the spacers, the oil pan wouldn't be able to bolt directly to the engine block. But it shouldn't be too difficult to make a sleeve that bridges that gap. I had to do one for my CMAX D110 build using the GCM TDi engine, and I don't see why it couldn't be done here.
With everything together other than wiring up electronics, the entire platform feels great on the bench. One of the pleasant surprises is the steering. The stock 10.2 platform is already a good place to start, but SSD was able to squeeze even more steering out of the Trail King. Here's a picture of my UMG at full lock:

And here's the Trail King at full lock:
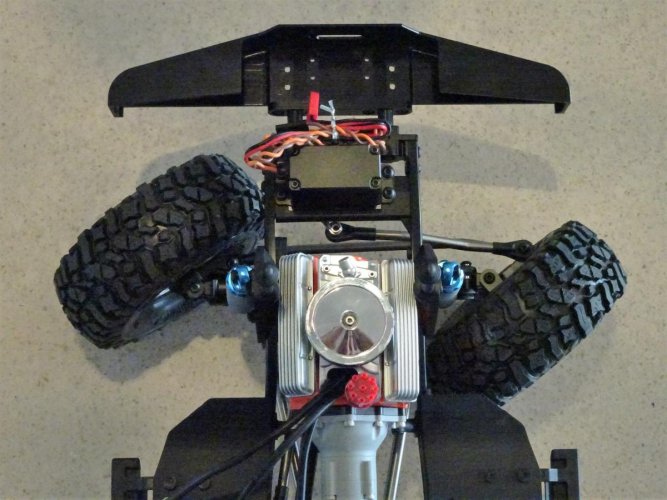
Even better, it can achieve this in both directions (10.2 steering is limited in one direction by location of the panhard mount). I can't wait to see how this turns with the upcoming OD gearing option that SSD is working on.
That's about all I can do for now from the beach. I'll have more updates when I get back home and can get it running. Thanks for following along!
Topher Builds
I wanna be Dave
Looks fantastic. Can’t wait to get one of these! Love that steering.
Great thread.
Great thread.
hey... how are you gonna drain your oil pan?!?!
and im sure that bronco wont mind a chevy powerplant.
;-):ror:
kidding aside, its looking good! im curious to see those engine spacers at work. also is there enough room to run a sensor wire if you go sensored brushless? (asking for a friend).
and im sure that bronco wont mind a chevy powerplant.
;-):ror:
kidding aside, its looking good! im curious to see those engine spacers at work. also is there enough room to run a sensor wire if you go sensored brushless? (asking for a friend).
Last edited:
also is there enough room to run a sensor wire if you go sensored brushless? (asking for a friend).
If you look at the last picture posted I'd say there is enough room to run a sensor wire through, it probably needs to be passed through before the motor wires. They left enough room to fit 3 motor wires so the sensor wire should fit too.
EDIT: I checked and yes a sensor wire fits
Last edited:
2mtech
RCC Addict
3D engine looks frankly stunning. Makes my Exclusive RC Mopar 440 look woefully lacking and crude.
Steering appears to be just short of rotating the inner rear wheel backwards at full lock!
Good job, David...enjoy the rest of your vacation. Hope you don't get as many surprise toll charges in the mail as I did after my last VA trap, I mean...trip. "thumbsup"
Steering appears to be just short of rotating the inner rear wheel backwards at full lock!
Good job, David...enjoy the rest of your vacation. Hope you don't get as many surprise toll charges in the mail as I did after my last VA trap, I mean...trip. "thumbsup"
JMass SA
Newbie
Thanks for an awesome thread bud!!
I received mine yesterday and started the build last nice.
I was a bit confused with the M3 bolts for the axle tubes, thought I was losing my mind Glad to see I wasn't!
Thanks for an awesome project for me to sink my teeth into SSD!
I received mine yesterday and started the build last nice.
I was a bit confused with the M3 bolts for the axle tubes, thought I was losing my mind
Thanks for an awesome project for me to sink my teeth into SSD!
Why are the axle tubes plastic when the previous pro44's were metal? Seems a backwards step?
A few reasons:
1) For a clean design I wanted to integrate the link/shock mounts into the tubes so doing cast metal tubes was a bad idea as they would likely break at the link mount as they won't flex/give a little.
2) Cost. Cast metal is more expensive and no machined link mounts needed.
3) Portals - cast metal tubes threads are not strong enough for Portal use.
Nylon is much better than cast metal in this case.
So nylon tubes are the better option for the kit.
The only reason for cast metal tubes is weight and we already have knuckle weights & brass knuckles. We will be releasing bolt on weights for the rear tubes soon. You can also use the cast metal rear tubes if you want to.
Amazing. I get my question answered as well as learning something "thumbsup" I'm getting closer and closer to getting one I think. Just need to get my head around not having more than 10% overdrive... but I guess 10% is fine for a trail truck, which mine would be.
Topher Builds
I wanna be Dave
Amazing. I get my question answered as well as learning something "thumbsup" I'm getting closer and closer to getting one I think. Just need to get my head around not having more than 10% overdrive... but I guess 10% is fine for a trail truck, which mine would be.
I’m hoping for the same, OD at the transmission. And a metal offset front axle.
I won’t be ready to buy this for a couple months so we’ll see what comes around then. Should be a great trail truck as is, similar to as you’re saying.
I’m hoping for the same, OD at the transmission. And a metal offset front axle.
I won’t be ready to buy this for a couple months so we’ll see what comes around then. Should be a great trail truck as is, similar to as you’re saying.
You should see machined tubes by then "thumbsup"
You should see machined tubes by then "thumbsup"
Very cool... 8)
(EDIT)
HEY!
They've created a separate SSD Trail King section now...
Scale Rigs Brand Specific Tech - SSD Trail King - Pro Scale Chassis Builder Kit at RCCrawler.com
"thumbsup"
Last edited:
Similar threads
- Replies
- 120
- Views
- 5K
- Replies
- 59
- Views
- 2K
