• Welcome to RCCrawler Forums.

    It looks like you're enjoying RCCrawler's Forums but haven't created an account yet. Why not take a minute to register for your own free account now? As a member you get free access to all of our forums and posts plus the ability to post your own messages, communicate directly with other members, and much more. Register now!

    Already a member? Login at the top of this page to stop seeing this message.

Jato Gets Offerings to Build the Teal Terrifier H10 Optic

I also think the manual is wrong at the step showing installation of the radiator. You can't use these holes. The radiator is too wide. You have to use the holes above the ones shown.
You are 100% correct. The radiator was mounted to the upper hole on my RTR.

The hole shown in your manual is the swaybar mount point.
 
The painting details look great. The build is coming along nicely I really like these optics.
Thank you! I suggest a kit. They are fun to build and look great. They seem to be all the rage right now :LOL: I think the longer wheelbase and big skid plate are going to hurt their performance, but they should make a really fun trail rig.
 
That's what i put in my son's rig. They feel pretty good and have a bit of weight to them.
They definitely have some heft. Not sure how they will perform, but they don't seem absolutely terrible. And the set of (4) only cost $20! Somebody in the Vanquish H10 group posted pics of their Optic on Trepadors and it sit perfectly. When I asked which inserts he was using, he stated these Injora mediums so I figured I would give them a try.
 
Another idea to get around the tires rubbing the chassis is using high-clearance front lower links and turning them sideways. It is reported that the Incision links work. Has anyone tried this on their Optic?

IRC00306-VRD-LOWER-LINK-SET-1000X1000_940x[1].jpg
 
I wonder if the tss wheels have the same lug pattern as locked ups AO8? If so, it would give you more hub options.

The chinese hubs on Amazon work with vanquish wheels. They're sold in 3mm increments. 12mm is close to .475. 9mm is close to .350. Hardware is metric. Some hubs include it.
 
I wonder if the tss wheels have the same lug pattern as locked ups AO8? If so, it would give you more hub options.

The chinese hubs on Amazon work with vanquish wheels. They're sold in 3mm increments. 12mm is close to .475. 9mm is close to .350. Hardware is metric. Some hubs include it.
I asked Cory and he didn't mention compatability with the LURC hubs, but I had the same thought as you. Cory even said he sent me his very last set of hubs so he can't run his remaining wheels wtihout them. And LURC is in his area so I would think he would know if the wheels and hubs were compatible. I can double-check though.

Yes! You brought up a great point and I'm researching those metric "SLW" hubs now as well as metric scale hardware. Vanquish prices are crazy on the SLW hubs. And my test fit was with Fanquish hubs last night.
Yes we are close. Cory and I used to comp together .... but I've never had his wheels on anything.
So no idea if there is any compatibility, but I suspect not.

We make a few "in between" sizes for SLW hubs as well, for a bit less than VP.
185, 290, & 415:
SLW Wheel Hubs
 
Last edited:
So now I'll try to catch up where I left off too long ago. I had to turn in my work phone when my position was eliminated. Cheap-ass company wanted their used iPhone back which I didn't mind at all. I wasn't going to use it anyway because it was literally a slow POS from day 1. Worst iPhone I've ever had and I don't understand why. Sonuvabitch got tossed on the floor more than once. But it did have a bunch of my photos on it that I tried to download to my PC. Looks like a lot of them are corrupt. POS! So I will just continue on from the pics I took on my personal phone since that time.

Next up was building the shocks. No shocker that the shocks know for holding fluid as well as a sieve, come packaged in the D-bag. Most of these parts had been ordered when I purchased my Fordyce RTR, but I put Traxxas GTS shocks on that and never used the machined S8E parts from Vanquish.

Tools:
-I had to buy a new set of shock pliers because I accidentally caught the threads and marred my Protek TruTorque set. Those are very nice, but I decided to try the slightly cheaper and much more feature-rich set of EcoPower pliers. It took me an embarrassingly long amount of time to settle on shock pliers.
-Noleen SF3 "green slime". Please stop overpaying for Team Associated Green Slime. It is Noleen SF3.
- 50wt AE Factory Team shock oil instead of the included 30wt.

Parts:
-Bag D-1 from the kit.
-I have the extra tuning springs, but I stock with the stock red springs front and back to start.
-Vanquish machined blue preload adjusters. Oddly enough they include black locking rings. I don't really like this setup. I'd prefer a nut with an o-ring inside or something else to stop the adjuster from moving.
-Vanquish machined blue shock caps.
-Vanquish machined pistons because I have a difficult time cutting Vanquish shock pistons from the tree without effing them up.
-Vanquish TiN shock shafts mostly for the looks.
-Vanquish rebuild kits because I was going to try removing the snap-rings and o-rings to lube them and was sure I'd lose or damage at least one component, but the Knipex pliers recommended by Vanquish simply does not work with these shocks in my experience. I gave it another shot and failed.


I think it was the TiN coating, but getting the e-clips on these shocks shafts were the tightest fit I've ever experienced with any shocks. You had to use some substantnial force to pop these clips onto the shock shaft. I'm guessing it was a tolerance issue and the TiN coating was too thick or the assumedly Chinese e-clips were undersized.

Anyway, here you can see the included black piston on the sprue versus the machined piston installed on the shaft. Interestingly, the machined piston is not directional. The taper on the stock shock piston is something you usually see in racing RCs. The taper is supposed to allow a shock to travel faster in the direction of the taper. With the machined piston, compression and rebound speeds will be equal based solely on the shape of the piston. Maybe @89Industries can expand on this since he's a former suspension engineer.


Stock shaft vs the TiN shafts with pistons installed. I took this photo just to verify that I did get the correct length shafts which are called 90mm on the Vanquish website.


Team Associated Factory Team 50wt Shock Oil next to the included tube which Harley states is 30wt in his S8E shock-building video on YouTube.


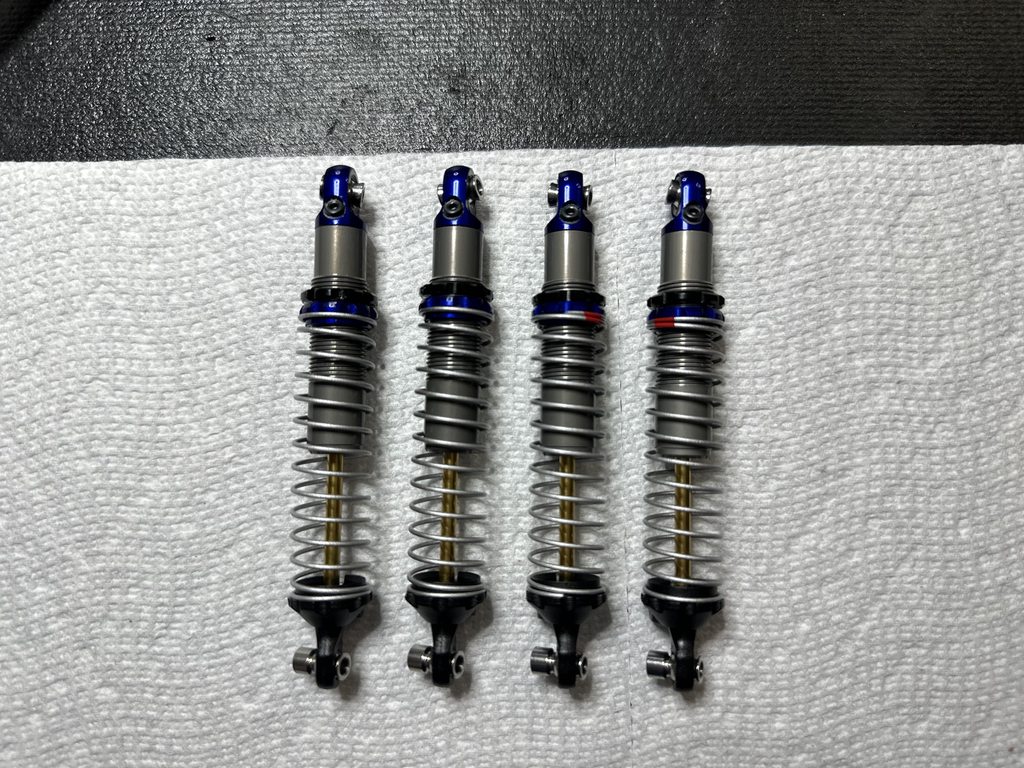
And by the magic of my spirit fingers, we have 4 beautiful shocks. These do look pretty damn good.

After bleeding the oil, I had more compression than rebound, but I bled them as Harley described in the video above. Seems to me like they need a little more oil, but I will start like this. According to the internet, they aren't going to hold oil for long anyway.
 
Vanquish did send me a replacement for my groovy rear cage section.


Warped vs new and straight. There is more distortion of the original piece in person than appears in photos.


Mucho more gooder or something like that if you're French. Mo' bettah for us 'Mericans!


The interior was kind of a pain in the balls to assemble for having just a few screws. I surely let a few F words fly here. The driver and seat back bolt to the interior, but you have to bolt the arms to the seat all while he his holding onto the steering wheel. The bastard in the driver's seat didn't want to grab and hold onto the wheel tightly. He was holding it daintily. Once I forced screws into the seat and his arms, I heard a distinct snap and then everything except his right hand was in place. I push on that and snapped it into place as well. Anybody else? Probably just me and my impatience...


Here's the cage with those pretty teal panels installed from the Throttle Therapy livery.


Next up was to install the shocks on the axles. The Treal knuckles slightly obscure the screw heads so you need to use ball-end hex drivers. Thankfully I have a nice Protek set of these.


I bought a VR-1 receiver to use with the VT-1 transmitter that came with the Fordyce. I was shocked to see it come with pre-installed 3M double-sided tape, but I'll take it. Nice touch. Yeah sometimes I am easy to amuse, but other times I'm impossible to please. Try dating me! :ROFLMAO:


I had an AGFRC servo on order, but cancelled that when I lost my job. I had a Holmes SHV500 laying around. I forget what it came out of. I really resisted using it because I didn't want to solder the direct power connector onto my Fusion Pro, plus I still want to get that AGFRC servo in the future.


Then my dim bulb pinged and I remembered ordering a direct-power XT60 adapter from NSDRC when I bought my 700v2 servo for my VRD Carbon. This way I will be able to use the SHV500 servo if I don't order the AGFRC, but I won't have to hack and cut or re-solder anything and I won't have to re-resolder anything to remove the direct-power adapter. Noice!


Installing the servo after the fact is a royal PITA. The bottom two servo mount screws that thread into the axle in a horizontal orientation are in their solid and you can't get drivers on them. Even using my ball-end hex drivers made these things want to strip. It will be in your best interest to disconnect two of the suspension links in order to get better access to these screws if you need it. In theory, you shouldn't need to, but I could not get this servo installed without loosening them and then retightening all 5 bolts that fasten the servo mount. I was shorted an M3x16 for an M3x14. I looked everywhere that I may have accidentally installed this screw and came up empty.


Here are the two PITA screws mentioned above.


Big-ass servo installed. I want low-profile for sure.
 
How’s the movement on the upper link with the servo installed? I was going to use the same servo but it pushed on the upper link rod end so much the suspension wouldn’t move.
Hmm I didn't test it. I will have to check and get back to you. Thanks for the heads up!
 
On the shock piston difference topic...

Tldr...machined piston good. Molded piston ok.

So... I doubt the piston taper does anything as far as damping. At this level of technology it is about cross sectional area. So, area of the bore of the body minus the area of the piston. Then the other thing you will notice is oil viscosity.

To get beyond that with damping you need to be able to change the amount of flow when direction of the shock changes. Such as valves.

I think the molded piston is tapered for manufacturing and tolerance reasons. If it is a bit oversize it wears in real quick to fit. Also, abs is not great bushing material, so it will continue to wear. So then you get more blow by and less damping.

On the machined piston, making that taper can be a pain, plus it's made out of better material which can then act as a low friction bushing to help support side loads better, longer.

Whether you can notice any of this with an rc truck is up to you though. I'm sure a lot of people can. I don't think my skills are there to notice the little differences like this would make. Bigger changes like oil viscosity, more holes in the piston, and spring changes I can tell the difference.
 
  • Like
Reactions: Ots
On the shock piston difference topic...

Tldr...machined piston good. Molded piston ok.

So... I doubt the piston taper does anything as far as damping. At this level of technology it is about cross sectional area. So, area of the bore of the body minus the area of the piston. Then the other thing you will notice is oil viscosity.

To get beyond that with damping you need to be able to change the amount of flow when direction of the shock changes. Such as valves.

I think the molded piston is tapered for manufacturing and tolerance reasons. If it is a bit oversize it wears in real quick to fit. Also, abs is not great bushing material, so it will continue to wear. So then you get more blow by and less damping.

On the machined piston, making that taper can be a pain, plus it's made out of better material which can then act as a low friction bushing to help support side loads better, longer.

Whether you can notice any of this with an rc truck is up to you though. I'm sure a lot of people can. I don't think my skills are there to notice the little differences like this would make. Bigger changes like oil viscosity, more holes in the piston, and spring changes I can tell the difference.
No, tapered pistons are a thing in RC. They are mainly used in racing. I also doubt I'd be able to notice the difference between a taper and squared piston, but apparently some can.

 
Back
Top