• Welcome to RCCrawler Forums.

    It looks like you're enjoying RCCrawler's Forums but haven't created an account yet. Why not take a minute to register for your own free account now? As a member you get free access to all of our forums and posts plus the ability to post your own messages, communicate directly with other members, and much more. Register now!

    Already a member? Login at the top of this page to stop seeing this message.

B-MOW's TRX-4m Mini Blue Bronco

9mm key ring is what I read somewhere, haven't got any yet but Amazon has em.

Sent from my SM-N981U using Tapatalk

I took the o-ring off and measured the slot and its 8mm I replaced the o-ring with a 8mm ID split ring. Didn't like the way it fit maybe with the right pliers I could get it tighter. I did leave it on and covered it with shrink wrap.
 
I took the o-ring off and measured the slot and its 8mm I replaced the o-ring with a 8mm ID split ring. Didn't like the way it fit maybe with the right pliers I could get it tighter. I did leave it on and covered it with shrink wrap.

Did the 8mm ring fit too tight and would the 9mm be too big? I'm going to order some, but want to make sure I order the right size. I guess I could just measure mine!:roll:
 
Sweet build, love the gold-ish wheels! The stock Bronco BFG tires look great, but the Canyons are better gripping. Stock gears are a bit too high for true crawling, but the low range gears don't provide enough wheel speed in some situations, Jim's Bearings kit did help, but a better motor and/or 3S would be good, Traxxas did pretty well but should've done 2-3S just like the brushless Slash, Rustler, etc.

The driveshaft o-rings tend to roll off the grooves, some scale Vanquish SCX10 style driveshafts would be sweet! Measured with calipers and looks like 0.333" about 7mm key ring would be best.
 
Did the 8mm ring fit too tight and would the 9mm be too big? I'm going to order some, but want to make sure I order the right size. I guess I could just measure mine!:roll:

The ring I used as a single split ring like you would use for jewelry. The one used in the other thread was one of the spiral keyring types. In the thread it look good but I'm thinking the OD was 9mm though Ynad didn't say if it was OD or ID.

The ring I used was still loose after I got it on but I also distorted it putting it on. I think the keyring type is a better solution.

Do you have Michaels around you? They have both style rings in various sizes and you don't have to put 100 of them. A couple bucks of a bag. Hobby Lobby probably has them too.
 
Have we determined what size we need? I read a guy on Farcebook used a 9mm keyring but Gramps said he used an 8mm and wasn't quite right, I think we have a solution here but just need to figure out what size works best.
 
Sweet build, love the gold-ish wheels! The stock Bronco BFG tires look great, but the Canyons are better gripping. Stock gears are a bit too high for true crawling, but the low range gears don't provide enough wheel speed in some situations, Jim's Bearings kit did help, but a better motor and/or 3S would be good, Traxxas did pretty well but should've done 2-3S just like the brushless Slash, Rustler, etc.

The driveshaft o-rings tend to roll off the grooves, some scale Vanquish SCX10 style driveshafts would be sweet! Measured with calipers and looks like 0.333" about 7mm key ring would be best.

Thanks Natedog!"thumbsup" Thanks for taking a look! The wheel speed with the low range gears is one reason why I haven't change mine out yet. I like to have the wheel speed when needed to bump over obstacles.

Thanks for the driveshaft measurement. Hoping to get this fixed soon.


The ring I used as a single split ring like you would use for jewelry. The one used in the other thread was one of the spiral keyring types. In the thread it look good but I'm thinking the OD was 9mm though Ynad didn't say if it was OD or ID.

The ring I used was still loose after I got it on but I also distorted it putting it on. I think the keyring type is a better solution.

Do you have Michaels around you? They have both style rings in various sizes and you don't have to put 100 of them. A couple bucks of a bag. Hobby Lobby probably has them too.

Thanks Gramps! I used to have Michaels about 10 years ago, but they closed shop. I do have a Hobby Lobby and I plan to stop there to see what they have. I really don't need 300 rings like I found on Amazon!


For Mail Order, Etsy has them as well.

Thanks for the info and link!"thumbsup"


Have we determined what size we need? I read a guy on Farcebook used a 9mm keyring but Gramps said he used an 8mm and wasn't quite right, I think we have a solution here but just need to figure out what size works best.

I agree! My plan is to check out my local Hobby Lobby and pick up a bag of each size and try them. @Natedog measured his and it measures about 7mm. I probably get 7, 8 & 9mm rings to try if they have them and don't cost too much.
 
This was reported as a 9mm and it seems to fit pretty tight.
0b4fae1842b61a2c73abb1b0fa2cfe4b.jpg

I'm guessing it's 9mm OD. I need to make a trip to Micheals when it quits raining.
 
Ok, I think the driveshaft issue is solved! I stopped by my local Walmart yesterday and found a bag of rings in the hobby/sewing isle. The bag comes with an assortment of 6, 8 & 9mm rings for $2.66.

Not sure how you guys are getting the split rings on your driveshafts on without breaking a finger or losing an eye!:ror: I was having a hell of a time trying to get the ring onto the shaft end.

I decided to cut the 9mm ring so that it was a perfect circle and easier to get on. With it cut, it sits perfectly into the o-ring groove. I went ahead and put a piece of heat shrink on it just to cover the split ring and to make it smooth.

I forgot to take a pic of the ring on the driveshaft before the heat shrink was put on. It looks like this will work good though.

I'll report back if I have problems, but I don't think the pin falling out will be an issue any longer.

IMG_1051.jpg

IMG_1052.jpg

IMG_1053.jpg
 
Ok, I think the driveshaft issue is solved! I stopped by my local Walmart yesterday and found a bag of rings in the hobby/sewing isle. The bag comes with an assortment of 6, 8 & 9mm rings for $2.66.

Not sure how you guys are getting the split rings on your driveshafts on without breaking a finger or losing an eye!:ror: I was having a hell of a time trying to get the ring onto the shaft end.

I decided to cut the 9mm ring so that it was a perfect circle and easier to get on. With it cut, it sits perfectly into the o-ring groove. I went ahead and put a piece of heat shrink on it just to cover the split ring and to make it smooth.

I forgot to take a pic of the ring on the driveshaft before the heat shrink was put on. It looks like this will work good though.

I'll report back if I have problems, but I don't think the pin falling out will be an issue any longer.

They make split ring pliers, I have a pair somewhere from when I was making fishing lures.

You cut the ring with side cutters or a cutoff wheel?
 
They make split ring pliers, I have a pair somewhere from when I was making fishing lures.

You cut the ring with side cutters or a cutoff wheel?


Ahh, split ring pliers would have made life a lot easier! I had no idea they existed!

I just cut them with my mini side cutters. They cut fairly easy. I do like that since I cut them it’s just a single wire in the groove instead of the whole ring. The rings I have are a tad wider than the groove.

I forgot to mention that I only did the driveshaft ends near the axles. I had already put heat shrink on the shaft ends near the trans and it seems to be ok. The next time I have the trans out I’ll put rings on them then.


Sent from my iPad using Tapatalk
 
Great write up and progress. Thanks for all the info. I just got my red Bronco last night. My amazing wife and daughter surprised me with it. I look forward to the changes that are coming.
 
Great write up and progress. Thanks for all the info. I just got my red Bronco last night. My amazing wife and daughter surprised me with it. I look forward to the changes that are coming.


Thanks for checking it out! Congrats on getting the Bronco!

Fun little rigs. I think you’re going to like it!


Sent from my iPad using Tapatalk
 
Great build B-MOW. These trucks are small but they handle well and are just as much fun to mod as the big ones! "thumbsup"
 
Great build B-MOW. These trucks are small but they handle well and are just as much fun to mod as the big ones! "thumbsup"

Thanks Jim!"thumbsup"

Agree, these little guys are fun!
 
I did the Keyring mod by cutting like you did then after installed heatshrinking. Was very easy. Great tip. See how it works. I’ve found orings by the pack of 50 on Amazon that may work too. 7mm Id 9mm od 1mm thick
 
I did the Keyring mod by cutting like you did then after installed heatshrinking. Was very easy. Great tip. See how it works. I’ve found orings by the pack of 50 on Amazon that may work too. 7mm Id 9mm od 1mm thick

Great to hear! I did the mod to 2 so far and have not lost a driveshaft or pin yet! I think this is a good, cheap fix!
 
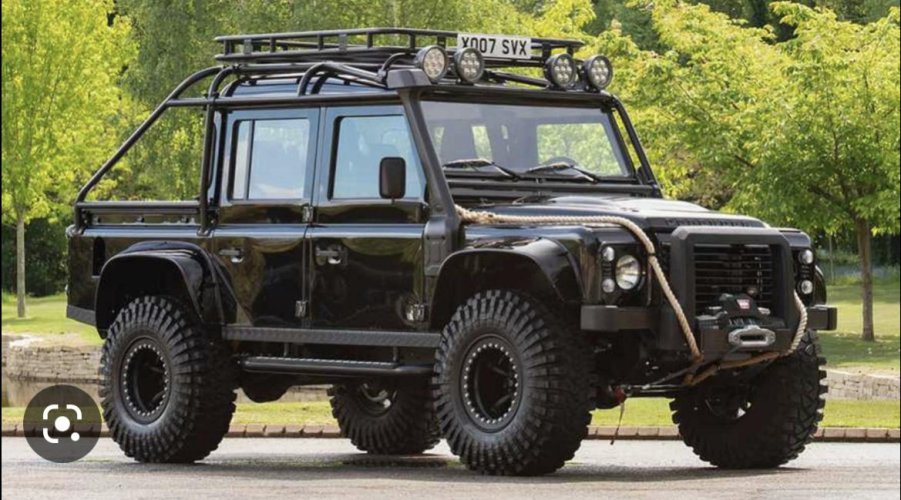
Bond, James Bond. Future Bond 007 Defender SVX Spectre Edition in the works.

Picked up an unpainted Traxxas Defender body a few months back and was unsure which direction to take it. After doing a quick search on the web of different styles of Defenders, the Spectre Edition caught my eye. I've been a huge 007 fan since I was a kid and I love the look of this SVX Edition, so decision was made to go this route.

For now, this Defender body will be going on my Bronco chassis. My plan is to pick up another TRX-4m to put this body on once my LHS gets them back in stock.

IMG_0686.jpg


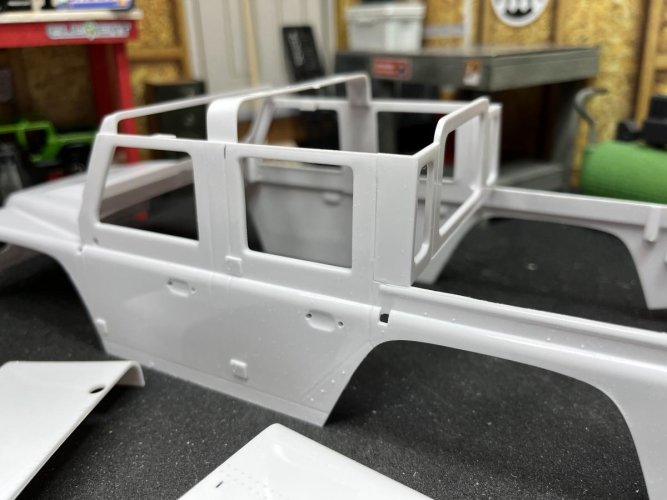
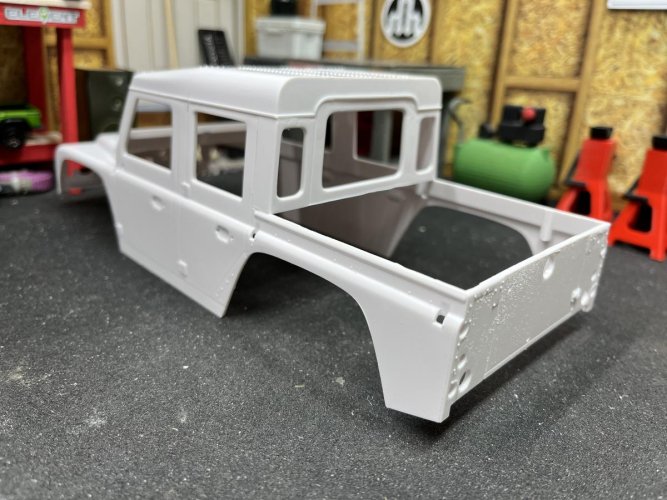
Body cut and glued together. Simply cut it with a hobby knife and did the score and snap method. A little sanding to smooth out the cuts and then glued together.

I need to give thanks to Defender Customs on YouTube for the easy step-by-step instructions to layout and cut the body.

Next I'll get the protection cage cut to fit the modified body. Hoping to get some paint laid on it this week before the weather turns bad this weekend. More to follow later!

IMG_0680.jpg

IMG_0681.jpg

IMG_0682.jpg

IMG_0683.jpg

IMG_0684.jpg
 
Back
Top