Nice, ok. I definitely like the look of the shifters. Realized I could also swap the shifter version from my Phoenix, where it is covered by the stock interior. The Knight Customs 3D printed interiors for the Optic are also appealing. It’s great to have many choices!It does show a bit.
View attachment 510271
-
Welcome to RCCrawler Forums.
It looks like you're enjoying RCCrawler's Forums but haven't created an account yet. Why not take a minute to register for your own free account now? As a member you get free access to all of our forums and posts plus the ability to post your own messages, communicate directly with other members, and much more. Register now!
Already a member? Login at the top of this page to stop seeing this message.
You are using an out of date browser. It may not display this or other websites correctly.
You should upgrade or use an alternative browser.
You should upgrade or use an alternative browser.
Thloftus’ Gravity Well H10 Optic kit
- Thread starter Thloftus
- Start date
You’d think I could pick up the pace once the axles and transmission were assembled. At least the progress is steady. It is nice if I’m honest to savor these kits.
Next up is mounting the transmission to the skid plate. No issues here. The transmission settles into place without any fasteners. Definitely some thought put into how the various parts go together.

And with the skids installed. The plastics are great. The parts go together nicely. I had to stare at the manual for a while to get the orientation right and find the fastener holes. No bid deal if you’ve assembled kits before.

And finally the electronics tray. It was nice to see how the parts interlock to make the overall assembly fairly stiff despite using plastic materials. It’s a clever design approach that also makes the assembly very satisfying. You don’t get to see these things on RTRs. Happy I was able to get an Optic kit instead.

Next is Bag D with the shocks. I’m skipping this part as I intend to use aftermarket shocks. Kits are a good excuse to try new parts. Plus the build takes even longer if you have to find the just right set of shocks and wait for them to arrive … The kit shocks are nicely packaged and would give the full shock build experience since it looks like nothing is preassembled.

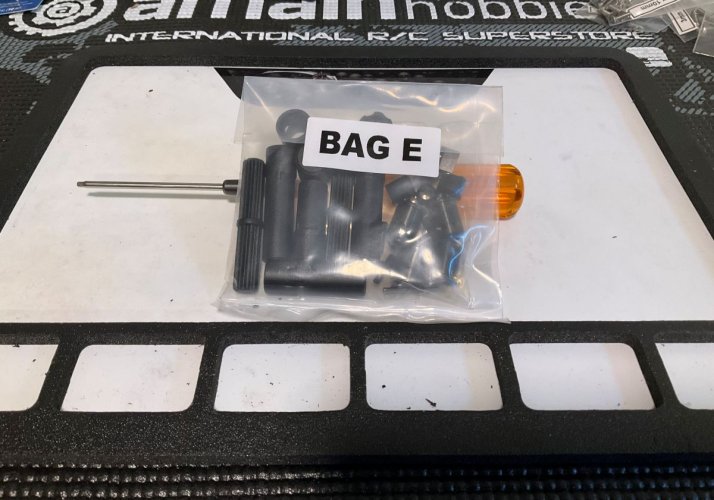
Bag E with the driveshafts is next. Nicely packaged to start
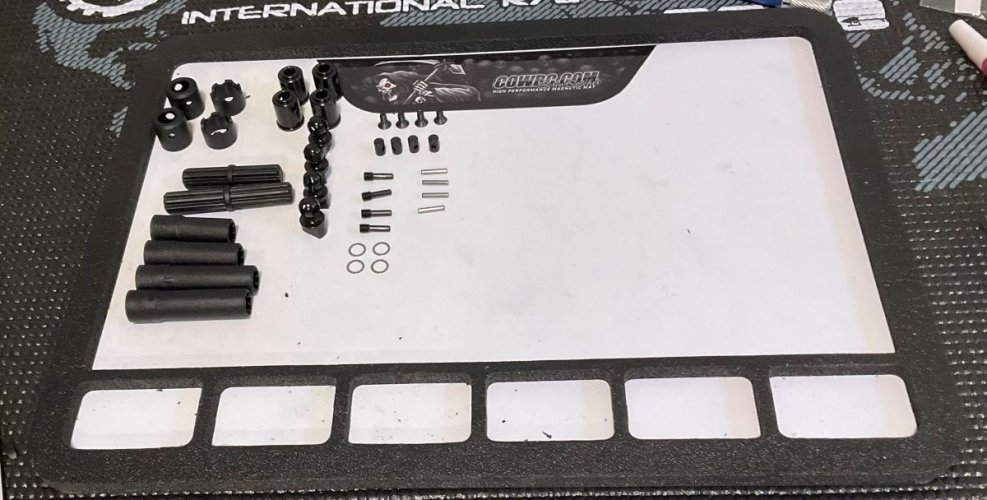
And with the parts organized on the build mat. I did take some time in this case to organize the parts. Makes for nice photos and also simplifies the build process with less hunting in the pile.
Drive shafts installed on the transfer case
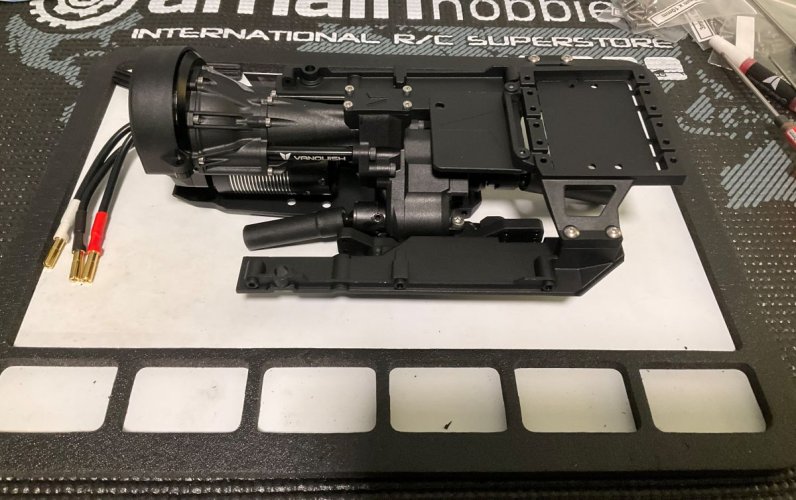
On the front axle

And also the rear axle

I discovered later that I’d flipped the front / rear portions of the driveshafts. They’re two different lengths. It wasn’t obvious to me from the manual which one should go on the front/back. Anyway, they’re backward in these images. But thankfully re-do’s add to the hours, lol
Take care until the next one!
Next up is mounting the transmission to the skid plate. No issues here. The transmission settles into place without any fasteners. Definitely some thought put into how the various parts go together.

And with the skids installed. The plastics are great. The parts go together nicely. I had to stare at the manual for a while to get the orientation right and find the fastener holes. No bid deal if you’ve assembled kits before.

And finally the electronics tray. It was nice to see how the parts interlock to make the overall assembly fairly stiff despite using plastic materials. It’s a clever design approach that also makes the assembly very satisfying. You don’t get to see these things on RTRs. Happy I was able to get an Optic kit instead.

Next is Bag D with the shocks. I’m skipping this part as I intend to use aftermarket shocks. Kits are a good excuse to try new parts. Plus the build takes even longer if you have to find the just right set of shocks and wait for them to arrive … The kit shocks are nicely packaged and would give the full shock build experience since it looks like nothing is preassembled.

Bag E with the driveshafts is next. Nicely packaged to start

And with the parts organized on the build mat. I did take some time in this case to organize the parts. Makes for nice photos and also simplifies the build process with less hunting in the pile.

Drive shafts installed on the transfer case

On the front axle

And also the rear axle

I discovered later that I’d flipped the front / rear portions of the driveshafts. They’re two different lengths. It wasn’t obvious to me from the manual which one should go on the front/back. Anyway, they’re backward in these images. But thankfully re-do’s add to the hours, lol
Take care until the next one!
Links are next. Unfortunately, not my favorite part of kit builds. I do have better tools this time, which is a big help.
I decided to use the Incision high clearance VRD Lower Links, PN IRC00306. I’ve seen mixed reviews of using high clearance links on the Optic since the skid plate is apparently the lowest point regardless. Can’t hurt to try the links I guess and I like the way they look. Plus the Incision links are relatively inexpensive. Also ending up with several stainless steel rods that could be useful someday. Or maybe they’ll just add the bin of leftovers …

And with the links fully assembled. I used a tool from Team Garage Hack that fits in a ¼” drill, a 3D printed hand tool for rod ends (can’t remember where I found this one, fairly common these days), and a set of shock pliers. Dang what a difference having these tools makes for assembling links. Can literally spin the rod ends on in a few minutes. I was sorry to see the Tram Garage Hack tool is not sold anymore. It’s nicely done and works well for an otherwise painful task

Links installed on the chassis. Getting too big for the build mat …

And with the axles attached to the links. Starting to look like a vehicle at this point!

Take care until the next one!
I decided to use the Incision high clearance VRD Lower Links, PN IRC00306. I’ve seen mixed reviews of using high clearance links on the Optic since the skid plate is apparently the lowest point regardless. Can’t hurt to try the links I guess and I like the way they look. Plus the Incision links are relatively inexpensive. Also ending up with several stainless steel rods that could be useful someday. Or maybe they’ll just add the bin of leftovers …

And with the links fully assembled. I used a tool from Team Garage Hack that fits in a ¼” drill, a 3D printed hand tool for rod ends (can’t remember where I found this one, fairly common these days), and a set of shock pliers. Dang what a difference having these tools makes for assembling links. Can literally spin the rod ends on in a few minutes. I was sorry to see the Tram Garage Hack tool is not sold anymore. It’s nicely done and works well for an otherwise painful task

Links installed on the chassis. Getting too big for the build mat …

And with the axles attached to the links. Starting to look like a vehicle at this point!

Take care until the next one!
New record for rapid posting! Well maybe. Going to feel good about it either way.
This is a short one to show the shocks. I decided to go with Ottsix Voodoo 90 mm’s. I was excited to see that the Optic uses 90 mm shocks as there’s lots of aftermarket options. Seemed like a good excuse to try Voodoos as I’ve never had a set before. They look awesome in person and feel super smooth. Excellent machining. Maybe not totally scale, but should look great on the truck anyway. I haven’t tried to fill them with oil so I’m not sure how that will go.
Here they are in the packaging

And free on the build mat. No, those aren't reading glasses in the background. Why would I possibly need a set of those?

Excited to see these on the truck. I ordered a set of ball ends that haven’t shown up yet. Instead taking the long way around the country for like 2 weeks already. Must have been mis-routed at some point. I’m keeping the stock shocks together complete in the package so I can sell them later. Or at least keep them whole.
Take care!
This is a short one to show the shocks. I decided to go with Ottsix Voodoo 90 mm’s. I was excited to see that the Optic uses 90 mm shocks as there’s lots of aftermarket options. Seemed like a good excuse to try Voodoos as I’ve never had a set before. They look awesome in person and feel super smooth. Excellent machining. Maybe not totally scale, but should look great on the truck anyway. I haven’t tried to fill them with oil so I’m not sure how that will go.
Here they are in the packaging

And free on the build mat. No, those aren't reading glasses in the background. Why would I possibly need a set of those?

Excited to see these on the truck. I ordered a set of ball ends that haven’t shown up yet. Instead taking the long way around the country for like 2 weeks already. Must have been mis-routed at some point. I’m keeping the stock shocks together complete in the package so I can sell them later. Or at least keep them whole.
Take care!
Next up is the cage and related. Bag G is no slouch. It’s stuffed full of cage parts, battery holders, the radiator and power tank, and apparently most everything else left to finish the kit. Well, not really, but it is the biggest bag so far.

I have a few more H-Tech upgrades for this part of the build: working bump stops, the aluminum custom front mount, light mounts and bumper, front grill (not pictured), and the light kit. I started with the bump stops and lights and then realized the light mounts wouldn’t fit without modifying the stock front mount – hence the H-Tech aluminum. I picked up the bumper at the same time, along with the winch mount on the upper left. I may not use the winch mount as the bumper looks pretty slick – but I picked it up anyway as it was only a few dollars and it’s nice to have options. The aluminum grill came before all of this. It’s great to have so many upgrade options for this kit that are both functional and scale.
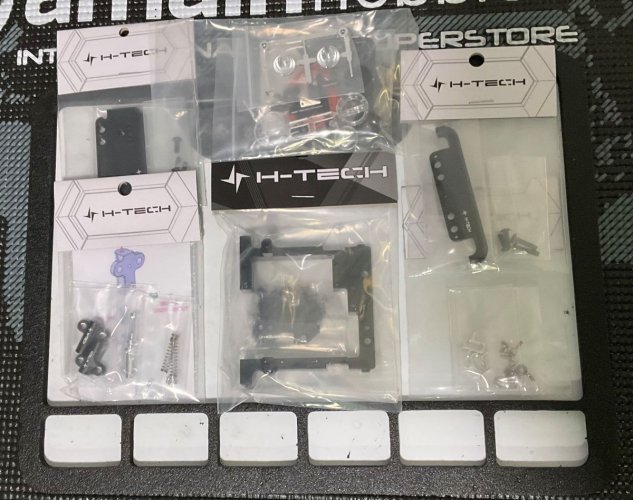
I built the bump stops first. H-Tech does a great job packaging their parts and the instructions, which come in their own bag. Everything arrives in good shape. Aside from some small screws it all goes together easily. I added some dry lubricant to the bumps once assembled, but this is optional as they slide fairly well on their own. It would be fun for Vanquish to offer functional bumps as a stand-alone hop-up. Maybe some hope as they’re included on the H10 Origin.
Here's the individual parts

And here they are all put together. The extra screw is a spare. Another round of falling off the edge of the world in this picture. I should pay more attention to crazy perspectives like this. I thought I could rotate the image while cropping it on my phone. But no luck, so here we are
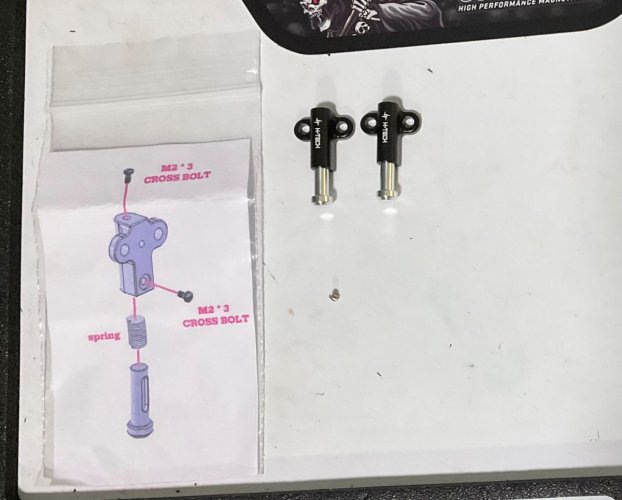
Next is the aluminum front mount, starting with the individual parts. The machining is very nice. The two “ears” slot on perfectly and are each held in place with four screws. The exploded screws on the left are from Bag G. They’re not relevant to this piece at all. Hanging around anyway to maintain relevance for subsequent steps.

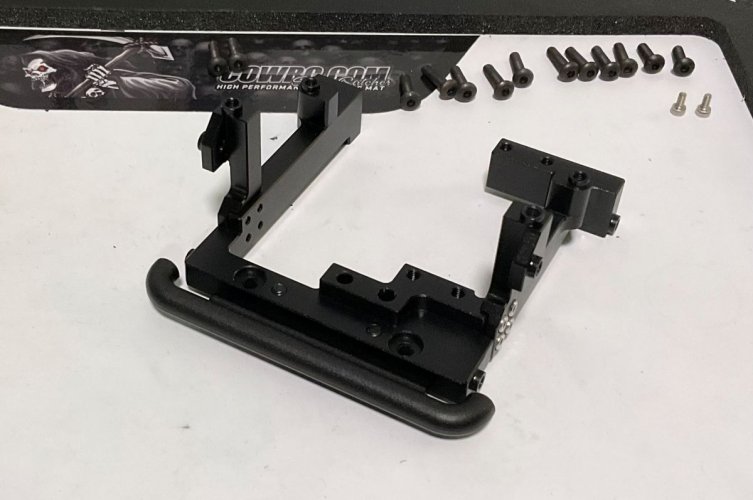
Here’s the aluminum front mount with the bumper installed. The black screws in the upper right are for attaching the cage. The stainless screws are spares. Nice to see these included. Super satisfying to assemble parts that go together well.
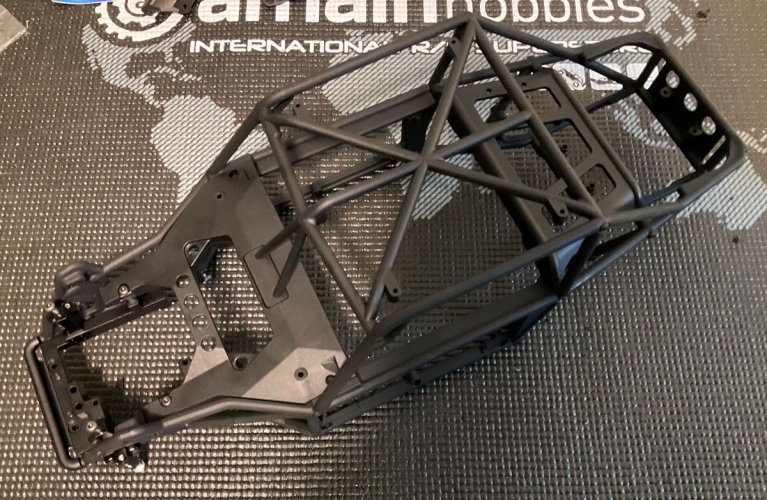
Next is the assembled cage. I’m skipping a few intermediate pictures / steps. But if you’ve assembled a cage before, these are all familiar. The end product is very solid, with obvious attention to detail given how the parts lock together. I have another plan for the power tank so it’s not installed yet. I’m 3D printing some racing fins. No issues with the fins included in the kit, just wanted black instead of gray
Here's a close up of the front assembly. Nice to see this coming together and getting closer to a roller.

Take care until next time!

I have a few more H-Tech upgrades for this part of the build: working bump stops, the aluminum custom front mount, light mounts and bumper, front grill (not pictured), and the light kit. I started with the bump stops and lights and then realized the light mounts wouldn’t fit without modifying the stock front mount – hence the H-Tech aluminum. I picked up the bumper at the same time, along with the winch mount on the upper left. I may not use the winch mount as the bumper looks pretty slick – but I picked it up anyway as it was only a few dollars and it’s nice to have options. The aluminum grill came before all of this. It’s great to have so many upgrade options for this kit that are both functional and scale.

I built the bump stops first. H-Tech does a great job packaging their parts and the instructions, which come in their own bag. Everything arrives in good shape. Aside from some small screws it all goes together easily. I added some dry lubricant to the bumps once assembled, but this is optional as they slide fairly well on their own. It would be fun for Vanquish to offer functional bumps as a stand-alone hop-up. Maybe some hope as they’re included on the H10 Origin.
Here's the individual parts

And here they are all put together. The extra screw is a spare. Another round of falling off the edge of the world in this picture. I should pay more attention to crazy perspectives like this. I thought I could rotate the image while cropping it on my phone. But no luck, so here we are

Next is the aluminum front mount, starting with the individual parts. The machining is very nice. The two “ears” slot on perfectly and are each held in place with four screws. The exploded screws on the left are from Bag G. They’re not relevant to this piece at all. Hanging around anyway to maintain relevance for subsequent steps.

Here’s the aluminum front mount with the bumper installed. The black screws in the upper right are for attaching the cage. The stainless screws are spares. Nice to see these included. Super satisfying to assemble parts that go together well.

Next is the assembled cage. I’m skipping a few intermediate pictures / steps. But if you’ve assembled a cage before, these are all familiar. The end product is very solid, with obvious attention to detail given how the parts lock together. I have another plan for the power tank so it’s not installed yet. I’m 3D printing some racing fins. No issues with the fins included in the kit, just wanted black instead of gray

Here's a close up of the front assembly. Nice to see this coming together and getting closer to a roller.

Take care until next time!
Quick update to install the front grill. This piece is from H-Tech also – ending up with a lot of their parts on this build.
This first picture is the grill prior to assembly. Same great packaging and instructions as the other H-Tech parts I’ve picked up so far. Silver for the mounting brackets is interesting. I was expecting black for all of the parts, but ended up liking the mixture once the grill was assembled.

Here it is installed on the truck. The blue highlights are an artifact of the photo. Maybe a reflection off something nearby.

Another view of the installed grill. The parts went together well. I ended up using longer screws up through the bumper, maybe 10 or 12 mm instead of the 6 mm listed in the instructions. It’s all very solid and looks great once installed.

Take care!
This first picture is the grill prior to assembly. Same great packaging and instructions as the other H-Tech parts I’ve picked up so far. Silver for the mounting brackets is interesting. I was expecting black for all of the parts, but ended up liking the mixture once the grill was assembled.

Here it is installed on the truck. The blue highlights are an artifact of the photo. Maybe a reflection off something nearby.

Another view of the installed grill. The parts went together well. I ended up using longer screws up through the bumper, maybe 10 or 12 mm instead of the 6 mm listed in the instructions. It’s all very solid and looks great once installed.

Take care!
Looks great strong motor diggin the good pics 

Thank you! Really enjoying this kitLooks great strong motor diggin the good pics
Moving on to the radiator. It’s a nice set of parts. I’ll come back and paint it once we get to the summer weather and it’s consistently warm. Here’s the various pieces prior to assembly. The radiator itself is fairly stout.

And installed on the truck. The stock location stiffens up the cage, but hides the radiator underneath the truck – as in it’s probably only visible when the truck is upside down. I may try to relocate it to the top half of the cage or use one of the aftermarket radiators. Would be nice to show off this scale detail versus having it hidden underneath the cage.

The Incision hollow balls for the shocks arrived after a few weeks of wandering across the country. Which completes a prior step of installing the shocks onto the chassis. I left the stock hollow balls in the shocks where they attach to the cage. They’re not as thick as the Incision versions, but I have spacers that can make up the difference and I wasn’t super excited about removing the hollow balls from the aluminum shock caps.

All of this allowed me to complete the slider. Excellent to see the truck at this stage. I also installed the racing fins. This particular version is available on Cults3D: Vanquish H10 Optic racing fin plate. I’m still learning 3D printing. I’m happy with how these turned out. I tried 3 different orientations on the print bed. Just laying them flat against the fin surface gave the best results.

Here's a closeup of the front. I also centered the servo and installed the horn and steering linkage. I might need stiffer springs for the shocks. We'll see how it looks once the truck is fully assembled.
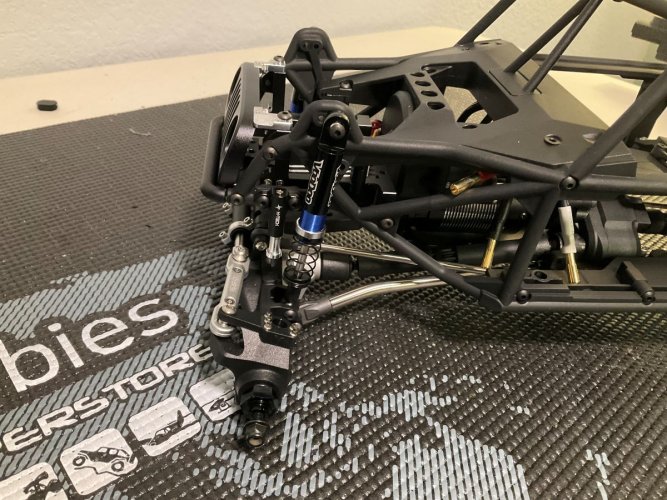
And a closeup of the back. Exciting to see it all coming together!
Take care until the next one!

And installed on the truck. The stock location stiffens up the cage, but hides the radiator underneath the truck – as in it’s probably only visible when the truck is upside down. I may try to relocate it to the top half of the cage or use one of the aftermarket radiators. Would be nice to show off this scale detail versus having it hidden underneath the cage.

The Incision hollow balls for the shocks arrived after a few weeks of wandering across the country. Which completes a prior step of installing the shocks onto the chassis. I left the stock hollow balls in the shocks where they attach to the cage. They’re not as thick as the Incision versions, but I have spacers that can make up the difference and I wasn’t super excited about removing the hollow balls from the aluminum shock caps.

All of this allowed me to complete the slider. Excellent to see the truck at this stage. I also installed the racing fins. This particular version is available on Cults3D: Vanquish H10 Optic racing fin plate. I’m still learning 3D printing. I’m happy with how these turned out. I tried 3 different orientations on the print bed. Just laying them flat against the fin surface gave the best results.

Here's a closeup of the front. I also centered the servo and installed the horn and steering linkage. I might need stiffer springs for the shocks. We'll see how it looks once the truck is fully assembled.

And a closeup of the back. Exciting to see it all coming together!

Take care until the next one!
I might be setting a personal best for the largest number of posts in a few days. But let’s try not to get distracted by such moments of glory and instead keep to the task at hand!
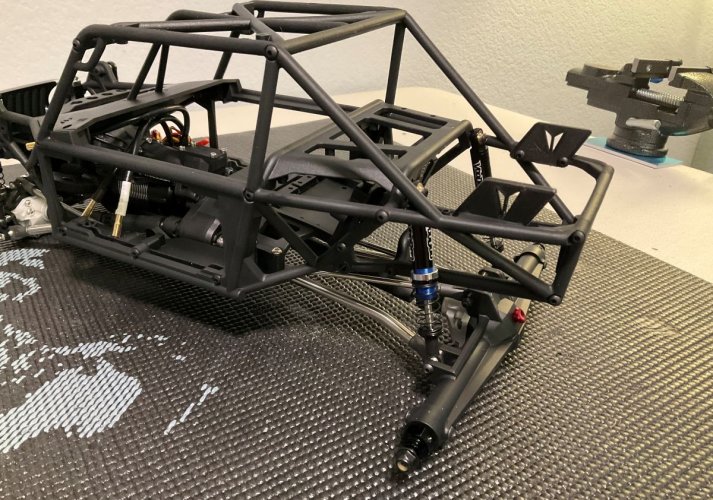
I saw the posts where others said 2.2 wheels and tires looked “cartoonish” and out-of-scale. But it’s hard to appreciate how true that is until you see it in person. Oh my, what large tires you have! I’m a big fan of huge and aggressive tires, but this is like completely out of scale. I probably should have guessed since the 2.2 Rock Beasts are a full inch larger OD than recommended. On the bright side, the LockedUp wheels look sweet and I do have other 2.2 scale rigs that could use a set of wheels and tires.

In case you’re wondering, the 2.2 Rock Beast do clear the front at full steer. I was pretty surprised to see this. Actually made me consider keeping them on the truck. But then look at the previous photo …

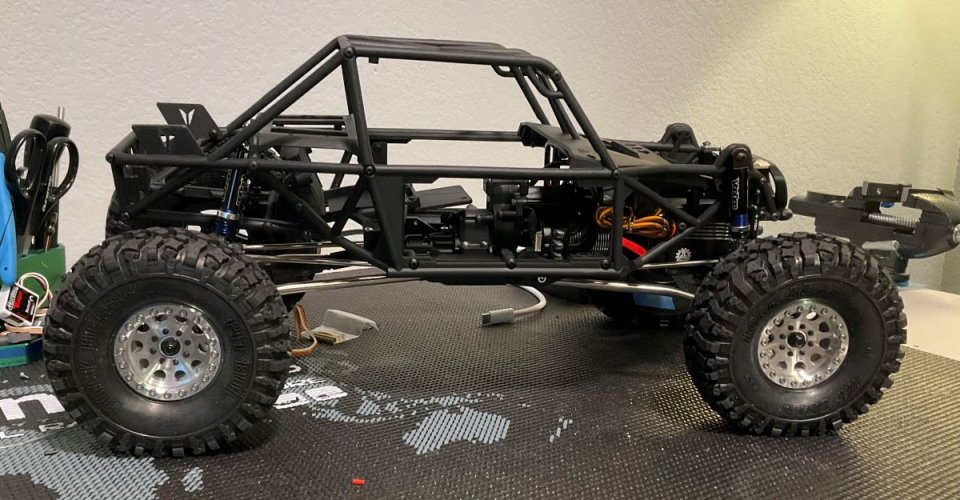
I have a set of 1.9 Rock Beasts on Scale Shop Stockerz wheels. You’ll recognize these if you’ve looked at my Phoenix build thread. The wheels are beautiful. Lucky to have a set. Here’s the Rock Beasts + Stockerz on the tuck. The noticeable lean is due to the mega tires on the other side. Certainly better, but a little undersized at 4.45” versus the recommended 4.75”.
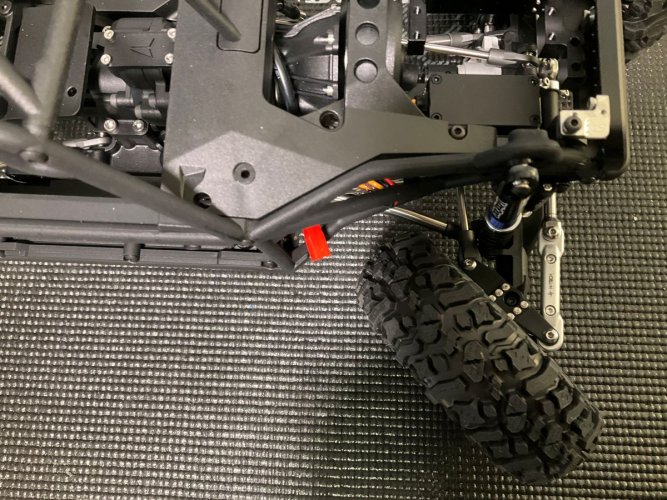
As you might guess, the more suitably sized tires also work fine at full steering lock. The angle in this photo is less ideal. The tire clears the link just fine.
I have one more option which is moving the set of Proline BF Goodrick Krawler T/A KX tires off the Vanquish Method 105s on my Phoenix and onto the Stockerz. Moving the tires + wheels complete is another option, but that would be to fast and easy and the Stockerz are a better match to where I want to go with the Optic. I’ll bring this switch up to the next post once I’ve remounted the tires, only something like 28 screws per Stockerz to do this, lol
Take care until next time!
I saw the posts where others said 2.2 wheels and tires looked “cartoonish” and out-of-scale. But it’s hard to appreciate how true that is until you see it in person. Oh my, what large tires you have! I’m a big fan of huge and aggressive tires, but this is like completely out of scale. I probably should have guessed since the 2.2 Rock Beasts are a full inch larger OD than recommended. On the bright side, the LockedUp wheels look sweet and I do have other 2.2 scale rigs that could use a set of wheels and tires.

In case you’re wondering, the 2.2 Rock Beast do clear the front at full steer. I was pretty surprised to see this. Actually made me consider keeping them on the truck. But then look at the previous photo …

I have a set of 1.9 Rock Beasts on Scale Shop Stockerz wheels. You’ll recognize these if you’ve looked at my Phoenix build thread. The wheels are beautiful. Lucky to have a set. Here’s the Rock Beasts + Stockerz on the tuck. The noticeable lean is due to the mega tires on the other side. Certainly better, but a little undersized at 4.45” versus the recommended 4.75”.

As you might guess, the more suitably sized tires also work fine at full steering lock. The angle in this photo is less ideal. The tire clears the link just fine.

I have one more option which is moving the set of Proline BF Goodrick Krawler T/A KX tires off the Vanquish Method 105s on my Phoenix and onto the Stockerz. Moving the tires + wheels complete is another option, but that would be to fast and easy and the Stockerz are a better match to where I want to go with the Optic. I’ll bring this switch up to the next post once I’ve remounted the tires, only something like 28 screws per Stockerz to do this, lol
Take care until next time!
Last edited:
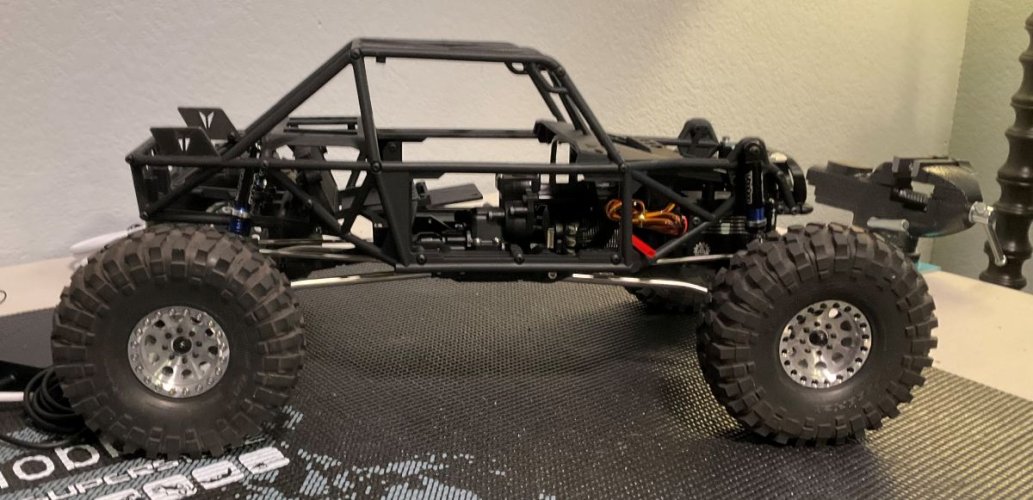
After a few short hours of turning screws, behold the Proline BF Goodrich T/A KX tires on the Stockerz. Turns out the suggested tire diameter of 4.75” is a great match to the truck. Planning to stick with this setup for now. The screw turning is hardly over, though. I only had enough scale hex bolts for one wheel (the front one in this photo). I ordered enough for the rest of the wheels. It looks sweet and seems more fitting to deploy these wheels with all the trims.
I also took an idea from RC Girl and added a scale engine to the back. The 3D model is available here: Vanquish Optic Modular Rear Engine. RC Girl’s video is available here. My version is very similar to the one she put together: exhaust and a few other parts in metal. The rest in resin, all from JLC3DP. The prices are great, the website is easy to use, and the print quality is very nice, especially compared to what I’m able to do at home. Plus no home capacity for metal parts. Or maybe that’s wrong, but lacking in confidence for printing in metal for sure. I did try printing the plastic bits at home first and wasn’t happy with how they turned out. The resin versions look fantastic with essentially no print lines at all.
I used Abteilung 502 Starship Filth as suggested to tarnish the metal parts. Pretty excited with how it turned out. I’m going to order a rush wash to weather it some more. Here it is on the bench

And installed in the cage, which is separated from the chassis so I can install the electronics.


The Knight Customs V8 engine and supercharger came out after I was underway. I may also give that one a try – pretty amazing level of detail.
Take care until next time!

I also took an idea from RC Girl and added a scale engine to the back. The 3D model is available here: Vanquish Optic Modular Rear Engine. RC Girl’s video is available here. My version is very similar to the one she put together: exhaust and a few other parts in metal. The rest in resin, all from JLC3DP. The prices are great, the website is easy to use, and the print quality is very nice, especially compared to what I’m able to do at home. Plus no home capacity for metal parts. Or maybe that’s wrong, but lacking in confidence for printing in metal for sure. I did try printing the plastic bits at home first and wasn’t happy with how they turned out. The resin versions look fantastic with essentially no print lines at all.
I used Abteilung 502 Starship Filth as suggested to tarnish the metal parts. Pretty excited with how it turned out. I’m going to order a rush wash to weather it some more. Here it is on the bench

And installed in the cage, which is separated from the chassis so I can install the electronics.


The Knight Customs V8 engine and supercharger came out after I was underway. I may also give that one a try – pretty amazing level of detail.
Take care until next time!
Back to my old ways of not posting very often. But don’t despair, this thread is likely to run on much longer than it should.
I did make a few bits of progress at least. Installed the ESC and routed the wires from the motor. The stock wires on the motor were unfortunately too short, so took longer than it would have otherwise. That doesn’t explain the lack of posting, but apparently bringing it up anyway. I’m pretty happy with how the wires turned out in the end. I made right angles at the ESC bullets. The wires themselves are sort of just long enough. If I had a do-over I might make them another 1/8” longer to have more slack, but this is home made after all.

Probably hard to tell what's going on with the wires everywhere. Promise I'll clean them up

I also started printing the Knight Customs Optic single interior detail set. There’s an impressive level of detail in the print. I haven’t tried Knight Customs previously. Happy I’m doing that for this build. I’m using Bamboo labs PLA matte and printing the parts tipped 45 degrees on the print bed as suggested elsewhere to minimize layer lines. The baseplate turned out reasonably well. I have some Tamiya acrylics on the way to give that a try also. Hoping I don’t mess it up

Quick fit inside the cage

While testing the electronics I also sadly realized that the Stockerz wheels don’t work with the Optic due to an interference with the front knuckles. Jato may have realized this already. I should have read that part of his thread sooner. Extra sad since this is the second set of tires I’d mounted and there are many screws along that path.
Good news is I had a set of The Scale Shop 1.9 Rock Monster V2 beadlocks on my v1 SCX10 (yes the first generation). The inside of the Rock Monsters are tapered and the wheels work with standard Vanquish hubs, which makes it easy to eliminate any interference. Plus they look sweet. I made a thread way back in 2018 when I first got my Rock Monsters. Crazy how the time goes by and how much life has gone by since then. I just started transferring the tires over yesterday. One is done so far. Should look awesome on the truck.
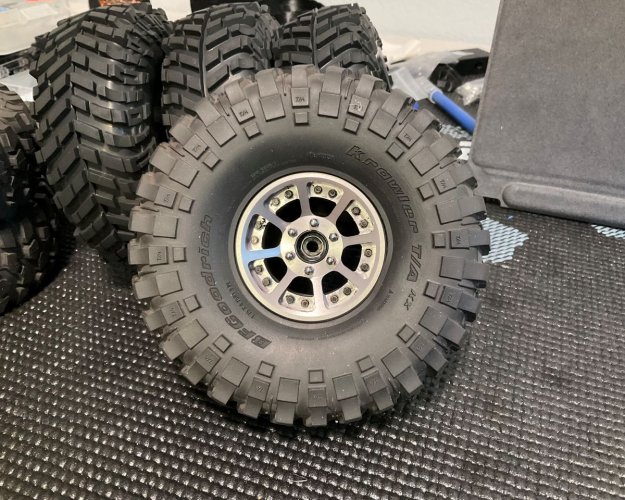
Take care!
I did make a few bits of progress at least. Installed the ESC and routed the wires from the motor. The stock wires on the motor were unfortunately too short, so took longer than it would have otherwise. That doesn’t explain the lack of posting, but apparently bringing it up anyway. I’m pretty happy with how the wires turned out in the end. I made right angles at the ESC bullets. The wires themselves are sort of just long enough. If I had a do-over I might make them another 1/8” longer to have more slack, but this is home made after all.

Probably hard to tell what's going on with the wires everywhere. Promise I'll clean them up

I also started printing the Knight Customs Optic single interior detail set. There’s an impressive level of detail in the print. I haven’t tried Knight Customs previously. Happy I’m doing that for this build. I’m using Bamboo labs PLA matte and printing the parts tipped 45 degrees on the print bed as suggested elsewhere to minimize layer lines. The baseplate turned out reasonably well. I have some Tamiya acrylics on the way to give that a try also. Hoping I don’t mess it up

Quick fit inside the cage

While testing the electronics I also sadly realized that the Stockerz wheels don’t work with the Optic due to an interference with the front knuckles. Jato may have realized this already. I should have read that part of his thread sooner. Extra sad since this is the second set of tires I’d mounted and there are many screws along that path.
Good news is I had a set of The Scale Shop 1.9 Rock Monster V2 beadlocks on my v1 SCX10 (yes the first generation). The inside of the Rock Monsters are tapered and the wheels work with standard Vanquish hubs, which makes it easy to eliminate any interference. Plus they look sweet. I made a thread way back in 2018 when I first got my Rock Monsters. Crazy how the time goes by and how much life has gone by since then. I just started transferring the tires over yesterday. One is done so far. Should look awesome on the truck.

Take care!
Short update this time, much shorter than the time spent to get here, but so it goes. At this rate I should be done with the build sometime this year. Still hope, though, for a continued low and slow completion.
I remounted the tires on the TSS Rock Monster wheels. Two are in great shape. The other two may need some more work. Can probably see this if you look close. In my defense, the Proline tires weren’t entirely cooperative. Here’s the chassis with the re-mounted wheels and tires.

I also cleaned up the wiring with a bit of loom. Looks a lot better in person. Likely more clean up when I install the lights.
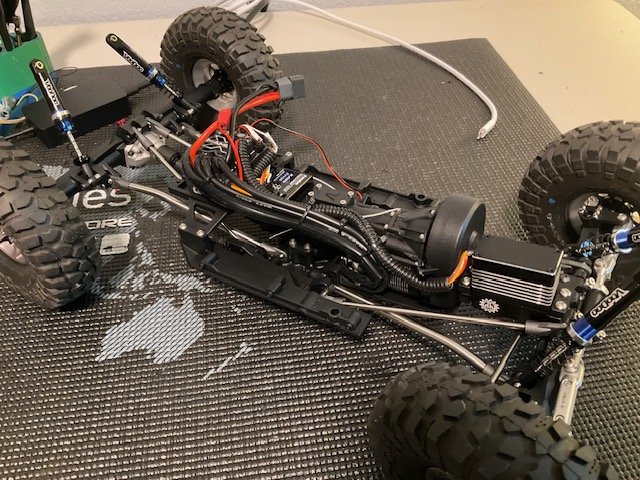
I also started painting the interior. This is a completely new exercise for me. The Tamiya acrylics I’m using work well with 3D printed parts. Fairly happy with how it’s turning out so far. I don’t have a head yet so just going without for now. I’ll try to get one on before the next update.


Take care until the next one!
I remounted the tires on the TSS Rock Monster wheels. Two are in great shape. The other two may need some more work. Can probably see this if you look close. In my defense, the Proline tires weren’t entirely cooperative. Here’s the chassis with the re-mounted wheels and tires.

I also cleaned up the wiring with a bit of loom. Looks a lot better in person. Likely more clean up when I install the lights.

I also started painting the interior. This is a completely new exercise for me. The Tamiya acrylics I’m using work well with 3D printed parts. Fairly happy with how it’s turning out so far. I don’t have a head yet so just going without for now. I’ll try to get one on before the next update.


Take care until the next one!
Similar threads
- Replies
- 81
- Views
- 5K
- Replies
- 2
- Views
- 404
- Replies
- 120
- Views
- 6K
- Replies
- 1
- Views
- 9K
