• Welcome to RCCrawler Forums.

    It looks like you're enjoying RCCrawler's Forums but haven't created an account yet. Why not take a minute to register for your own free account now? As a member you get free access to all of our forums and posts plus the ability to post your own messages, communicate directly with other members, and much more. Register now!

    Already a member? Login at the top of this page to stop seeing this message.

The "Just shut up and build it" thread...

Dayum! You may take some remedial motivation to get going but then you're up and gone! :lmao:

It sure does look purty, lots of shiny bits.

I've always found it frustrating that aftermarket manufacturers send you a/several bags of parts and hardware and expect you to decipher assembly from one or two product description pics. I feel like I've won a scratch off when I find even a rudimentary instruction diagram included.

I'll say after building Vaterra, MST and RC3WD kits the Axial kit instructions were good but still contained several discrepancies and part number/tree mismatches, just enough to make you stop and think, and look, more than once. I'll further say I didn't torque any fasteners with the power driver for fear of stripping even the relatively heavy Bomber plastic parts.

Carry on! Don't let something silly like going back to work impede your momentum. "thumbsup"
 
MIP Metric Speed Tip Set (3) Hex Driver Wrench 1.5mm, 2.0mm, 2.5mm MIP9512

Worked perfectly with my battery powered driver

These don't strip. I stripped the one you posted and had a hard time getting the dam button head screw out:evil: I do use that one for hand tightening...

Though I might share"thumbsup"
 
Same here, i use a little Dewalt gyroscopic screwdriver and MIP tips.
It's a blessing on the bomber...

Sent from my Nexus 6 using Tapatalk
 
I'm not using a powered driver during initial assembly, I don't trust them for getting everything "just right"... I have one for use later.

I have the MIP drivers with the amber plastic handles.

The Dynamite 1.5mm replacement is working well so far, and I think I'm nearly done with it, should just be screwing into plastic from here on out.

Thank goodness!
 
Looking good sir. Can't wait to be there for the first scratch!

Oops I meant drive.... I can't wait to be there for the first drive and if it gets a scratch well I will be there for that too! ��
 
Slowed down a bit, just built shocks and called it a night yesterday (aka early this morn')...

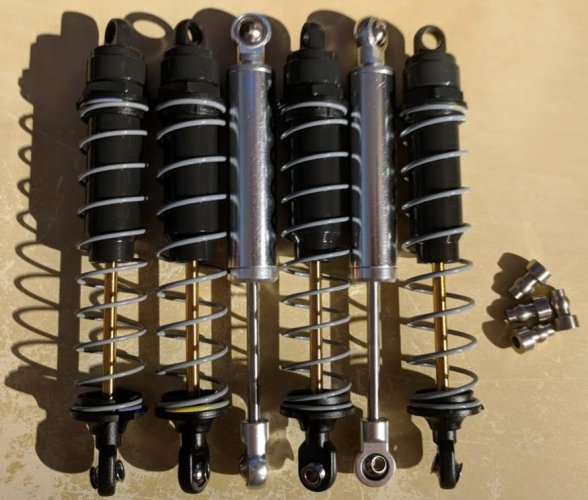
Traxxas 2662 XX-Long Big Bores w/ Axial purple front and yellow rear springs, XtraSpeed 100mm internal springs (soft), Dlux Fab Big Bore Shock Ends - 40 weight Team Associated shock oil in all shocks, was going to leave the XtraSpeeds empty, but didn't want them fighting the Big Bores for rebound:
 

Attachments

  • IMG_20180711_151318.jpg
    IMG_20180711_151318.jpg
    85.2 KB · Views: 389
Last edited:
Got a pair of them from a member here, cheap... Thought I'd maybe try them out as extra rear shocks in a dual setup.

Too much chrome for me, after I've tested them out I will likely use a decal on the shock bodies to change that.
 
Get some Rc4wd internal spring shocks. They have yellow bilstein brand, black chrome and white superlift brand

Sent from my Nexus 6 using Tapatalk
 
I've seen them, they are pricey (more than double!) compared to what I paid for these.

Not buying anything else right now, I shudder to think how much is already sunk into these two builds.

I can make these look custom with the decals...
 
Nice, tho' I've seen them as well. ;-)

I could get the XtraSpeed shocks in black on fleaBay for less than $10 if I wanted or needed more shocks!

Seriously, one thing that has definitely happened in 2 years of gathering parts for my Bomber(s) as well as buying and modifying a Vaterra Ascender K10 - I have browsed through practically every RC parts manufacturer or online parts vendor out there.

That's including using keyword searches on Axial, RR10, Bomber, Wraith (for front end parts), Yeti (for the ass-end), etc on eBay and Amazon.

Barring any unexpected breakages, I'm done buying anything else except for:

1. A particular and secret (for now) body for the carbon-fiber chassis rails (as soon as I can get off of unemployment!)...

2. Eventually, a second set of SS or Titanium links to replace the kit links on the one build I'm finishing up...

3. And down the road a bit probably a set of Crawler Innovations Double Deuce 6 Bolt 2.2 glue-on wheels for the Team DC tires that have too thin of a bead to work properly with my Incision Method MR307 wheels...

4. And lastly I will likely make a final decision on a set of super-sticky performance-oriented 2.2 tires for those Incisions - maybe RC4WD Goodyear MT/Rs (I love my little 1.7"s of them) or if Proline comes out with Predator compound 2.2 tires in a tread design I like.

5. Can't forget performance foams for those!

I have loads of new scale accessories in a box, and plenty of new wheels and tires for now.
 
OK, so last night was spent soldering up some connectors (XT60 and 4mm CC bullets) and refreshing my memory on how to set up the Mamba X using the Castle Link.

I also contacted Holmes Hobbies with a settings list, asking if they thought it would be proper for a Revolver motor, and they directed me to this INCREDIBLY helpful video (Many thanks, Justin from HH!):

<iframe width="560" height="315" src="https://www.youtube.com/embed/6wvH4A_VqTs" frameborder="0" allow="autoplay; encrypted-media" allowfullscreen></iframe>

After viewing that, and including some things I'd picked up regarding the Auxiliary Wire function of the Mamba X, I used the following settings - please remember, I am using a SENSORLESS motor here ~

Basic:
Cutoff Voltage Auto Li-Po (Default)
Auto-Lipo Volts/Cell 3.5 Volts/Cell
Reverse Type With Reverse (Default)
BEC Voltage 8.0V
Idle/Error Beep Disable 4
Brake Amount 50% (Default)
Drag Brake 30.0%
Power:
Start Power High
Max Power 100% (Default)
Reverse Percentage 100%
Punch Control 30%
Torque Control Value 0
Torque Control Electrical Motor kV Not Determined
Advanced:
Arming Time 1.5s (Default)
Auxiliary Wire Mode 96
Link Live Enable Disabled (Default)
Throttle Dead Band Average (0.1000 ms) (Default)
Full Reverse 1.048 ms
Neutral 1.479 ms
Full Forward 1.910 ms
Motor:
Motor Direction Normal (Default)
Motor Type Smart Sense™ Brushless (Default), Checkbox: False
Sensorless Motor Timing Lowest (0)
Motor Temperature Cutoff Disabled (Default)
Logging:
Data Log Enabled 2047
Sample Frequency 5 Sample / Sec (Default)
Automatic Data Reset Disabled (100%) (Default)

For the Throttle Curve, per JRH's video I used a curve made by placing one point at 20% up the graph at 50% throttle input.

No Brake Curve setting was used, left it linear.

I have also decided that I will not be using my Futaba 3PV for this go-round on the Bomber, as the receiver for it only takes 7.4v - I wanted to deliver max BEC power from the Mamba X (8.0v) to the ProModeler 470 servo, and the FlySky receiver will take 8.4v - which is the same as what the ProModeler will take at a maximum.

The Futaba tx/rx combo will be used on the other Bomber build, as it will be using direct 3S power for the HH SHV500 v1 servo, and I can reduce the BEC power from the Mamba Monster X in that build to 7.0v for the Futaba R203GF receiver and a couple GearHeadRC lightbars.

It was entertaining and very easy programming the CC Mamba X, so much so that I went ahead and programmed the Mamba Monster X for the other build while I was at it.

Both needed to have the firmware upgraded to the new 2.02 version, so that I could use the new Rock Racer / Crawler Mode setting for the Aux Wire - I'd bought them both quite some time ago, before that firmware was released.

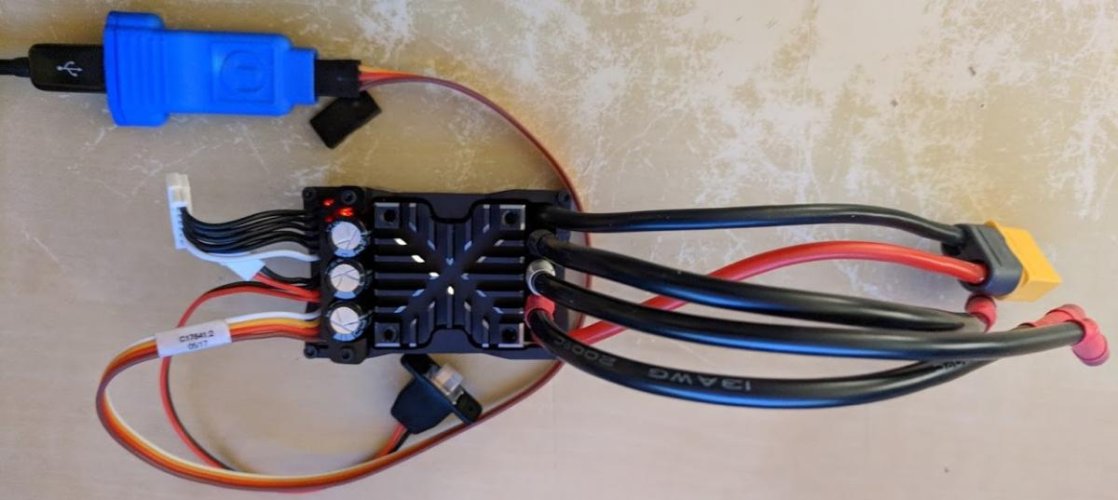
I even got to use my nifty 3D-printed Castle Link protective housing that I got on ShapeWays, it's just the coolest little thing, Castle needs to just pay the creator and either include them with the Link or at least sell them - it even has the Castle "C" logo, and is bright blue, the Castle color.

One other thing I found out while doing this - all you need is the ESC, the Link, and a USB cable to program - no battery or radio needs to be connected.

Nice to be able to do all this before the ESC is buried in the Bomber cage! "thumbsup"

I do have a Castle Quick Connect Duo cable, which will allow me to connect the Castle Link in the field without unplugging the ESC from the receiver, so when I go on my first real crawl on the Bomber, my HP Stream 7 Windows 10 tablet (bought specifically for this purpose for $70 long ago) will be in my backpack, to allow me to make programming changes without returning home...

Here's the programming in action - and the blue Castle Link case, you can see the green light showing proper connection through it - as well as the motor connectors and XT60+ connector that I finally got around to doing:
 

Attachments

  • IMG_20180712_190916.jpg
    IMG_20180712_190916.jpg
    64.1 KB · Views: 310
OK, so last night was spent soldering up some connectors (XT60 and 4mm CC bullets) and refreshing my memory on how to set up the Mamba X using the Castle Link.

I also contacted Holmes Hobbies with a settings list, asking if they thought it would be proper for a Revolver motor, and they directed me to this INCREDIBLY good video

After viewing that, and including some things I'd picked up regarding the Auxiliary Wire function of the Mamba X, I used the following settings - please remember, I am using a SENSORLESS motor here ~

Basic:
Cutoff Voltage Auto Li-Po (Default)
Auto-Lipo Volts/Cell 3.5 Volts/Cell
Reverse Type With Reverse (Default)
BEC Voltage 8.0V
Idle/Error Beep Disable 4
Brake Amount 50% (Default)
Drag Brake 30.0%
Power:
Start Power High
Max Power 100% (Default)
Reverse Percentage 100%
Punch Control 30%
Torque Control Value 0
Torque Control Electrical Motor kV Not Determined
Advanced:
Arming Time 1.5s (Default)
Auxiliary Wire Mode 96
Link Live Enable Disabled (Default)
Throttle Dead Band Average (0.1000 ms) (Default)
Full Reverse 1.048 ms
Neutral 1.479 ms
Full Forward 1.910 ms
Motor:
Motor Direction Normal (Default)
Motor Type Smart Sense[emoji769] Brushless (Default), Checkbox: False
Sensorless Motor Timing Lowest (0)
Motor Temperature Cutoff Disabled (Default)
Logging:
Data Log Enabled 2047
Sample Frequency 5 Sample / Sec (Default)
Automatic Data Reset Disabled (100%) (Default)

For the Throttle Curve, per JRH's video I used a curve made by placing one point at 20% up the graph at 50% throttle input.

No Brake Curve setting was used, left it linear.

I have also decided that I will not be using my Futaba 3PV for this go-round on the Bomber, as the receiver for it only takes 7.4v - I wanted to deliver max BEC power from the Mamba X (8.0v) to the ProModeler 470 servo, and the FlySky receiver will take 8.4v - which is the same as what the ProModeler will take at a maximum.

The Futaba tx/rx combo will be used on the other Bomber build, as it will be using direct 3S power for the HH SHV500 v1 servo, and I can reduce the BEC power from the Mamba Monster X in that build to 7.0v for the Futaba R203GF receiver and a couple GearHeadRC lightbars.

It was entertaining and very easy programming the CC Mamba X, so much so that I went ahead and programmed the Mamba Monster X for the other build while I was at it.

Both needed to have the firmware upgraded to the new 2.02 version, so that I could use the new Rock Racer / Crawler Mode setting for the Aux Wire - I'd bought them both quite some time ago, before that firmware was released.

I even got to use my nifty 3D-printed Castle Link protective housing that I got on ShapeWays, it's just the coolest little thing, Castle needs to just pay the creator and either include them with the Link or at least sell them - it even has the Castle "C" logo, and is bright blue, the Castle color.

One other thing I found out while doing this - all you need is the ESC, the Link, and a USB cable to program - no battery or radio needs to be connected.

Nice to be able to do all this before the ESC is buried in the Bomber cage! "thumbsup"

I do have a Castle Quick Connect Duo cable, which will allow me to connect the Castle Link in the field without unplugging the ESC from the receiver, so when I go on my first real crawl on the Bomber, my HP Stream 7 Windows 10 tablet (bought specifically for this purpose for $70 long ago) will be in my backpack, to allow me to make programming changes without returning home...

Here's the programming in action - and the blue Castle Link case, you can see the green light showing proper connection through it - as well as the motor connectors and XT60+ connector that I finally got around to doing:

Looks like you're right in there!

I set my brake to 20% (not enough) and drag brake to 50% (way too much). I'll reprogram when I replace the servo with the G13 that's supposed to ship next week.

I used that same throttle curve from John Rob and it seemed to work great.

I love the Rock Race/Crawler mode...switched it frequently in the woods.

Good times!

Sent from my SM-G930R4 using Tapatalk
 
I personally am somewhat shocked to realize that all that is left is for me to assemble the cage! :shock:

I'll test it w/out panels, then install them after final tweaks and go for a long crawl session - got 2 of those 3600mAh 4S packs, and if I want could run 3S for a bit, too... ;-)
 
Once you get in the swing of it, it becomes really interesting and pretty logical to complete...

My cage is DONE!!!

(My hands hurt like a mo-fo...)

No pics of it this way, I think it deserves panels being put on for the first test - and I do have a few options for my panels, so I may go with some more durable first before finalizing it.

I've been up around the clock!

Ran out and picked up some NOS energy drink, my 2nd favorite - Monster Import 18.6oz cans are sold out everywhere - no one carries many of them (if they do at all), and I seem to be buying them out!

Got my nicotine patches in the mail from the VA -after I finish the few packs I have left, it's no more cigarettes or energy drink for me.

MOAR cash for crawlin'!!!

I still need to mount my ESC, attach the cage to the skid/axles, mount the shocks and wheels - and then it's a...

(hopefully)

Friday the 13th Premiere of the:

"Team RRC² (Rzadki Radio-Controlled Racing & Rock Crawling) Revolver #777 Bomber"!
 
AWSOME "thumbsup"

I cant wait to see this beast all complete, if you can get some video with the sounds of the Revolver with no load and loaded up. I'm still considering this motor for one of my TRX4's and possibly my bomber.
I will be real interested in your thoughts of it in your Bomber.
Only thing I will be worried about is the noise of the Revolver.
I believe/think it would be worse in the TRX4 due to the serious gear reduction those have.
 
Last edited:
It may be worse inside a Lexan body (from resonating) than in a Bomber without an interior such as mine...

...but eventually these electronics/trans/axles will be bolted up to carbon fiber chassis rails with a Lexan bodyshell, so who knows?

I'm doing a few minor mods that are taking longer - still working on it though!

I am excited to hear your so close to the finish line. Funny to see how fast things moved once you got started. But I have been itching to hit trail with my RTR Bomber, you being so close doesn't help!
 
Back
Top