• Welcome to RCCrawler Forums.

    It looks like you're enjoying RCCrawler's Forums but haven't created an account yet. Why not take a minute to register for your own free account now? As a member you get free access to all of our forums and posts plus the ability to post your own messages, communicate directly with other members, and much more. Register now!

    Already a member? Login at the top of this page to stop seeing this message.

TF2 tips and tricks thread

If your like me and wanted your TF2 to have the scale Toyota graphics and had no idea where to get them at well this is where you find them!

RPP Hobby | Radio Controlled Cars, Trucks, Boats, Helis, Planes, Plastic Models

YotaDecal.jpg
 
Last edited:
Always install all 3 leafes to prevent the leafes to bent:

For a soft ride install the shorter ones above the main leafe so the leafe gets support from upside.

No more axlewrap ;)
 
TF2 Shift rod linkage in the kit has very little thread and can strip easily.

RC4WD sells an upgraded part that has more threads! Before you tackle this upgrade make sure you have some spare E-clips because the part does include a replacement E-Clip (mine snapped in half when removing it).

R3 Shift Rod Linkage Mount Ver II

Z-S0675_8004WD_3113.jpg
 
Where can I find that mesh you are using for the grill?
ya it was a letter holder/file holder type thing i found at staples office supply, they have wastpaper baskets made of this stuff if you want a good sized piece..great stuff"thumbsup"
 
Hi
The transfer case consol modding

original:

b_201204192134165013.jpg

and the new version
b_201205032307228201.jpg

b_20120503230719322.jpg

b_201205032307218993.jpg

the raised ground clearance
b_201204241812382775.jpg
 
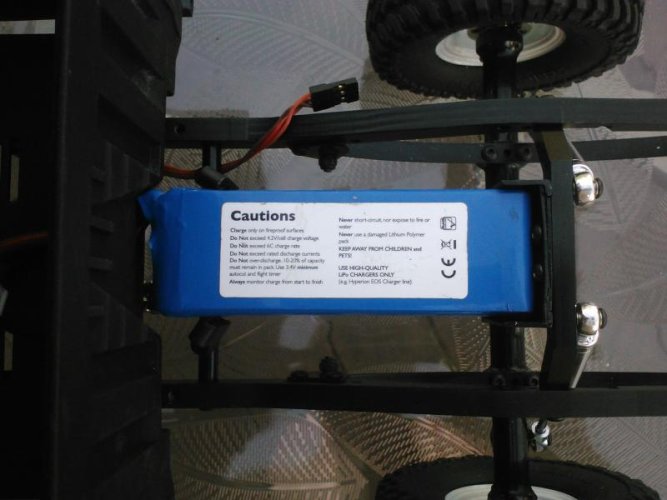
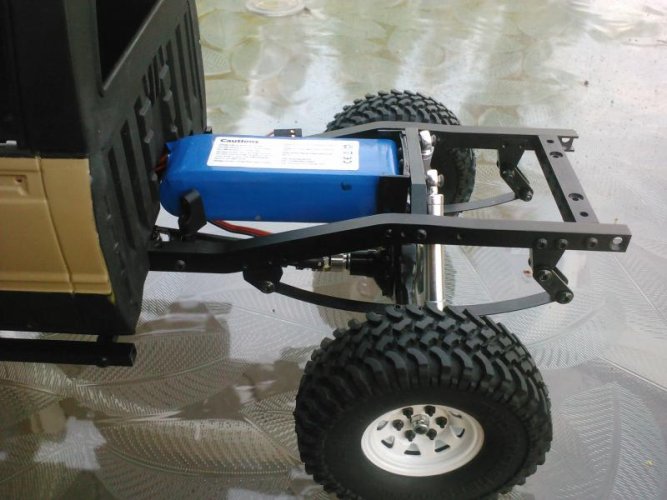
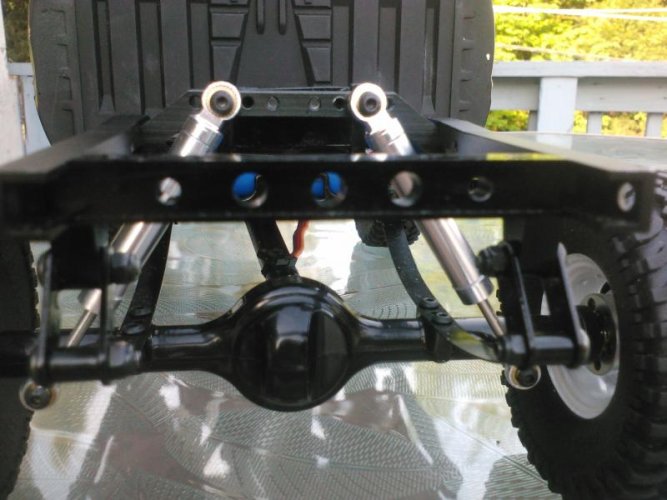
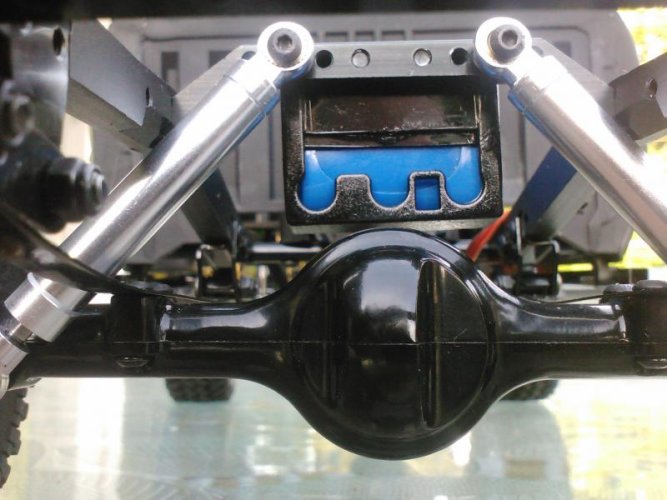
Battery relocation mod:
To keep the interior uncluttered and throw a little weight back, low and centered, I moved the battery below the bed. It sits low enough to still mount the stock bed (I am going to a flat bed set up), but high enough to clear the rear diff at full up travel. I used two servo mounts on one of the round braces moved forward, and hacked up an axial esc holder then bolted it to the shock brace.
 

Attachments

  • TF2 battery relocation.jpg
    TF2 battery relocation.jpg
    49.2 KB · Views: 19,144
  • TF2 battery relocation 2.jpg
    TF2 battery relocation 2.jpg
    63.2 KB · Views: 21,135
  • TF2 battery relocation 3.jpg
    TF2 battery relocation 3.jpg
    60.5 KB · Views: 19,169
  • TF2 battery relocation 4.jpg
    TF2 battery relocation 4.jpg
    60.9 KB · Views: 21,834
Last edited:
just a looks thing, open the grill and mount mesh behind..i left the mounts on the grill but i,m gonna remove them and glue the grill in for a cleaner look
tf2grill001.jpg

tf2grill003.jpg

tf2grill002.jpg

tf2grill005.jpg

need one of stangkillas nice rads now"thumbsup"


Took your concept and ran with it....

I assembled the grille panel onto the truck and glued it all into position - no turning back now.:cry:

3aa94380-1acd-1781.jpg


Then I cut out all the openings right out including removal of the mounts from the grille.

3aa94380-1afd-0084.jpg


Got some steel mesh from a donour pen cup from the bargain shop for $2 and measured, folded trimmed.

3aa94380-1b2c-4680.jpg


3aa94380-1b4b-ddd8.jpg


Then fitted behind the grille and secured it in place using the existing mounts on the underside of the hood. I used the supplied steel bracket to keep the mesh in position, all straight and secure.

3aa94380-1baf-e132.jpg


End result is quite pleasing I think!! "thumbsup"

3aa94380-1bf4-98da.jpg


3aa94380-1c13-2da8.jpg
 
Last edited:
If it's a direct fit for the TF-2 chassis, they failed to make that clear. I want one, but for 150 clams it better drop right on "thumbsup".

By using the info they DO provide, you can interpret that the fit is based on the body, not the chassis. Also, the trailfinder 1, didn't come with the MOJAVE body....only the TF2. Spacially the tf2 and the hilux occupy the same real estate...you can mount a hilux cab on a tf2 body and vice verse. You can use the tf2 cab-back on a hilux ect.

You guys can make it as difficult as you like.:mrgreen:
 
I kinda stripped the front gears last night they were clicking when it got a lil bound up but did a lil fix, i got a brass washer and installed it on the pinion gear shaft and removed the stock shim. it pushed the pinion into the ring gear for a tighter mesh and got rid of the front to back play. i put it to the test and no more clicking so its a bandaid till i get my new gears. im gonna do the same to the rear just to get rid of that front to back play on the pinion and maybe that will prevent me from stripping the rears.

hope this helps
 
Hello,


It will fit the body, but the chassis is designed to fit the TF1 and Bruiser chassis. So it would need your own mounts for TF2.


We are working on an Exo for the TF2.


As for other items. The TF1 chassis design is much different from TF2. So some will and some will not. Most will require some type of custom mounting.


We have many new hop ups for the TF2 coming soon.


Thanks

Tom


-RC4WD Support Team


sothis should answer the questionsabout what will fit the tf2.
straight from rc4wd.

bob
 
Cheap alternative rear shock mounts

I used 2 sets of shackles (that came with the truck), 4 M3X10 button head screws and 2 M3 lock nuts.

TF2 New Shock Mount 004.jpg

TF2 New Shock Mount 007.jpg

TF2 New Shock Mount 008.jpg
Behind the axle
TF2 New Shock Mount 012.jpg

TF2 New Shock Mount 026.jpg

TF2 New Shock Mount 024.jpg

TF2 New Shock Mount 032.jpg

In front of the axle
TF2 New Shock Mount 001 (2).jpg

TF2 New Shock Mount 008 (2).jpg

TF2 New Shock Mount 005.jpg
 
Last edited:
Anyone got tips on making a scale exhaust pipe? I remember the scale master himself Pardonynoob did one on his CC-01 Tundra...however I don't have a tube bender....any ideas?
 
Inner fenders & radiator support:

Radiator Core Support/Inner Fender kit RC Tamiya Toyota Hilux and RC4WD Mojave

These are great for when you cut the grill out & put wire mesh in. you see a radiator rather than the inside of an RC truck.

low angle camera angles can be had without seeing wires, electronics or if you are low budget like me... hampster feet. It's dirty where I drive & their little feet get yucky & can be seen sticking out from under the truck. No more problems with dirty hampster feet in my low angle photos with these inner fender wells.
 
Hi guys have a question
Wouldnt it be better for gripping without the foam n the tires?
Or would the tf2 is to heavy without the foam
 
Front Bruiser Spring mounts/make your own for $5 !

Hey guys, I wanted some bruiser type front spring mounts and didn't want to buy them or wait for em, so I made em! You can to. They are easy. All you need is a drill and a 1/8 bit and 5/32 bit. A dremel with a cut off wheel and sanding wheel. Lastly a steel, brass, or aluminum bar that is 3/4" wide, 3" long or longer(easier to hold) and .07" or so thick.

You need to make your basic shape but the main idea is to push the axle a little forward so it doesn't hit the rear of the front fenders when the spring compresses. Also you can give it a little lift while your at it.

Here is how I made mine. The bottom hole is .550 from center to center from the hole above it. And the center of the bottom hole is just in front of the end of the frame.

649b50c8a444027a149acab96c19c32f_zps08b879c4.jpg


I stacked them together when I was done and took the sander to make all the edges line up perfectly.
8278b834ffeb59278a0071db48e483be_zps14b49665.jpg


Here is how they turned out. I'm real happy with em!
38fc48e4a00ae59a7cebd0f07887f498_zps3443dcb6.jpg


9480539bb3f7fe7ca9dd576264d4c2da_zps3e4390c6.jpg


I also drilled out the frame where the front bolt hole of the front spring hanger went originally so that the shackle could be mounted with the bolt that was supposed to go through it. You can still put it back if you want to. The design of the frame will keep it from spinning.

e1d383a17e6019668eb7b089808bff19_zps74d99203.jpg


Hope this helps you guysEs! :mrgreen:
 
Back
Top