• Welcome to RCCrawler Forums.

    It looks like you're enjoying RCCrawler's Forums but haven't created an account yet. Why not take a minute to register for your own free account now? As a member you get free access to all of our forums and posts plus the ability to post your own messages, communicate directly with other members, and much more. Register now!

    Already a member? Login at the top of this page to stop seeing this message.

Snowman (the Abominable) - born as a beast, Yeti build thread

Not impressed by this:
1cdfe08099d113e2451de6de65efe37c.jpg


Happened during second run. Not anticipated. Any suggested upgrade?

Skickat från min SM-G920F via Tapatalk
 
Last edited:
Not impressed by this:
1cdfe08099d113e2451de6de65efe37c.jpg


Happened during second run. Not anticipated. Any suggested upgrade?

Skickat från min SM-G920F via Tapatalk

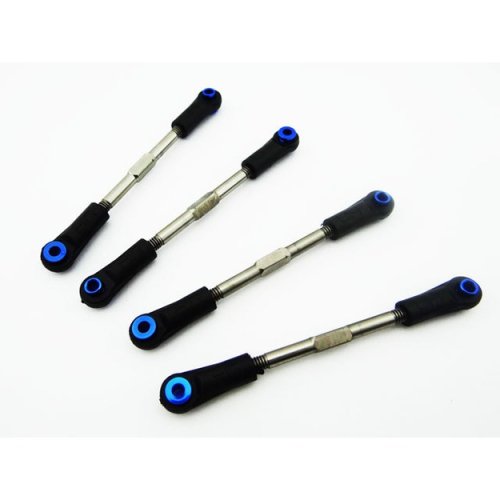
Is it me, or does it look like you got the older version turnbuckles?

My kit came with different ones (silver instead of bronze) unless it's the lighting.

25198425778_f35fe18bb7_b.jpg
 
Last edited:
Yes your kit came with the alloy version of steering/chamber links like mine. axial changed it later

fb873ae70bac844e45f03d41cfd48c63.jpg


You can get a steel version from axial.
 
Yes your kit came with the alloy version of steering/chamber links like mine. axial changed it later

fb873ae70bac844e45f03d41cfd48c63.jpg


You can get a steel version from axial.

That's strange.... his kit must be really old stock then.

I bought mine late 2015 and it came with the steel turnbuckle.

It could be because you guys are in Europe, and I'm in California where Axial is.

What's funny is that I got the updated steel turnbuckles, but I still got the older 94mm CVDs. I had to call up Axial to get the 92mm CVDs.
 
I've bent it back, so while not completely straight, it will keep me running. I'll get the steel versions or the shiny ones Cheez posted.

Concerning the CVDs, what was the problem with the old ones? I don't know what version I've got, but it would be good to spot the problem (if there is one) and do something about it before something breaks.
 
That's a bummer. Axial's bronze links on the Bomber bent too easily as well. They replaced it for me, but since you are in Sweden I'm not sure they'd do it unless you want to pay shipping. Or do they have official distributors over there? It might be worth reaching out to Axial.
 
I've bent it back, so while not completely straight, it will keep me running. I'll get the steel versions or the shiny ones Cheez posted.

Concerning the CVDs, what was the problem with the old ones? I don't know what version I've got, but it would be good to spot the problem (if there is one) and do something about it before something breaks.

Axial quietly changed the universals from 94 to 92 mm some time ago - the length is indicated on the driveshaft.

As I understand it, depending on the amount of negative camber you had dialled in, on hard landings the dogbone end would bottom out in the drive cup, resulting in a bent shaft. You can check for this clearance yourself by simply compressing the suspension fully and seeing if this is happening on your yeti.

Axial did offer the 92mm replacements for those that had this issue.
 
That's a bummer. Axial's bronze links on the Bomber bent too easily as well. They replaced it for me, but since you are in Sweden I'm not sure they'd do it unless you want to pay shipping. Or do they have official distributors over there? It might be worth reaching out to Axial.


I've ordered Axial steel links from a Swedish vendor. A while ago it turned out that I had two left sided 4-link mounts, instead of one right and one left. After a fair bit of mailing, I got in contact with the Danish distributor and just yesterday, two aluminum replacements turned up. Really nice of them to give me aluminum replacements (COSTs 43$), but it took so long for them to reply that I got tired of waiting and bought a pair from STRC. So this time I don't know if I even care to write. But on the other hand, if they send me a replacement, I'll have plenty of spare links.

Axial quietly changed the universals from 94 to 92 mm some time ago - the length is indicated on the driveshaft.

As I understand it, depending on the amount of negative camber you had dialled in, on hard landings the dogbone end would bottom out in the drive cup, resulting in a bent shaft. You can check for this clearance yourself by simply compressing the suspension fully and seeing if this is happening on your yeti.

Axial did offer the 92mm replacements for those that had this issue.


I'll check this on my Yeti as soon as I get home. If I have the 92mm shafts, I'll definitively contact the Danish distributor, and if I'm lucky I'll get new links and shafts come spring.

But, I have to say, apart from that bent link, which was rather easily fixed, Snowman did really impress. I took him for a walk around where I live, and he crawled better than I had hoped. He really only get stuck when there was too much Heather and he got tangled. On the picture below he is standing on some slippery rocks and has just conquered a 40-degree (rough estimate) slope that I didn't stand a chance of climbing myself. 2-speed and crawler mode turned out to be great indeed. And when it comes to speed, Mr Snowman is too fast for his own good. At least on 3S. A beast indeed. That rolls really easy in the corners.

I had one problem though, and I hope someone can help me with it. Going forward, low speed control is really, really smooth. But when I hit reverse, it hacks and sputters. Any idea why this might be? Getting out of tight spots is really hard when reverse is either zero or close to full throttle, and hacking in between. Any idea why this might be?

fb72ab933b7e7b7220800843012fd148.jpg
 
Snowman is alive and doing well, this weekend we had a lot of fun bashing around on the frozen sea, I posted some pictures in this thread. Concerning the problem I posted above, with speed control not working properly in reverse, it's working fine now. I think I adjusted trim on channel 2 slightly, and then the problem just disappeared. Throttle control is now really smooth, forwards and backwards.

A few updates has been done, and one upgrade. The upgrade regarded the sloppy steering. When I first heard talk about steering being sloppy, I didn't quite understand what that was supposed to mean, but I soon found out. I did what so many others has done before me, and put a bearing in the servo saver, to tighten it up. That made a lot of difference, all of a sudden I can actually turn the wheels their full range on grippy surfaces, which I couldn't before.

I had expected this little mod to go very easy, but that loctite made it a PIA. I stripped the screw heads disassembling the steering rack, which really made things difficult for me. Luckily, I managed to get them out and had some spares for the assembly, dating back from my Kyosho of 1994. That head came clean off when I tried to screw it in. Oh, the grief. In the end, I found exactly two Axial screws after doing some serious digging in my bits box and got it all together. More M2,6 screws need to be ordered.

099839e7c1c53af28fe3b6883d76779a.jpg


After a few packs though, the steering went sloppy again. Checking it, I realized I hadn't put in both small tightening screws in the servo horns, the small ones running perpendicular to the servo axle. That made the horn come loose and the steering becoming sloppy. Now that's fixed as well, and steering should now be as good as it gets. I haven't tried it though, too much snow.

I also changed the 4-mount links from STRC aluminum to original Axial aluminum. An update, not an upgrade. You might remember that my kit came with two left-sided mounts and since customer service was really slow I ended up ordering a pair from STRC. Then Axial came through and sent me a pair of aluminum link mounts. I felt like doing something, so out went STRC, and in went Axial. I quite like that bronze colour as well. Grey, black and bronze, that's all the colors that are going on this build.

STRC mounts vs. Axial mounts. Aside from the colour difference, the axial mounts allows me to switch the position of the trailing arms, should I want to. I don't, but still it's a nice feature.
0ef027f74e66219005e78b16c33ebe21.jpg


0fca94a5cecb0e1d21172091f74f949b.jpg


While I was at changing from STRC to Axial, I also changed the upper link plates for the rear suspension. I made an order for a future Bomber build (Oryx!) from Tower a while ago, and needed something to fill it up to a certain discount level. In went Axial plates. Note that they use four screws instead of two for the STRC, so I guess that makes them slightly more stable. Not likely to be a noticeable difference though. But I like the color! Ridiculous, I know, please be kind on me...
4ccd34254d49a6ed5f389bfb6b306588.jpg


SRTRC plates. Two screws.
6c8b64378f457a9117c69daf5d07fdf3.jpg


Axial plates, four screws. Revolutionary!
abc7da2a64628e40f9152b0f5070e336.jpg


Please excuse the crappy pictures, I'll compensate for them with some action shots of Snowman enjoying an outing:
 
Last edited:
30f211fc3ca25525838bcf60a6a25530.jpg


fb99cb27c1a8759724e0228a623fdf2f.jpg


Oh, I forgot, I just changed the diff fluid in the front diff from 500.000 to 1.000.000. I hope that will make Snowman perform a bit better when climbing rocks. I can't fell much difference when I turn the front wheels by hand, but I guess it will improve crawling capability at least a little.
 
Last edited:
Snowman has recently made the move from Sweden to Australia, so there won't be any pictures of driving in snow for a while. The original body has been bashed to pieces, so a new one is coming. Paintwork will be roughly the same as before, pictures to come as I go along.
09e52ac7196b1aef15779766d72a7880.jpg


Skickat från min SM-G920F via Tapatalk
 
Hello! Im new here, and don’t really know where to post this... so I’m putting it here. Hopefully someone will redirect me to the proper location. I’m looking to buy a piece of sheet metal (undecided on type) to make body panels for my axial yeti rc rock racer... I’m a noob, so aside from drawing the pattern on the metal and using my jig saw to cut it out... am I missing anything? Should I be using certain tools/materials? Thank you in advance from a girl trying to make her Yeti Spaghetti happy.


Sent from my iPhone using Tapatalk
 
And here it is, Snowman's new body. Pretty much same graphics as before, except the hood and boot. Turned out OK I think, except for the dark blue at the rips on the hood, I wish it was a bit brighter. In hindsight I should have used the same blue as for the rest of the body, but backed it with black instead of white, for a slightly darker shade. But mind that this is just the third body I've ever painted, so I have a lot to learn. Enough talking, have a look at the pics and tell me what you think.

e9e6ca64973d25591aacf07ee23d096a.jpg


aa2fa7970d1c7385dba1ab2e9f6eea88.jpg


2f70454256b912bf7b8208b445f9cd9a.jpg


0ed7e0fbb9b71f8dcb0297e415d6aeab.jpg

4d7f0cef5f5f91a3be7e6ed3019131a5.jpg


0ca287a4d40ce3fc5d6473d74b378740.jpg


c07864820edb2690c377dd2c0424bb1c.jpg


9dbd91bde58b6047bb294fc37b2102b5.jpg


58abd49d874689634d96ac80c0bde064.jpg


Skickat från min SM-G920F via Tapatalk
 
Last edited:
Great choice of color, Gulf Blue forever!
The blue can change shades with white, gold, silver, and black. Adding florescent blue in before backing gives more pop. I used it under the roof color, in the sun you will see the subtle ness . Paint is OK, but not as planned.
2f8e7eb70459e3b90fe89e88565f10ea.jpg


Hang up and Drive
 
Snowman is getting a new body! The Jeep Wrangler, that's no longer produced, but great looking. I foresee his performance will improve a lot with it. Designing, masking and cutting the paint scheme has taken ages, but I think it will be worth it. I have raised my bar quite a bit and really hope I will pull it off.

Also, a Vanquish front diff housing is on its way, I couldn't resist ordering it alongside a Bomber kit.
ebea8fecfa9c5eb9e753f40ca182b13d.jpg


Skickat från min SM-G920F via Tapatalk
 
A bit of progress, to give you an idea of the design. It will be very exciting to remove the protective wrapping!
5ecf8270cbf4e6d491b64569155b337c.jpg


Skickat från min SM-G920F via Tapatalk
 
I've got no picture to show you, but painting is now done and only stickers remain. Hopefully, I'll get that done on Monday. The paint scheme was a pain, but I think it will turn out good. In order I've now sprayed:

1. Black
2. Dark blue
3. Medium blue
4. Light blue
5. Medium blue
6. Light blue
7. Yellow
8. White
9. Dark gun metal
10. Gun metal
11. Silver
12. White
13. Dark blue (these last three coats were to fix a few places where I had forgotten to peel the masking film)
14. Medium blue
15. White
16. Black (on outside)

Phew! lots of peeling of liquid mask in between layers of paint. After the first eight coats I had to re-cut most of the markings, since the layers of paint were building up too much to peel it cleanly. Plenty of work!
 
Great build thread!

I enjoyed reading through it all!

I would like it known that your original Yeti tribute paint job was IMHO a top 5 all time! great color choices and simplistic graphic look but real geographical tie ins make it original and the less is more concept kept it classy.

Just a top shelf job all around!

Kudos to you brother!

Thanks mate! I appreciate the input on the original paint job - glad you appreciated the geographical references. The next one is not quite as simplistic though...
 
Back
Top