Looks mean with Traxx up front and tires out back. Keep moddin' lol.
Thank you!
Looks mean with Traxx up front and tires out back. Keep moddin' lol.


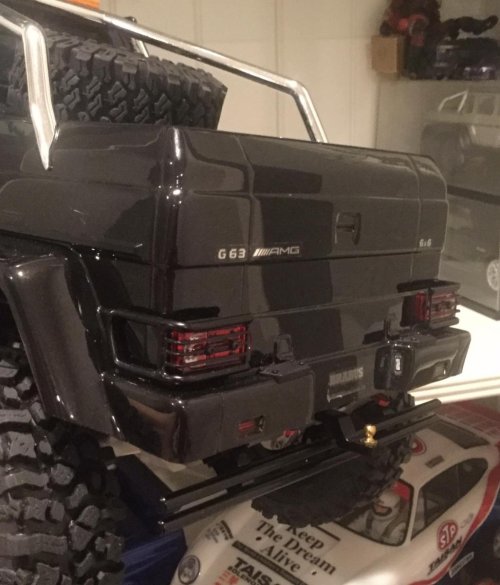
Installed an aluminum rear bumper with a hitch receiver. Had to cut the body to clear.


Nice stealth mod, I have the RC4WD one, I didn’t need to cut the body but it sits lower so probably not good for crawling.


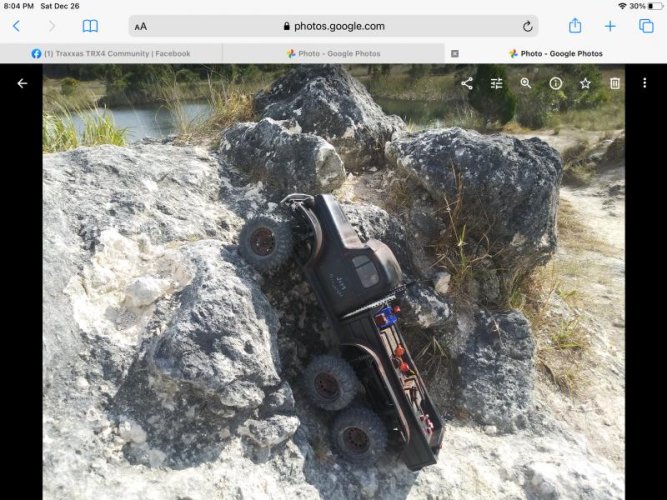
Very nice pictures, does the shocks still works smoothly with the tilted angle like that? especially after running trough dusty trail runs.
Also you need to adjust your 2nd and 3rd axle upper links so the drive shaft will more straight to reduce vibrations and increase efficiency. Right now the 2nd axle is pointing down a bit at the back and 3rd axle is tilted slightly up . I had the same issue when I replaced my trx6 axles with aluminum one. It’s a simple adjustment by making the upper links shorter.
")
I wouldn't think shock angle would cause a leak, maybe check the caps and make sure they are tight. I have had to re-seat the o-ring on several shocks as well, seemed to help. But I've mounted them almost horizontal before without it causing a leak, at least not any more than Axial shocks already leak
Sounds good! When I have time, I'll take them apart and service them. Thanks for the advice! What weight shock oil do you guys use? I've heard from people using oil weight ranging from 20 to 30, but that's quite a broad range. The factory oil in my front shocks seems to be too stiff to my liking.
 on't get me wrong I'm not a mod snob and I get that 90% of this hobby is 'hop ups' I just wonder how much they really affect, all things being equal on a light toy truck.
I kind of knew, but learned a lot more about it in another thread the other day, that preload doesn't affect spring rate (doesn't make them stiffer). If you are seeing slower compression/rebound it very likely could be shock oil weight, or a combo of that and the springs. Sure others will chime in with some real advice lol. But shock oil is easy enough to swap out if you want to test the theory.
Great build photos. I wish I would of followed mine every step. Try the shock mods that you use white Teflon tape. You don’t tighten the caps as much and frees up the shaft thru the O rings. I use 80wt for a smooth articulation. I spooled the front after I overdrived it. That free’d a position on the transmitter. I am using the Dual Sound E.S.S. The available channel gets the yellow wire. I now have the Dixie horn along with a good V-8 downloaded. I am running a 9T pinion with a 3S Lipo. I am using the dual stage foams with hard outer foams. Tallest one with two outer foams. I am running the Canyons modded and sipped for dirt/Limstone. Another set of Hyrax for smooth rocks. I don’t take mine out when social crawling as it does not play well with 4x4’s. Holmes Hobbies makes hand wound brushed motors that do everything better. I have his Torque Master Pro 550 21T with a 10 pinion on my other TRX-4. Crawlers slo-mo and faster than stock. I have his 27T waiting for the 6x6. Wanted to share what works for me. Nice build.
Spooling the front axles seem like a great idea. I lock the fronts most of the time anyways. Would you mind if get in contact with you when I change out the motor and ESC? I may need some help with some tips on that. Again, thank you for chiming in!Jeff6x6: That’s some amazing info. Thank you for sharing. I’m going to try that Teflon tape trick
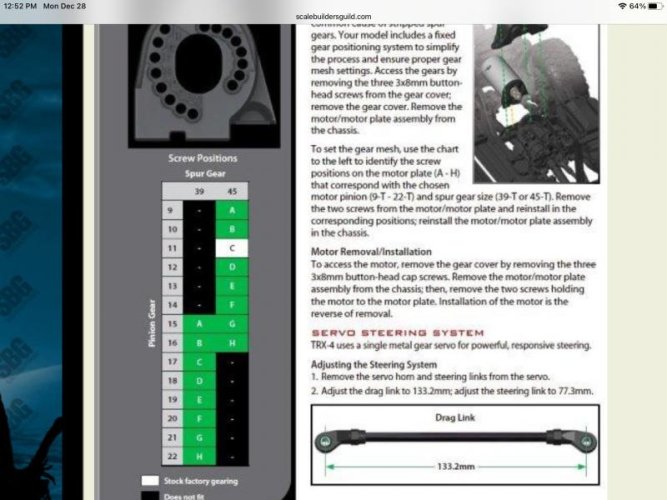
Sure...I do not visit this site often as I do Facebook. I have 3 sites I am active with. Posts get responses within minutes. Some comments I have are months old here and no other posts added. The chart is not as clear as it could be. A 9T for the 45 Spur puts you at bottom A bolt and the other set of holes ...top right. This gives the bolt pattern vertical lined up. The Hoby Wing ESC has an open plug available but I spliced into the main plug and added a power splitter . I cut one end off and soldered on and electrical dipped. That gave me two power leads to hook accessories up. Some people have install issues with the 1080. I read the instructions and got it the second attempt. I YouTube any new install. It is great to know what to expect before you pick up a tool and dig in. I had parts that stayed in boxes for some time till I was comfortable enough to start the mods. Please keep posting your progress ;as a lot of readers learn and enjoy other build posts.

Jeff6x6: That’s some amazing info. Thank you for sharing. I’m going to try that Teflon tape trick
I don’t feel much difference between the ti-nitride shafts and the stock stainless shafts. But they do look a lot cooler! 


When I fully compressed the shocks, I can see the oil slowly seep out.