It's a bummer given the third member is not sold separately in plastic. I'm a little surprised Vanquish hasn't offered replacementsIt was fairly common to get two front or two rear third members. I got two rears with mine.
-
Welcome to RCCrawler Forums.
It looks like you're enjoying RCCrawler's Forums but haven't created an account yet. Why not take a minute to register for your own free account now? As a member you get free access to all of our forums and posts plus the ability to post your own messages, communicate directly with other members, and much more. Register now!
Already a member? Login at the top of this page to stop seeing this message.
You are using an out of date browser. It may not display this or other websites correctly.
You should upgrade or use an alternative browser.
You should upgrade or use an alternative browser.
Thloftus’ Gravity Well H10 Optic kit
- Thread starter Thloftus
- Start date
Made some more progress with the front axle while waiting for the aluminum third member to arrive, hopefully sometime today according to my email.
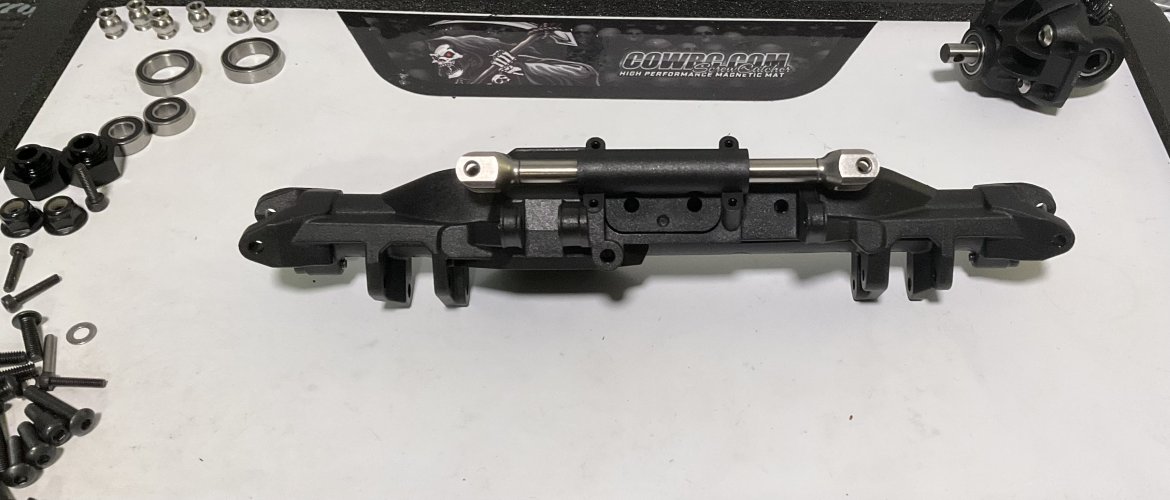
Ram for the hydro steering assembled. Not the most exciting picture. The parts went together well. There’s friction in the slip fit for the rod, but that’s probably necessary to avoid slop in the steering. Will be interesting to see if it loosens up over time or if that becomes an issue. Having some kind of keyed reference for the two ends would be helpful. In the current setup, they’re free to rotate while screwing the parts together. I eye-balled the relative alignment. There’s not a great reference once the rod is installed into the ram as required before attaching the ends – without this you could install one end and hold the rod / second end flat against a surface while screwing the second one in place.
Ok, probably way too much in the weeds on that one …
I should have squared up the picture. Feels like I'm falling off the edge of the world.

With the ram placed onto the front axle. The interlocking mounts for the ram and the servo mount are pretty sweet. The fitment is notably good in that everything holds together prior to installing the screws.
Servo before unboxing. It’s a pretty one for sure

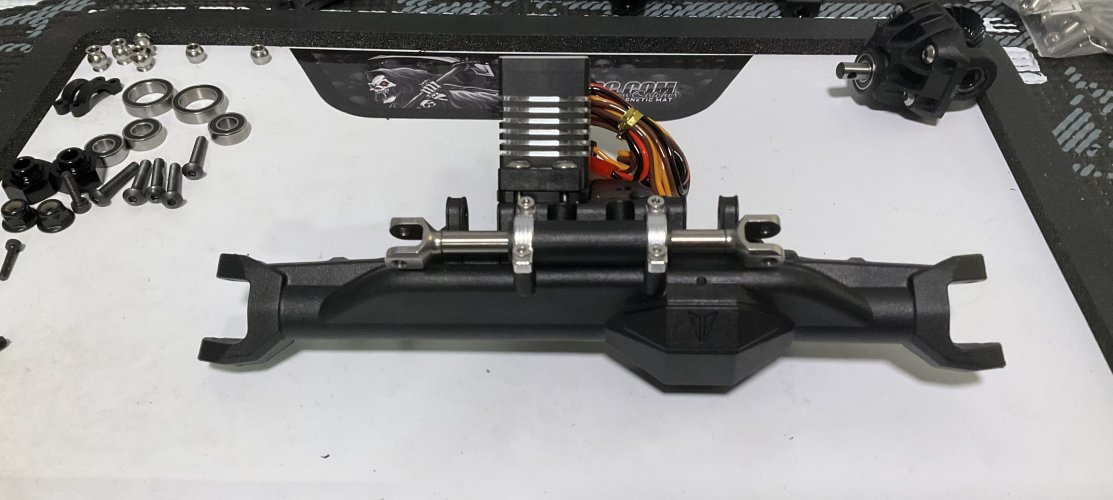
With the servo installed on the axle. The manual calls for using 16 mm M3’s to mount the servo. These ended up poking out the bottom on one end, so I replaced them with 12 mm screws. There’s still plenty of thread engagement and the ends are flush on the backside with under side of the servo mount. Have any of you used the brass servo mounts? Seems like a great way to add weight to the axle, although it’s cantilevered – are weights on the steering axles better or does it not matter?
The face of the servo is also very attractive. and well machined Thought I’d show that off. I haven’t used this servo before. I actually don’t think it’s made anymore. Or at least it’s no longer on the Holmes Hobbies website. I really need to get more on top my hobby and not wait so long to use this stuff!

See you next time!
Ram for the hydro steering assembled. Not the most exciting picture. The parts went together well. There’s friction in the slip fit for the rod, but that’s probably necessary to avoid slop in the steering. Will be interesting to see if it loosens up over time or if that becomes an issue. Having some kind of keyed reference for the two ends would be helpful. In the current setup, they’re free to rotate while screwing the parts together. I eye-balled the relative alignment. There’s not a great reference once the rod is installed into the ram as required before attaching the ends – without this you could install one end and hold the rod / second end flat against a surface while screwing the second one in place.
Ok, probably way too much in the weeds on that one …
I should have squared up the picture. Feels like I'm falling off the edge of the world.

With the ram placed onto the front axle. The interlocking mounts for the ram and the servo mount are pretty sweet. The fitment is notably good in that everything holds together prior to installing the screws.

Servo before unboxing. It’s a pretty one for sure

With the servo installed on the axle. The manual calls for using 16 mm M3’s to mount the servo. These ended up poking out the bottom on one end, so I replaced them with 12 mm screws. There’s still plenty of thread engagement and the ends are flush on the backside with under side of the servo mount. Have any of you used the brass servo mounts? Seems like a great way to add weight to the axle, although it’s cantilevered – are weights on the steering axles better or does it not matter?

The face of the servo is also very attractive. and well machined Thought I’d show that off. I haven’t used this servo before. I actually don’t think it’s made anymore. Or at least it’s no longer on the Holmes Hobbies website. I really need to get more on top my hobby and not wait so long to use this stuff!

See you next time!
An email to vanquish customer service and they'll send out the proper parts free of charge.It's a bummer given the third member is not sold separately in plastic. I'm a little surprised Vanquish hasn't offered replacements
Those Holmes SHV650s have been good for me.
Just need to Email Customer Support at Vanquish and they'll get one out to you.It's a bummer given the third member is not sold separately in plastic. I'm a little surprised Vanquish hasn't offered replacements
I picked up one of the brass servo mounts for my front axle (4WS mine). Let the rear stock for now, but it will likely end up with the VP Aluminum mount.Made some more progress with the front axle while waiting for the aluminum third member to arrive, hopefully sometime today according to my email.
Ram for the hydro steering assembled. Not the most exciting picture. The parts went together well. There’s friction in the slip fit for the rod, but that’s probably necessary to avoid slop in the steering. Will be interesting to see if it loosens up over time or if that becomes an issue. Having some kind of keyed reference for the two ends would be helpful. In the current setup, they’re free to rotate while screwing the parts together. I eye-balled the relative alignment. There’s not a great reference once the rod is installed into the ram as required before attaching the ends – without this you could install one end and hold the rod / second end flat against a surface while screwing the second one in place.
Ok, probably way too much in the weeds on that one …
I should have squared up the picture. Feels like I'm falling off the edge of the world.
View attachment 509749
With the ram placed onto the front axle. The interlocking mounts for the ram and the servo mount are pretty sweet. The fitment is notably good in that everything holds together prior to installing the screws.
View attachment 509750
Servo before unboxing. It’s a pretty one for sure
View attachment 509751
With the servo installed on the axle. The manual calls for using 16 mm M3’s to mount the servo. These ended up poking out the bottom on one end, so I replaced them with 12 mm screws. There’s still plenty of thread engagement and the ends are flush on the backside with under side of the servo mount. Have any of you used the brass servo mounts? Seems like a great way to add weight to the axle, although it’s cantilevered – are weights on the steering axles better or does it not matter?
View attachment 509752
The face of the servo is also very attractive. and well machined Thought I’d show that off. I haven’t used this servo before. I actually don’t think it’s made anymore. Or at least it’s no longer on the Holmes Hobbies website. I really need to get more on top my hobby and not wait so long to use this stuff!
View attachment 509753
See you next time!
The Brass mount I got looks exactly like the Meus mount, but without the laser etching of Meus and the extra 15.00.
I got mine on Ebay for like 18.00 shipped from the Chy-Nas. Most no names were 22-28, while the Meus was 30.
Do you mind sharing a link to the one you purchased? Don’t know if I’ll need it, but will bookmark just in case.I picked up one of the brass servo mounts for my front axle (4WS mine). Let the rear stock for now, but it will likely end up with the VP Aluminum mount.
The Brass mount I got looks exactly like the Meus mount, but without the laser etching of Meus and the extra 15.00.
I got mine on Ebay for like 18.00 shipped from the Chy-Nas. Most no names were 22-28, while the Meus was 30.
I should have realized an email to Vanquish customer service would work. Hopefully my comment didn't come off poorly.An email to vanquish customer service and they'll send out the proper parts free of charge.
Those Holmes SHV650s have been good for me.
Great to hear SHV650s have worked well for you! I'm excited to give it a try
Thank you - I should have thought to email Vanquish customer support ...Just need to Email Customer Support at Vanquish and they'll get one out to you.
I picked up one of the brass servo mounts for my front axle (4WS mine). Let the rear stock for now, but it will likely end up with the VP Aluminum mount.
The Brass mount I got looks exactly like the Meus mount, but without the laser etching of Meus and the extra 15.00.
I got mine on Ebay for like 18.00 shipped from the Chy-Nas. Most no names were 22-28, while the Meus was 30.
Nice to hear that you found a brass mount that's working!
I would also be interested in a link if you're able to share. There's a huge number of options on ebay ...Do you mind sharing a link to the one you purchased? Don’t know if I’ll need it, but will bookmark just in case.
Received the aluminum front member! Here it is in the package. Seemed worthy of a full un-boxing

With the gears installed. My only regret in all this is that I greased the gears before (originally) for test fitting in the axle. Made the transfer a little messy. Beautiful assembly in the end. The machined Vanquish parts are very well done. The gears are buttery smooth. May need to get the aluminum rear member now that I’ve seen how this one went together.
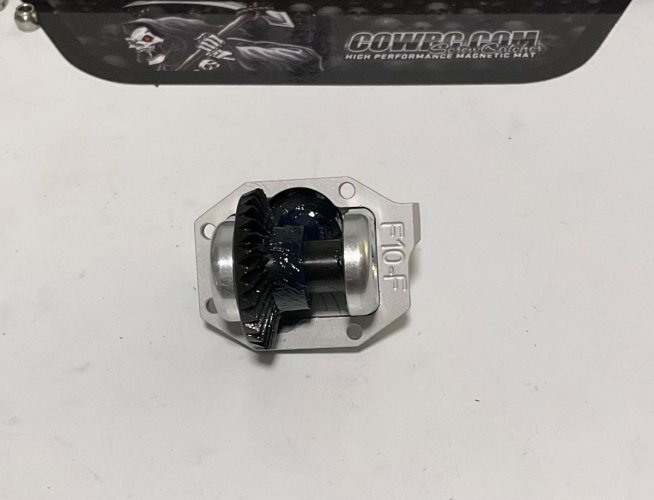
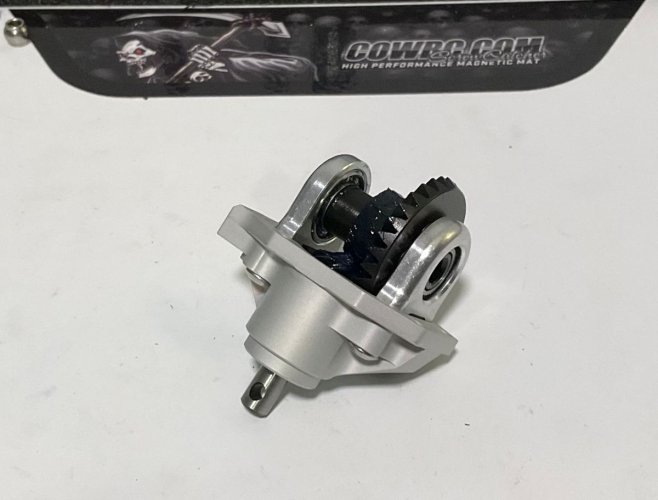
Installed on the axle. Fit together perfectly. Fantastic tolerances. Super satisfying to assemble.

Next up are the knuckles and universals. I may look into metal knuckles if these are available, although the plastic looks like it will last. Silver knuckles could look sweet with the black/silver theme that’s emerging for this rig.
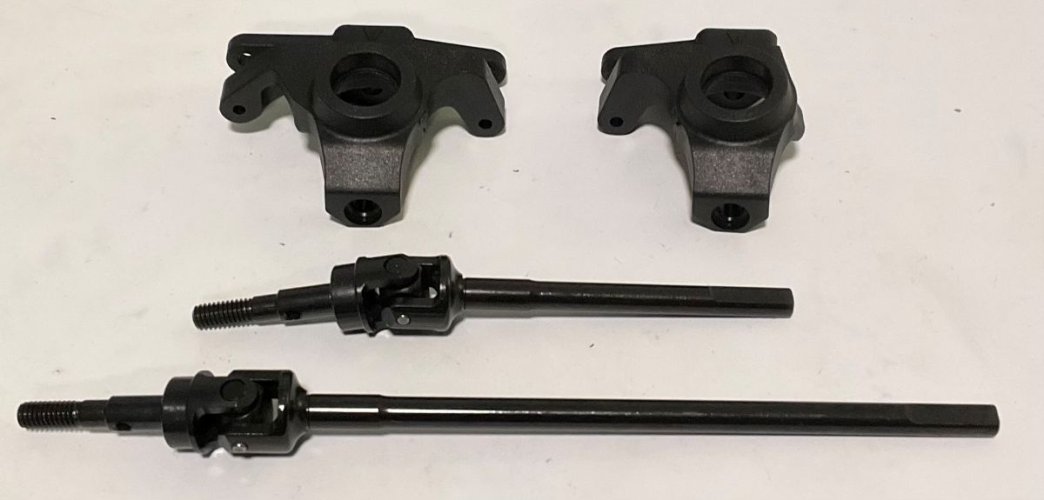
And the front axle is done! Well, all except for attaching the drag link to the servo. Just need to center the servo to get that part done. I think I have enough electronics on hand to do this and separately power the servo.

Take care until the next one!

With the gears installed. My only regret in all this is that I greased the gears before (originally) for test fitting in the axle. Made the transfer a little messy. Beautiful assembly in the end. The machined Vanquish parts are very well done. The gears are buttery smooth. May need to get the aluminum rear member now that I’ve seen how this one went together.


Installed on the axle. Fit together perfectly. Fantastic tolerances. Super satisfying to assemble.

Next up are the knuckles and universals. I may look into metal knuckles if these are available, although the plastic looks like it will last. Silver knuckles could look sweet with the black/silver theme that’s emerging for this rig.

And the front axle is done! Well, all except for attaching the drag link to the servo. Just need to center the servo to get that part done. I think I have enough electronics on hand to do this and separately power the servo.

Take care until the next one!
89Industries
Quarry Creeper
I should have realized an email to Vanquish customer service would work. Hopefully my comment didn't come off poorly.
Great to hear SHV650s have worked well for you! I'm excited to give it a try
I second the old shv650 being a good servo. Have 2, no issues at all. I wish you could still get them, I'd buy more.
I checked for Jato, but the seller has no more available. I did find another seller that had them listed for just under 23.I would also be interested in a link if you're able to share. There's a huge number of options on ebay ...

Bridge Servo Block Brass Servo Mount for Vanquish Phoenix H10 OPTIC | eBay
L Applicable Model: for Vanquish Phoenix H10 OPTIC. l 1 x Brass Servo Mount. Antenna Head Antenna Connector for Walkie-Talkie EVX-261 VX531 evx261. l Material: Brass. Bucket Gear Mop Buckets Replace Parts for vileda/O-Cedar Easywring RinseClean.
www.ebay.com
Great to hear! I’m looking forward to trying it fout!I second the old shv650 being a good servo. Have 2, no issues at all. I wish you could still get them, I'd buy more.
Thank you!I checked for Jato, but the seller has no more available. I did find another seller that had them listed for just under 23.

Bridge Servo Block Brass Servo Mount for Vanquish Phoenix H10 OPTIC | eBay
L Applicable Model: for Vanquish Phoenix H10 OPTIC. l 1 x Brass Servo Mount. Antenna Head Antenna Connector for Walkie-Talkie EVX-261 VX531 evx261. l Material: Brass. Bucket Gear Mop Buckets Replace Parts for vileda/O-Cedar Easywring RinseClean.www.ebay.com
Sometimes progress is in a straight line and other times, not so much. Or maybe it’s just the curvature of my local space time getting in the way.
I realized it’s easy to add scale hex bolts to the front axle knuckles. Not the first person to notice this, but pretty sweet regardless. So, I picked up some silver 2 x 5 mm hex bolts. The longer 8 mm length also seems to work fine, but I only had those in black. Here they are installed on the axles. It’s great that Vanquish added these options for customization.
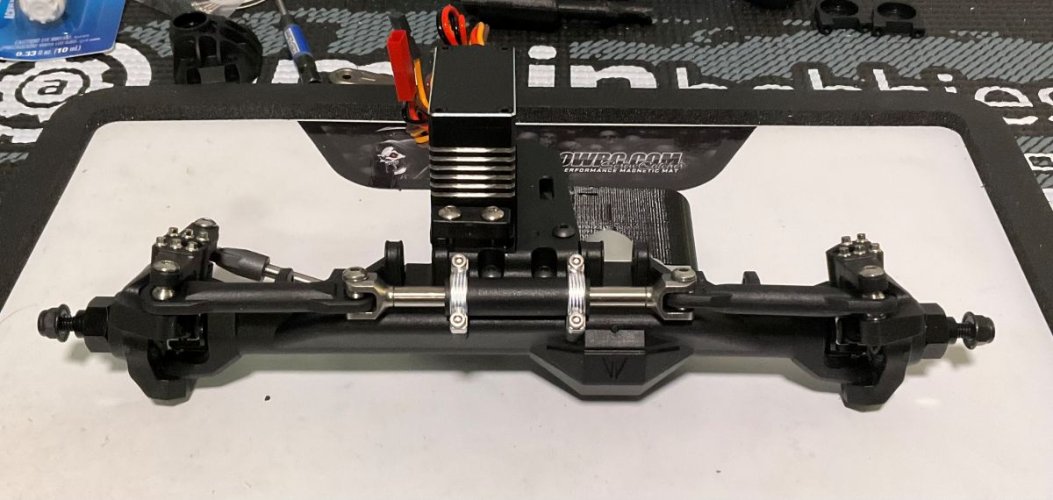


Also vinyl wrapped the 3D printed hood. I’ve never vinyl wrapped anything before and probably should have started with a simpler shape. I did watch several how to videos and got a set of tools ahead of time. I’m happy with the result. It was much easier than I expected and may be something I do more in the future. The “change your mind” flexibility is great and the vinal itself is fairly inexpensive. One down side is the print lines show through. I should have realized this would happen and sanded the print first. I’ll probably print out another hood and give it a second try.

The screen for the hood didn’t print well But I found some scale stainless steel screen and will use this for the final piece.
Take care until next time!
I realized it’s easy to add scale hex bolts to the front axle knuckles. Not the first person to notice this, but pretty sweet regardless. So, I picked up some silver 2 x 5 mm hex bolts. The longer 8 mm length also seems to work fine, but I only had those in black. Here they are installed on the axles. It’s great that Vanquish added these options for customization.


Also vinyl wrapped the 3D printed hood. I’ve never vinyl wrapped anything before and probably should have started with a simpler shape. I did watch several how to videos and got a set of tools ahead of time. I’m happy with the result. It was much easier than I expected and may be something I do more in the future. The “change your mind” flexibility is great and the vinal itself is fairly inexpensive. One down side is the print lines show through. I should have realized this would happen and sanded the print first. I’ll probably print out another hood and give it a second try.

The screen for the hood didn’t print well But I found some scale stainless steel screen and will use this for the final piece.
Take care until next time!
Thank you!Lookin good!
Back to the old ways of delays between posts. There’s probably a good reason in there somewhere. Mostly busier that I wish I was. But no fear, onward progress!
Next up is bag B. In my defense I was waiting for the aluminum 3rd member to arrive before starting this one. The fit for the gears was so nice on the front that I decided the aluminum part was a good idea for the rear also. Makes me want to take a look at my Phoenix again. Ignore the fact that the package is cut open already. I did that a while ago in my confusion over having a rear third member in Bag A.

And the honorary unboxing for the aluminum 3rd member. The Vanquish aluminum parts are always nicely done. The Ziploc-like packaging is a nice touch. Down side is it adds to the collection plastic bags and the temptation to use them instead of better methods for organizing leftovers.

Arranging the gears. I’ve never figured out a good way to hold them during assembly that avoids mashing the sharp-ish teeth into my hands and fingers. Maybe a reason to get some shop rags or similar, lol
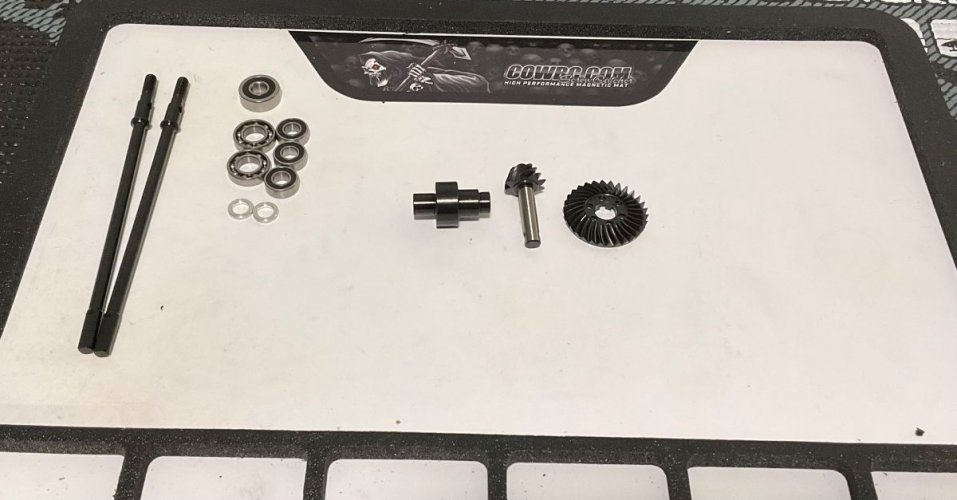
Assembled 3rd member. The parts go together fantastically well with what seems like perfect gear mesh. All butter smooth with no noticeable slop. Satisfying for sure.

And the finished product. I liked the stainless screws for the lock outs in the moment, but may change them back to the stock black after looking at the pictures. The red cap is a nice touch. The included installation tool is great, as others have pointed out.
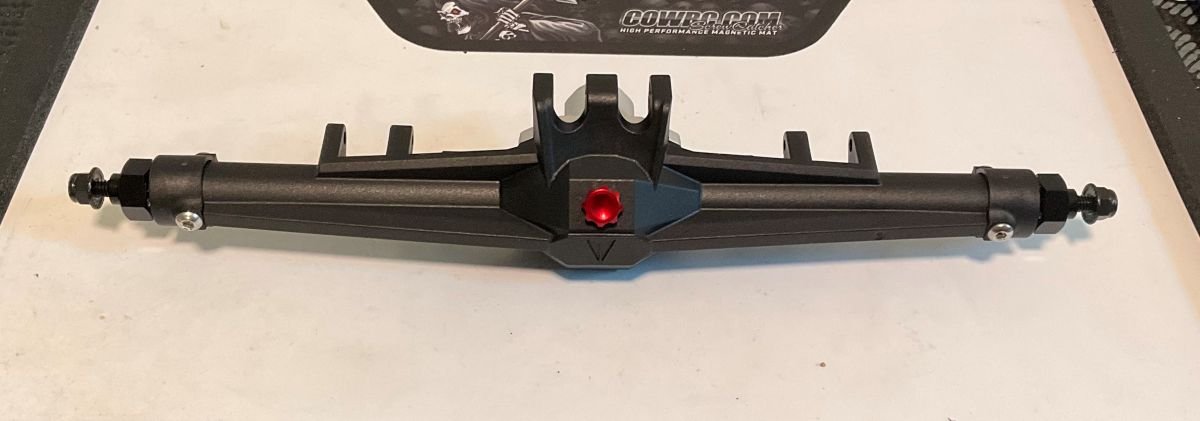
On the flip side, I ran out of stainless screws for installing the 3rd member. I’ll switch out the black ones when the stainless versions arrive. The assembled axle seems very stout. Looking forward to the next steps in this build!

Take care until next time!
Next up is bag B. In my defense I was waiting for the aluminum 3rd member to arrive before starting this one. The fit for the gears was so nice on the front that I decided the aluminum part was a good idea for the rear also. Makes me want to take a look at my Phoenix again. Ignore the fact that the package is cut open already. I did that a while ago in my confusion over having a rear third member in Bag A.

And the honorary unboxing for the aluminum 3rd member. The Vanquish aluminum parts are always nicely done. The Ziploc-like packaging is a nice touch. Down side is it adds to the collection plastic bags and the temptation to use them instead of better methods for organizing leftovers.

Arranging the gears. I’ve never figured out a good way to hold them during assembly that avoids mashing the sharp-ish teeth into my hands and fingers. Maybe a reason to get some shop rags or similar, lol

Assembled 3rd member. The parts go together fantastically well with what seems like perfect gear mesh. All butter smooth with no noticeable slop. Satisfying for sure.

And the finished product. I liked the stainless screws for the lock outs in the moment, but may change them back to the stock black after looking at the pictures. The red cap is a nice touch. The included installation tool is great, as others have pointed out.

On the flip side, I ran out of stainless screws for installing the 3rd member. I’ll switch out the black ones when the stainless versions arrive. The assembled axle seems very stout. Looking forward to the next steps in this build!

Take care until next time!
Similar threads
- Replies
- 78
- Views
- 4K
- Replies
- 2
- Views
- 313
- Replies
- 120
- Views
- 5K
- Replies
- 1
- Views
- 9K
