• Welcome to RCCrawler Forums.

    It looks like you're enjoying RCCrawler's Forums but haven't created an account yet. Why not take a minute to register for your own free account now? As a member you get free access to all of our forums and posts plus the ability to post your own messages, communicate directly with other members, and much more. Register now!

    Already a member? Login at the top of this page to stop seeing this message.

MAC FAB Bomber build, TAKE 2

"Fin" on the back is known as a spill plate, a visible place for your vehicle's number for race scoring/tracking.

Here is shot of hood #2, still a work in progress. To the jury now, should continue with the program or throw it in the scrap bin and start #3? I find the chassis "nose" lines to be a difficult task to overcome. Lip on the back was for the thought of a lower windshield mounting point.
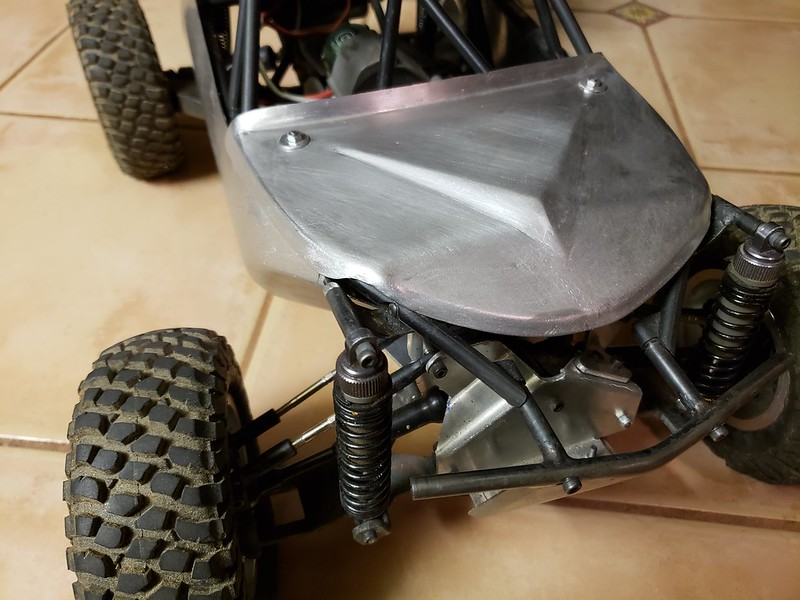

20190201_041902 by MAC FAB, on Flickr
 
Is that just a very thin gauge anealed aluminum? Are you forming them over a wood buck or something like that? I don’t particularly like the v point in the hood but can respect the skills it takes to do it.
 
I'm liking the new hood better on the leading and trailing edges. I agree with the previous comment about the "V," though. The rest of the body is so curvy and swoopy, I think the hard edges muddle it up. If you could make it follow the arc of the leading edge, like a late 60's Corvette L88, I think it might be the ticket.
 
MasteroFlego, I'll get you a pic once the ears are welded on it, perhaps tomorrow. It will be cool looking from the side. Haven't picked up some longer m2.6 screws to mount the sides yet either. Brian5582, .040" aluminum (takes a lot of abuse and doesn't deform and ding easily), not annealed, no buck or hammerform. One piece as it sits. The dart is way better looking in person than this pic shows, still needs to be finish sanded and blended, after the ears are put on. The round nose, I'm not entirely convinced with that, even though it keeps with the shapely/curvy theme happening on this blocky vehicle.
 
As promised, more progress.

20190202_095833 by MAC FAB, on Flickr

20190202_095911 by MAC FAB, on Flickr

20190202_095747 by MAC FAB, on Flickr

20190202_100009 by MAC FAB, on Flickr

Hood is a keeper, note the flowing lines from the rear to front to around the hood and back. "thumbsup" Block mobile now looks different than the rest. Dart in the hood means the roof can stay now. Next, something to finish off the rear. Then strip the car so I can weld up the slits in the sides of the pan. I need a driver/co dawg...home made "action figures"... does it ever end?
 
As promised, more progress.
...
20190202_095911 by MAC FAB, on Flickr
...
Hood is a keeper, note the flowing lines from the rear to front to around the hood and back. "thumbsup" Block mobile now looks different than the rest. Dart in the hood means the roof can stay now. Next, something to finish off the rear. Then strip the car so I can weld up the slits in the sides of the pan. I need a driver/co dawg...home made "action figures"... does it ever end?

You're right. These pictures do make it look right. Great work!
 
Finally a sunny day, so I went to my local spot to give it a run with the new axle format. First, I have to say: FINALLY, NO BROKEN AXLES!!! Second, I am utterly amazed how well this thing goes when it can get traction. (RTR tires) It pretty much goes up, down or over most anything. So I shot about 2 hrs worth of video and found a new passion. I think they call it trail walking? Drove the car down the mountain I had to hike to hit my spot. YEE HAW. 3s battery lasts forever in this thing.

20190216_133458 by MAC FAB, on Flickr

20190216_133408 by MAC FAB, on Flickr

20190216_133329 by MAC FAB, on Flickr

20190216_132818 by MAC FAB, on Flickr

and of course there is the "I ran out of talent" shot.....

20190216_131000 by MAC FAB, on Flickr
 
Lol, nice. I don't have any good crawling spots near where I live so I mostly hike the trails that are near my house.

Sent from my SM-G960W using Tapatalk
 
<iframe width="560" height="315" src="https://www.youtube.com/embed/4fNt-aNqozg" frameborder="0" allow="accelerometer; autoplay; encrypted-media; gyroscope; picture-in-picture" allowfullscreen></iframe>
https://youtu.be/4fNt-aNqozg

TRIP 3

Time to change the hardware that sticks out of the bottom from socket heads to something smoother to reduce hang up on rocks. .090 pan may not like to be countersunk. A little rear shock tune and some time with a Castle link to lose the pipey forward and 100% reverse so its easier to go slow. Drag brake too, its got none now.
 
Continuing with the addiction, the new Bomber cage arrives by next Wednesday. Build a solid axle rig or another "unusual" build?
 
My Bomber axles are roughly 250mm wide from center of tire to center of tire, my TRX-4 are about 200mm.

That's about 2 inches wider!
 
Thanks. I picked up a TRX 4 front, complete, $10 off flea bay, guaranteed. We'll see when it shows up.
 
Is it feasible to remove the portals off the axle to apply in an IFS application, perhaps even cutting/removing the axle tubes to use the pumpkin so I get a locker? Is this idea a "Major Tom to ground control" moment or doable? Anone had their' axle torn apart to verify my pipe dream? I can have bearing carriers 3D printed or machined if necessary.
 
Is it feasible to remove the portals off the axle to apply in an IFS application, perhaps even cutting/removing the axle tubes to use the pumpkin so I get a locker? Is this idea a "Major Tom to ground control" moment or doable? Anone had their' axle torn apart to verify my pipe dream? I can have bearing carriers 3D printed or machined if necessary.

Have you looked at the Traxxas Summit diffs? They're definitely larger than the TRX4, but they're functionally the same (selectable locker) and come in an IFS/IRS package.
 
Back
Top