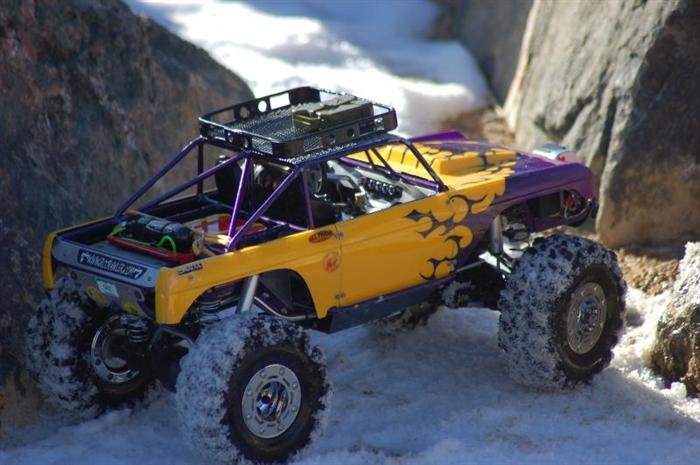
I just read the article in RC Driver by JIA and then searched for this thread...
You have a very awesome rig.
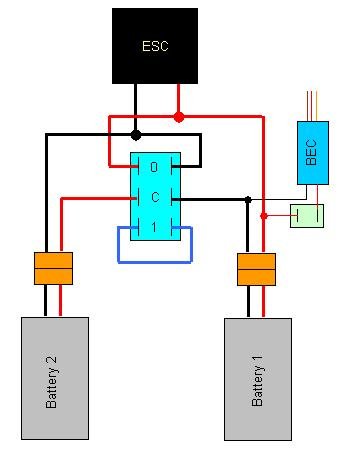
Is there any chance is getting a schematic of the wiring for your "two speed" switch? I am smart enough to know how it works, build it from a drawing, debug, and figure out if it will fry my esc. I just can't figure out how to wire it up.
I thought I might use 2- 2cell LiPos... I don't know if a Sidewinder will handle 14.4 V ?
Here you go.
The light blue switch is a DPDT center-off toggle (double pole double throw). The light green switch is a SPST toggle (single pole single throw). Assuming you use 7.2V 1500 mAh batteries:
-When thrown in position "0" it connects the common ("C") pole to "0" pole. Thus connecting the batteries in parallel (7.2V, 3000 mAh) to the ESC.
-When thrown in position "1" it connects the common ("C") pole to "1" pole. Thus connecting the batteries in series (14.4V, 1500 mAh) to the ESC.
-When thrown in the center position (off) it disconnects all battery power to the ESC.
The BEC is connected directly to battery 1. I did this so that even when the batteries are in series, the BEC would always be converting 7.2V to 6V and would never have to work too hard. This also keeps power going to the RX while you are switching voltage so the Spektrum radio never loses it's bind. This is also why there is a switch for the BEC (light green), this way you can kill power to the BEC and shut down the RX. Otherwise the BEC will always be drawing power from battery 1.
To turn on the rig: Turn on the BEC switch, then turn on the "shifter" switch.
To switch voltages ("gears"): Just flip the "shifter" switch from position 1 to position 0, or vise-versa.
To turn off the rig: Put the "shifter" switch to the center (off) position, turn off the BEC switch.
The switches I used in Guido:
"Shifter" switch;
Radio Shack model number 275-664, DPDT center-off toggle, rated 6A@125VAC
BEC switch;
Radio Shack model number 275-624, SPST Micromini toggle, rated 3A@125VAC
Thanks for all the great comments guys. "thumbsup"