• Welcome to RCCrawler Forums.

    It looks like you're enjoying RCCrawler's Forums but haven't created an account yet. Why not take a minute to register for your own free account now? As a member you get free access to all of our forums and posts plus the ability to post your own messages, communicate directly with other members, and much more. Register now!

    Already a member? Login at the top of this page to stop seeing this message.

BluJeep builds a Toyota (Phoenix)

I put mine up beside the steering servo. It's in a receiver box that I found on Thingiverse. It does not seal, but will serve as a splash guard in case I get into shallow water or mud.

View attachment 402423


Thanks everyone, I think I’m going to put it up front. I mocked up a simple styrene box, I just need to figure out how to attach a lid.

Or if that doesn’t work, I found a couple of 3D print files. Don’t have a printer so I’d have to send it out.

B-MOW-71, did you attach yours to the servo mount holes?


Sent from my iPhone using Tapatalk


I made a plate and attached it with screws. I used 3M servo tape to attach the receiver box to the plate.

0415b617adca9801721b7a9452d82285.jpg


17e25e82c082ca7abf0b70da00d34e39.jpg


Sent from my iPhone using Tapatalk
 
Last edited:
I made a plate and attached it with screws. I used 3M servo tape to attach the receiver box to the plate.

Looks great, thanks! My handmade box idea didn't work out, I went to screw the lid on and it cracked. :shock: So going the 3D printed route also.
 
Well my 3D printed receiver box finally showed up!

I used this as an opportunity to do another design in Fusion 360. I've been watching YouTube tutorials from Paul McWhorter (Learn Fusion 360 or Die Trying!) and I was able to fab this little guy up. I used my failed styrene box to help me get the measurements right.

019AA41C-36EF-4936-86C6-8F95620B83C5.jpeg


17DBF2AE-D53B-4977-AA03-D1ACC2787BEC-scaled-e1680666240981.jpeg


There are some things I'd like to change for the next one but I'm pretty happy with this, and it will do for now. There's a lip on the inside of the lid which I should have made a little smaller; I had to sand and trim a bit for it to fit. The box is also little thin, so not sure how long it will last, lol.

This was printed at JawsTec in MJF nylon. I had a hinged body mount printed there in the same material and it has been super tough so far. We'll see how it does here.

I used some silicone tape to make a seal at the opening.

9F982CDB-407D-4F27-9DBB-2BEB1A550048-scaled-e1680666228908.jpeg


AC8ACC9F-EFE3-444D-97D7-74E531BE10FB-scaled-e1680666276593.jpeg


E34F04AE-752C-4331-9F93-E1F84024F0B3-scaled-e1680666266293.jpeg
 
Last edited:
The Rx box looks good. I don't know anything about the material, don't have a printer yet but I'm sure it will hold up if it's nylon. The silicone tape gave me an idea, I might just make my own from a tube of silicone I have to seal my Rx. Just thought of making a silicone gasket for the top too. "thumbsup"
 
Receiver box looks great and fits in there perfectly! I like that you made it tall enough so that the wires have room to be plugged in.

The box that I printed is a little short and the wire that are plugged into the receiver are somewhat smashed when the lid is on.

I need to check out that YT vids you watched and learn more about Fushion 360 so that I can design and modify my own parts. As of now I know just enough to make small parts, but takes me forever!:roll:
 
The Rx box looks good. I don't know anything about the material, don't have a printer yet but I'm sure it will hold up if it's nylon. The silicone tape gave me an idea, I might just make my own from a tube of silicone I have to seal my Rx. Just thought of making a silicone gasket for the top too. "thumbsup"


Thanks! I thought about that too. But this should be dirt and splash resistant at least, not going to be dunking it.


Sent from my iPhone using Tapatalk
 
Receiver box looks great and fits in there perfectly! I like that you made it tall enough so that the wires have room to be plugged in.

The box that I printed is a little short and the wire that are plugged into the receiver are somewhat smashed when the lid is on.

I need to check out that YT vids you watched and learn more about Fushion 360 so that I can design and modify my own parts. As of now I know just enough to make small parts, but takes me forever!:roll:


Thanks! That was one of my goals, to leave enough room for wires to avoid kinking.

I’m a total noob with Fusion too, so this took me a long time to make. But the videos helped, definitely recommended.

Having a mock-up helped get the dimensions and screw holes right. I’d like a set of calipers for next time.


Sent from my iPhone using Tapatalk
 
Finally got some paint on the Phoenix body. I sprayed silver backed with black on the inside, and this PS-32 Corsa Grey on the outside. I love it. Originally I was going to paint the top white and buy some white or silver wheels and a white Toyota grille.

But I’m broke atm so stock black wheels and grille it is. And I’m going to see what the top looks like in black. I may try to weather it and then seal it up with matte clear.

d437d0970ff07a958bac1a39812eb65f.jpg


c29692833eaa9f1ab5505cdc80215861.jpg


Sent from my iPhone using Tapatalk
 
That classic color is going to look great with a little weathering.

You could still paint the top white before it is sealed with matte clear. Also, I would paint the window trim black or silver on the outside instead of using the decals. It's more work, but looks great in the end. I painted mine black with matte clear and it looks great. Just a though.


Cool, thanks! What kind of paint did you use for the window trim? I have some Tamiya black acrylic I could brush on.

Also, what did you use for the matte clear? I was thinking of using the PS55 clear.


Sent from my iPhone using Tapatalk
 
Cool, thanks! What kind of paint did you use for the window trim? I have some Tamiya black acrylic I could brush on.

Also, what did you use for the matte clear? I was thinking of using the PS55 clear.


Sent from my iPhone using Tapatalk

I use Tamiya PS-5 black spray can and top it off with a couple coats of the PS-55 flat clear. I normally use the outside film for the masking when spraying the black on the outside. Without the film I use the green frog tape to tape off the window trim and the rest of the body to spray the black on the trim.

I don't have a close up of mine at the moment, but have this pic if you are able to zoom in to see what it looks like. The top, hinges and fender flares are painted black the same way.

IMG_0290.jpg
 
I use Tamiya PS-5 black spray can and top it off with a couple coats of the PS-55 flat clear. I normally use the outside film for the masking when spraying the black on the outside. Without the film I use the green frog tape to tape off the window trim and the rest of the body to spray the black on the trim.

I don't have a close up of mine at the moment, but have this pic if you are able to zoom in to see what it looks like. The top, hinges and fender flares are painted black the same way.

View attachment 402679


Thanks, that looks great!


Sent from my iPhone using Tapatalk
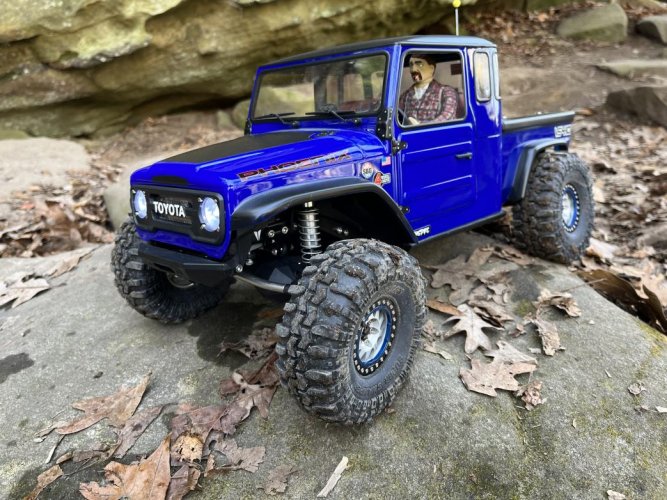
 
Finished up the body, turned out better than I thought. Using the PS-55 flat clear on top really helped unify the surface. I’ll weather it and add some more scale details at some point.

Took it out for a shakedown run, it did awesome! Super smooth and quiet with the Fusion SE motor. Very good slow control too.

The only problem I have is the shocks are leaking pretty bad despite using green slime. But since the o-ring pack in the shock body is pre assembled, I didn’t put any on those. Just used it on the shaft threads when sliding them through. Otherwise I’m super stoked with this little truck!

d46b80e802350b904a4e113ae5de0e06.jpg
 
Body looks great! The black trim and top turned out great!

When I built my shocks I used a toothpick to try and spread as much green slime in the packing I-rings as I could. I really haven’t seen any leaking yet. It may be a good idea to remove the o-rings and apply more slime. IMO these shocks are a huge improvement over the Incision shocks that came with my Origin and Pro.


Sent from my iPhone using Tapatalk


Thanks! I didn’t like the black top at first, it was too shiny and stood out too much. But a coat of flat clear made it much better. Need to find a driver.

I’ll pop the shocks and try adding more slime when I get motivated, lol.


Sent from my iPhone using Tapatalk
 
Back
Top