• Welcome to RCCrawler Forums.

    It looks like you're enjoying RCCrawler's Forums but haven't created an account yet. Why not take a minute to register for your own free account now? As a member you get free access to all of our forums and posts plus the ability to post your own messages, communicate directly with other members, and much more. Register now!

    Already a member? Login at the top of this page to stop seeing this message.

1/6 Wraith/Nylint TJ Jeep + scale quad

Your spare tire mounted in the middle of the body will warrant a longer lunette to keep from hitting the spare. Mine was mounted more to the right side of the rear body, so while I had clearance to the left 90 degrees, I only had 45 degrees to the right, if Jeep and trailer were on level ground.

If I had left the spare mounted to the rollbar, I would have had 90 degree to jackknife in both directions in reverse.

On your Toy above, you have clearance all around because the spare is in the bed.
 
Your spare tire mounted in the middle of the body will warrant a longer lunette to keep from hitting the spare.

On your Toy above, you have clearance all around because the spare is in the bed.
Yep I realize that...
and I thank you for the reminder.

So like you mentioned...
I may need use a longer pintle ( Lobster clasp )
or base mount for my custom Max coupler to clear the spare
tire during departure and entry angles.

Was thinking of removing the spare from the back of the TJ
and instead mount it at the front or rear of the trailer like on my 1:1 trailer.

But I kinda like the TJ with the spare mounted at the rear when
the trailer is not attached.
Ideally... it would be great if I could remove the pintle when not needed.
But fabricating a way to remove it would be difficult and more work.

Not really excited about the pintle sticking out past the outer surface
of the spare tire...
But I realize that the articulation pivot for spare clearance needs be further rearward.
I would suppose in doing so...
the hitch will hamper my TJ's entry/departure angles when the trailer is not towed behind.

So I'm likely boogered either way I go. Lol

But if I do that... then
at least the spare tire on the TJ would garner some protection
by the trailing pintle guarding the spare from abrading the ground.

^ more like a tail dragging anchor... but I'll guess it's gotta be.


Guess I'll need think about this for a moment.
 
no you can't see the second picture

when you first posted it the 2nd picture was see-able, then after you added the 3rd pic of the quad on platform and the 4th one the couch picture

the 2nd one crashed after that

:flipoff: fix your picture
nope... i see 'dem all /or maybe I do not care :flipoff:

don't need a stinkin' trailer... to cart around the toys.

just get a big enough truck :shock:

atv-truck-rack__2.jpg


got an even bigger turd ?! :shock:
just need a bigger truck :twisted:

Over-Box-Over-Cab-for-4-seater-Side-X-Side-UTV-4XP-66-1-xl.png


if neither of those pictures work for you... TFB
C3nwu.gif
 
Last edited:
You're slacking, your trailer isn't orange yet:lmao:, but the quad fits nicely on top"thumbsup"

I'm glad the corners didn't sustain damage when you pulled the tubes off "thumbsup"
 
Last edited:
Dell, that's the same clasp I used for a pintle, I found mine at the local Home Depot, picked up the smallest one they had, think they cost $2.39 each. I say they, because they are made out of pot metal, and when I tried to braze to the rear bumper, it melted like wax, good thing I bought 2.

If this helps: I used a trigger snap for the pintel hitch on my big Jeep, I found some that were made out of stainless at TCS, they're intended to be used for horse bridles.

Z1113wfo5oy.JPG


While it wasn't a 100% scale representation, it worked really well, never broke or became disconnected. Since it was stainless, I was able to braze it into a pocket that I had on the rear bumper skin. There's a few pics of it buried someone in the build thread for my orange Jerp. The trailer has been in Zoso's collection for a while now.
 
Last edited:
You're slacking, your trailer isn't orange yet:lmao:, but the quad fits nicely on top"thumbsup"

I'm glad the corners didn't sustain damage when you pulled the tubes off "thumbsup"
...would seem so

reason it ain't orange yet...

is 'cuz I'm still in the process of trying to remove the residual remaining
where those posts were adhered in the corners.

What the hell was it ? Lol

looks like a black sticky tape was first applied...
then maybe shoe goo or some other silicone adhesive
was applied over the top of that !?

Is proving to be a little stubborn to remove :???:

It's almost there
But PD doesn't look good sprayed over residual boogers :oops:

Sorry I'm not gonna use your chuck wagon hoops/hoodie materials.
The corner posts sorta use up the space I need utilize.
Plus I contemplating building a trailer lid / platform for the Quad.

Yer chuck wagon cover design was quite tall...
but was actually not tall enough to fit over muh quad :cry:

so that's my excuse for little happening !? Lol

If this helps:
thanks for the heads up... still weighing my options.
 
Last edited:
Not sure, I know it wasn't a 2-part epoxy. It was either some stuff called Foam-Cure, got it from Hobbytown, it's a slow cure superglue. you apply it to both surfaces to be glued, let it dry for 15 minutes, then when it tacks up, put the parts together, sort of like rubber cement. Or it was Loktite Superglue Gel, another slow cure superglue. I don't remember.
 
Not sure, I know it wasn't a 2-part epoxy. It was either some stuff called Foam-Cure, got it from Hobbytown, it's a slow cure superglue. you apply it to both surfaces to be glued, let it dry for 15 minutes, then when it tacks up, put the parts together, sort of like rubber cement. Or it was Loktite Superglue Gel, another slow cure superglue. I don't remember.
...Well I certainly don't know

Is the black stuff the Foam Cure contact adhesive ?

Seems to me the black corner patches are a very hard adhesive...
even scraping with an exacto blade isn't removing that chit.
I'm likely gonna have to sand that smooth enough and call it good.

Additionally... it seems there was a 2ndary adhesive applied.
further supporting the posts into the corners.
This adhesive remained flexible like shoe goo would.

No matter... I'll get the chit off one way or another.
at least good enough to PD spray the trailer orange ;-)
 
Both glues are clear, and dry clear. The only thing I can think of is maybe the black is a chemical reaction between the glue and the coating on the brake line. Those 4 pieces of pipe were 1/4 inch coated brakeline.
 
Both glues are clear, and dry clear. The only thing I can think of is maybe the black is a chemical reaction between the glue and the coating on the brake line. Those 4 pieces of pipe were 1/4 inch coated brakeline.
maybe those black patches are actually the abs surface

I thought they looked slightly raised... buttt... maybe not.
oddly rectangular... like square tape coming out the inner corners.

What color was this trailer when you first got it ? green ?

I guess the glued/posts just ate the paint off ? :dunno:

No matter... think I have it cleaned up good enough for PD chit.

PDing the box was gonna be put off for a bit anywys
as I'm still working on configuring the hitch assembly.

gotta pull it. .. before it gets PD'd ;-)
 
Welp... constantly hanging up on the Frt fenders at severe angles.
And even caused a tear (crack) on the passenger side, that I needed to repair.

So I think I'm going to trim those back some...
and add some solid 1/4 rod to follow the perimeter of the fenders.
So any further hits or scrapes should be of no concern.

Black line defines the fenders cut off point(s).
Blue lines define where the perimeter tube(rod) is positioned.

Tho' I need make some bends to the rod
to follow and hug the outer contour of trimmed fender lips.

The rod will be tied into the sliders (welded)...
as well...
tied into onto the forward portion of the frame (welded).


Whatcha' think ?
 
Last edited:
Just my opinion and taste. Cut them off and follow the hood for a Comp cut look or like you have it if your going to make stubby hi line fenders.
 
Just my opinion and taste. Cut them off and follow the hood for a Comp cut look or like you have it if your going to make stubby hi line fenders.
Thanks... tho' I'm not really a fan of the straight cut/fender removal.
I want a little bit of fender lip remaining to minimize the dirt kick up,
and build up on the hood and windshield.

Besides I need to keep the right angle ( 90* ) material
or the hood will likely flex too much.
Flexibility is the primary reason the hood cannot be hinged.
ie: if I removed the interior... this body would flex excessively.
And I'd need build a cage and secure the body panels to that.

So basically everything supporting to the body
is critical for keeping it somewhat rigid and square.

This body is not your std abs type plastic.
and so I have to consider it's rigity - stiffness
when removing material from certain areas.

The only reason the fender cracked was...
because the rig took a 40 ft tumble down a rocky hill.
And caught the forward fender corner/lip as it cartwheeled.

Fairly flexible and durable otherwise.
Tho' I'd suspect a cold ambient air might make this
plastic less flexible and more susceptible to cracking.
Thankfully... the SW doesn't ever get that cold.

I also have an unused fresh spare Nylint TJ body...
so I'm not too worried about hacking up/altering this one.
 
maybe those black patches are actually the abs surface

I thought they looked slightly raised... buttt... maybe not.
oddly rectangular... like square tape coming out the inner corners.

What color was this trailer when you first got it ? green ?

I guess the glued/posts just ate the paint off ? :dunno:

No matter... think I have it cleaned up good enough for PD chit.

PDing the box was gonna be put off for a bit anywys
as I'm still working on configuring the hitch assembly.

gotta pull it. .. before it gets PD'd ;-)

Trailer was originally OD Green, underside of trailer is stock molded color
 
Trailer was originally OD Green, underside of trailer is stock molded color
well shoot... then I have no clue what these black patches are in each corner !?
Guess I'll just ignore them and paint over whatever it was.

I think it'll look cool, especially with an exo-cage around the fender lips"thumbsup"
thanks, I think they'll look good enough.
But I'll admit I'm going to have some difficulty bending that 1/4" rod
to form/angle around them fenders properly (consistently).

I've been bending using a vise up 'til now...
But that was using only 3/16" rod.

I'll suppose now... I'll need invest in a better rod bender
that is capable of bending 1/4" without too much difficulty.

Maybe Harbor Freight has a low buck bender that could suffice ?
Doubt I'll ever use it again once this single project is done.

So low dollar investment, bends 1/4" mild steel rod, and survives at least until this particular job gets done. ... is all I need.

Got any suggestions Mike - anyone... !?
 
Do I count as any one :flipoff: and :flipoff: if I don't

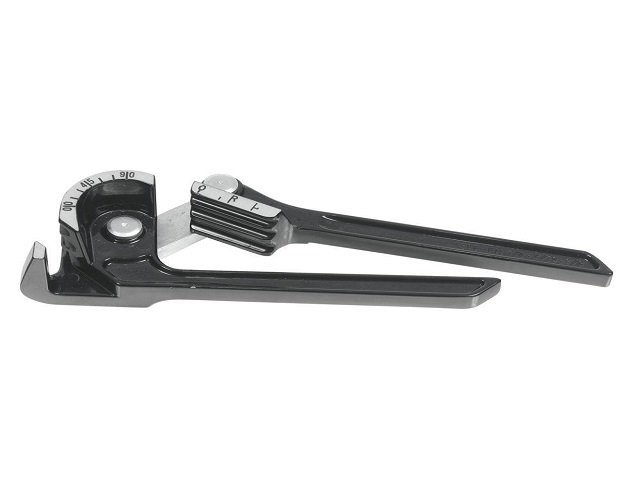
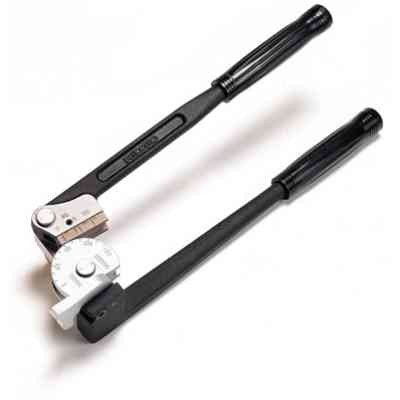
first one is $30 bucks at Home Depot

second one was $56 at a plumbing supply place

Harbor Freight has a bender for $10 its the third picture

yeah cheap blind ass bastard
 

Attachments

  • 5c82fe72-c15b-4369-9bf1-31df19ab6868_1000.jpg
    5c82fe72-c15b-4369-9bf1-31df19ab6868_1000.jpg
    27.4 KB · Views: 262
  • Ridgid-36122.jpg
    Ridgid-36122.jpg
    14 KB · Views: 296
Last edited:
Do I count as any one :flipoff: and :flipoff: if I don't

first one is $30 bucks at Home Depot

second one was $56 at a plumbing supply place

Harbor Freight has a bender for $10 its the third picture

yeah cheap blind ass bastard
yes of course you do numbnutz

Only problem is those benders don't offer a small enough
bend radius that I see.

I Think I need a bender that has optional sized dies.
But those a generally much more costly.

I may give one of those a shot tho'
maybe just use a vise for the tighter radius bends if needed.

I'll suppose ten bucks isn't too much spend if it can bend what I need.

----------------

oh btw numbnutz...
I was hoping someone actually had used one and knows something...

Not just post up a link that supposedly bends rod :flipoff:
 
Last edited:
well shoot... then I have no clue what these black patches are in each corner !?
Guess I'll just ignore them and paint over whatever it was.


thanks, I think they'll look good enough.
But I'll admit I'm going to have some difficulty bending that 1/4" rod
to form/angle around them fenders properly (consistently).

I've been bending using a vise up 'til now...
But that was using only 3/16" rod.

I'll suppose now... I'll need invest in a better rod bender
that is capable of bending 1/4" without too much difficulty.

Maybe Harbor Freight has a low buck bender that could suffice ?
Doubt I'll ever use it again once this single project is done.

So low dollar investment, bends 1/4" mild steel rod, and survives at least until this particular job gets done. ... is all I need.

Got any suggestions Mike - anyone... !?

You could build a bender using some nuts and bolts.

I did a quick search using the words "tubing bender", and found a thread called "Tubing Bender" OP Di_Spencer from 8/3/16, Codyboy posted in there a bender he made from $4 worth of parts, check it out.

I don't know how to do a link
 
Back
Top