-
Welcome to RCCrawler Forums.
It looks like you're enjoying RCCrawler's Forums but haven't created an account yet. Why not take a minute to register for your own free account now? As a member you get free access to all of our forums and posts plus the ability to post your own messages, communicate directly with other members, and much more. Register now!
Already a member? Login at the top of this page to stop seeing this message.
You are using an out of date browser. It may not display this or other websites correctly.
You should upgrade or use an alternative browser.
You should upgrade or use an alternative browser.
Scx10ii with Land Rover D90 body
I think rc4wd and raffee bodies are 275mm wheelbase - basically you'll need to make top and bottom rear links about 35mm shorter than the stock ones.
The axial kit includes drive shaft options to cover this length.

The axial kit includes drive shaft options to cover this length.

Last edited:
I used 5mm stainless tube (3mm id). Available on ebay, as link below. I cut to length, then tapped the ends M4.
The tapping is a little tight since the bore size is small (ideally would be 3.3), but with plenty of oil on the tap you can drive the tap in. I then use 20mm long M4 grub screws and traxxas Jato rod ends. Whole job takes less than an hour.
http://pages.ebay.com/link/?nav=item.view&alt=web&id=112168909941&globalID=EBAY-GB
what tyres are you using?
The tyres came on the set of cheapo wheels from ebay. Cost about £17 for the whole set. Tyres seem good & fit the gmade beadlocks fine.
I think rc4wd and raffee bodies are 275mm wheelbase - basically you'll need to make top and bottom rear links about 35mm shorter than the stock ones.
The axial kit includes drive shaft options to cover this length.
Cool thanks. Now I have some measurements to work with.
")
jimkill
Pebble Pounder
What a great thread, you've done some amazing work to get this truck looking perfect. I just got my D90 body in the mail today, would you be willing to share some of your 3D print files?

Last edited:
Thanks Jim!
It's an awsome body. You are gonna have loadsa fun building it.
Most of my parts are all available on Shapeways (see link below). Shapeways prints are not cheap compared to FDM type diy prints, but the quality is really good. I try to keep prints a cheap as possible without compromising durability, and only take a small cut for myself.
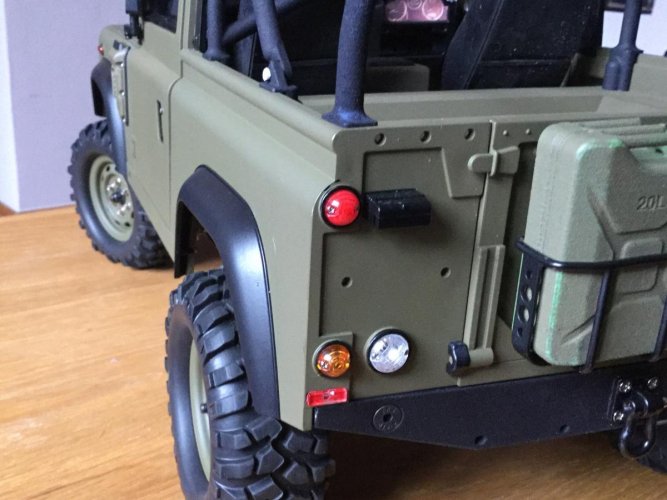
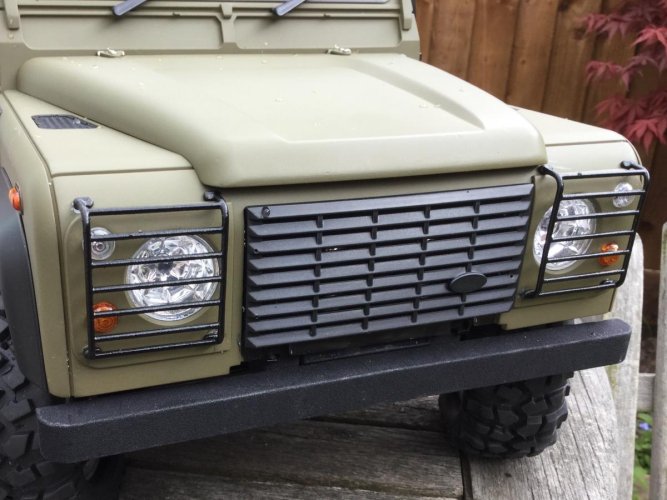
I've just had my headlight grills come in. RC4WD do some, but i didn't like them that much, and they are super pricey. These are about half the price:
I messed up on my lens painting. I tried some normal acrylic red, but it was too opaque, even when thin. I bought some Tamiya orange 'clear' for the indicators, and this was perfect. Wish i'd done the same for the red. Oh well.
It's an awsome body. You are gonna have loadsa fun building it.
Most of my parts are all available on Shapeways (see link below). Shapeways prints are not cheap compared to FDM type diy prints, but the quality is really good. I try to keep prints a cheap as possible without compromising durability, and only take a small cut for myself.
I've just had my headlight grills come in. RC4WD do some, but i didn't like them that much, and they are super pricey. These are about half the price:
I messed up on my lens painting. I tried some normal acrylic red, but it was too opaque, even when thin. I bought some Tamiya orange 'clear' for the indicators, and this was perfect. Wish i'd done the same for the red. Oh well.
Attachments
Last edited:
willyg1981
Quarry Creeper
Very tidy indeed [emoji106]
Sent from my iPhone using Tapatalk
Sent from my iPhone using Tapatalk
jimkill
Pebble Pounder
Thank you! I just ordered a set of shock hoops.
nosser
Pebble Pounder
great build so far!
The quest for quiet
I'm almost ready to get the truck of for a proper run with some local guys tomorrow. Even just the warm up runs have had me not happy with the noise level. The hard body amplifies things and it sounds horrendous.
I had an SSD 2 speed fitted, but the early runs also showed this was not necessary. With the 2700kv puller pro on 3s, there is more than enough speed for thus sort of rig.
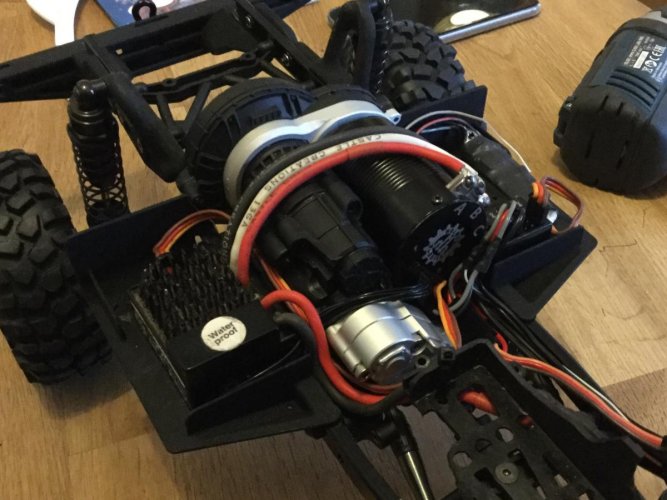
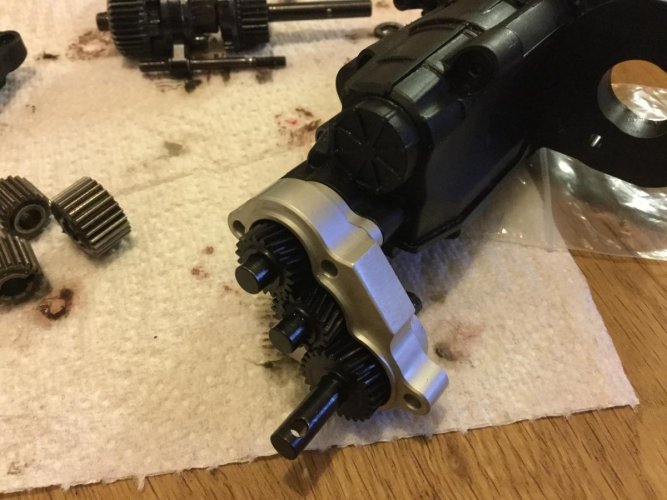
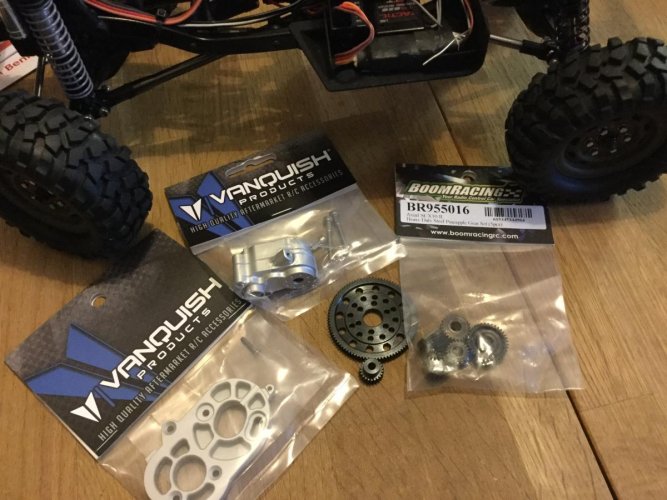
I have been eying helical gear options for a while, so pushed the button last week on the boom racing gear set (helical gears being much quieter than straight cut). I also plummed for the vp transfer case and motor mount hoping that these would help too.
The boom racing gear set includes transfer gears and the main transmission gear pair. I also bought a helical spur and pinion. I can confirm that the boom gears are hard steel. Not super hard like in an automotive gearbox, but convicingly hard enough for me to not worry about them
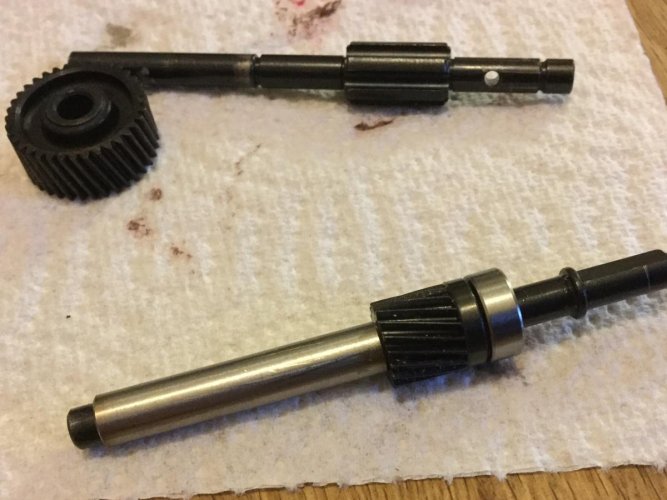
I've managed to loose the correct top shaft plastic spacer whilst the ssd 2 speed was fitted. I made a new one from some stainless steel tube. This is just as well since the extra side thrust the helicals will generate would probably eat the plastic spacer.
Everything fitted together perfectly. The bearings were a tight fit in the vp cases - they aint coming out easy if the bearings wear out.
When all assembled i am very happy to report that it runs very smoothly - much releif following the pita fiasco that in the stock axial gearbox. Well done boom racing!
So... the million dollar question... is it quiet?:
It's much quieter. Not as good as i was hoping, but at least it sounds like an engineered machine rather than an agricutural rock crusher.
The big test tomorrow!
I'm almost ready to get the truck of for a proper run with some local guys tomorrow. Even just the warm up runs have had me not happy with the noise level. The hard body amplifies things and it sounds horrendous.
I had an SSD 2 speed fitted, but the early runs also showed this was not necessary. With the 2700kv puller pro on 3s, there is more than enough speed for thus sort of rig.
I have been eying helical gear options for a while, so pushed the button last week on the boom racing gear set (helical gears being much quieter than straight cut). I also plummed for the vp transfer case and motor mount hoping that these would help too.
The boom racing gear set includes transfer gears and the main transmission gear pair. I also bought a helical spur and pinion. I can confirm that the boom gears are hard steel. Not super hard like in an automotive gearbox, but convicingly hard enough for me to not worry about them
I've managed to loose the correct top shaft plastic spacer whilst the ssd 2 speed was fitted. I made a new one from some stainless steel tube. This is just as well since the extra side thrust the helicals will generate would probably eat the plastic spacer.
Everything fitted together perfectly. The bearings were a tight fit in the vp cases - they aint coming out easy if the bearings wear out.
When all assembled i am very happy to report that it runs very smoothly - much releif following the pita fiasco that in the stock axial gearbox. Well done boom racing!
So... the million dollar question... is it quiet?:
It's much quieter. Not as good as i was hoping, but at least it sounds like an engineered machine rather than an agricutural rock crusher.
The big test tomorrow!
Attachments
Last edited:
Natedog
I wanna be Dave
Wow, beautiful D90 mate! Really liking all the scale bits and upgraded parts that you're printing in your Shapeways store, nice job again! 8)
Re: The quest for quiet
Thanks for the heads up on these gears. I have been looking for aftermarket gears in the main transmission, since there are a number of reports that the tolerances on the stock gears is not as good as it could be, leading to imperfect meshing and a 'crunchy' transmission. Some people are fixing this by adding a chamfer to the main gear with a bench grinder, but I would rather just buy an aftermarket gear set that works. There is a thread about transmission 'slop'where this was discussed.
I am curious to know why you didnt throw in the VP top shaft while rebuilding the transmission. For $14 it seems like money well spent.
I hope VP make the rest of the transmission housing some time soon. The machining on the motor plate and the transfer case is so nice, it looks a bit out of place bolted onto the cheap plastic transmission housing.
I'm almost ready to get the truck of for a proper run with some local guys tomorrow. Even just the warm up runs have had me not happy with the noise level. The hard body amplifies things and it sounds horrendous.
I had an SSD 2 speed fitted, but the early runs also showed this was not necessary. With the 2700kv puller pro on 3s, there is more than enough speed for thus sort of rig.
I have been eying helical gear options for a while, so pushed the button last week on the boom racing gear set (helical gears being much quieter than straight cut). I also plummed for the vp transfer case and motor mount hoping that these would help too.
The boom racing gear set includes transfer gears and the main transmission gear pair. I also bought a helical spur and pinion. I can confirm that the boom gears are hard steel. Not super hard like in an automotive gearbox, but convicingly hard enough for me to not worry about them
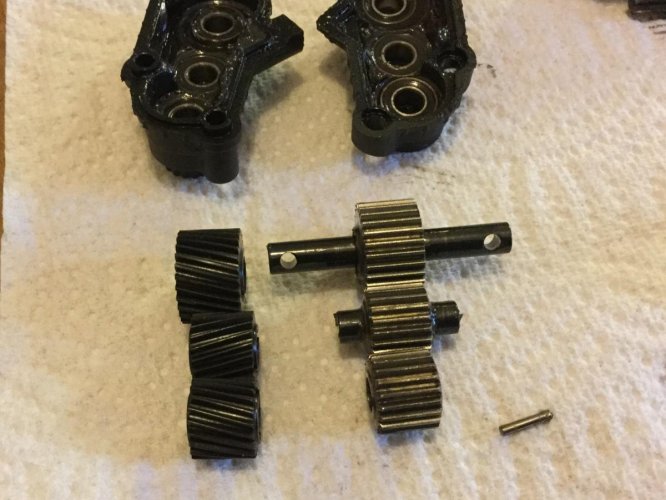
Stock vs helicals:
I've managed to loose the correct top shaft plastic spacer whilst the ssd 2 speed was fitted. I made a new one from some stainless steel tube. This is just as well since the extra side thrust the helicals will generate would probably eat the plastic spacer.
Everything fitted together perfectly. The bearings were a tight fit in the vp cases - they aint coming out easy if the bearings wear out.
When all assembled i am very happy to report that it runs very smoothly - much releif following the pita fiasco that in the stock axial gearbox. Well done boom racing!
So... the million dollar question... is it quiet?:
It's much quieter. Not as good as i was hoping, but at least it sounds like an engineered machine rather than an agricutural rock crusher.
The big test tomorrow!


Thanks for the heads up on these gears. I have been looking for aftermarket gears in the main transmission, since there are a number of reports that the tolerances on the stock gears is not as good as it could be, leading to imperfect meshing and a 'crunchy' transmission. Some people are fixing this by adding a chamfer to the main gear with a bench grinder, but I would rather just buy an aftermarket gear set that works. There is a thread about transmission 'slop'where this was discussed.
I am curious to know why you didnt throw in the VP top shaft while rebuilding the transmission. For $14 it seems like money well spent.
I hope VP make the rest of the transmission housing some time soon. The machining on the motor plate and the transfer case is so nice, it looks a bit out of place bolted onto the cheap plastic transmission housing.
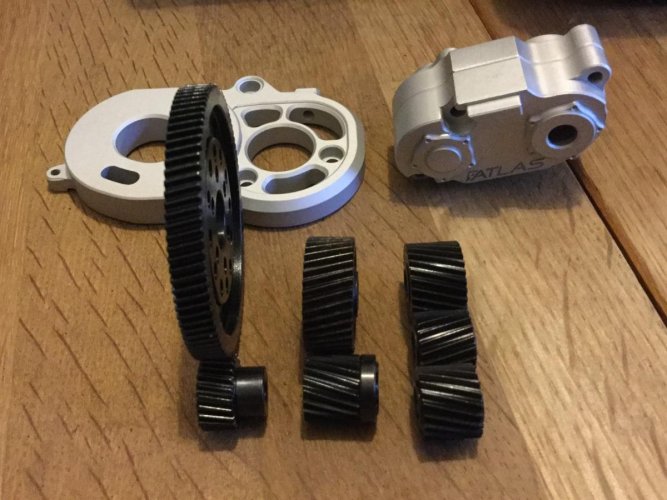
I missed the final picture of the re-assembled transmission:

We had an epic 7 hour run out today. Loads of fun with the guys.

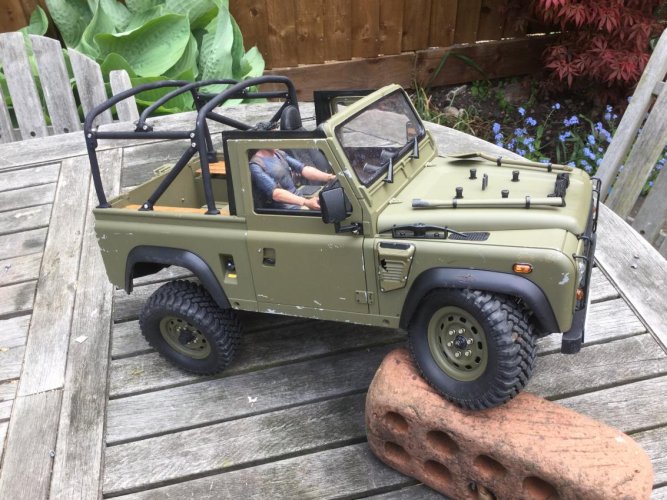
The Wolf is now looking... errrr... "weathered". Multiple crashes on the rocks have given a distinct patina:

Performance wise i'm very happy. Everything held up solidly and without a hitch. I was worried that the heavy body would severely limit what i'd be able to do, but the heavy wheels really help and there were not too many occasions wherei was unable to 'keep up'.

We had an epic 7 hour run out today. Loads of fun with the guys.

The Wolf is now looking... errrr... "weathered". Multiple crashes on the rocks have given a distinct patina:

Performance wise i'm very happy. Everything held up solidly and without a hitch. I was worried that the heavy body would severely limit what i'd be able to do, but the heavy wheels really help and there were not too many occasions wherei was unable to 'keep up'.
Re: The quest for quiet
There's not much wrong with the stock one really - plus the vp shafts were out of stock when i ordered. The postage and tax to the uk would make the shaft cost about £25 by the time it was in my hand, so i'll be happy with what i have for now.
Another plus to the Boom Racing gears - the input gear pin slot is nice and tight = almost zero shaft slop without any other mods.
I am curious to know why you didnt throw in the VP top shaft while rebuilding the transmission. For $14 it seems like money well spent.
There's not much wrong with the stock one really - plus the vp shafts were out of stock when i ordered. The postage and tax to the uk would make the shaft cost about £25 by the time it was in my hand, so i'll be happy with what i have for now.
Another plus to the Boom Racing gears - the input gear pin slot is nice and tight = almost zero shaft slop without any other mods.
Last edited:
The beast is really close now... even had a short run around the garden. I'm gonna cry when it first goes over on rocks!
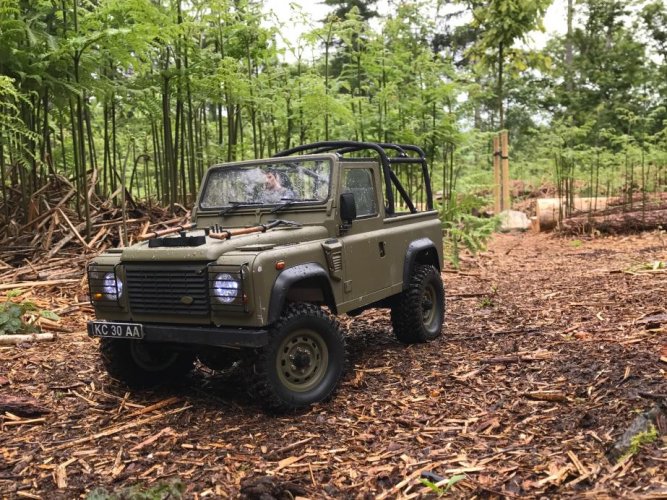
The wheels finally turned up after waiting for 2 months. Shop website said "in stock, 2-3 days delivery". Mmmmm. They're gmade sr02 wheels. These are usefully heavy wheels and i'm really happy with them. Nice bolts.
I still have lights and light lenses to colour an fit. Any tips on doing this are welcome. Painting is not my strong point. The dashboard needs some attention to make something out of its potential too.
Still waiting on my headlight grills that are being printed in steel. The front end should be a pretty good replica with these. With sharp eyes you will see i've already made some mods the get the front end much closer to a wolf compared to the stock raffee body.


It's quite funny that the team raffe body got the pre 2007 hood, but the new dash and bulkhead. Love the look of your d90."thumbsup"
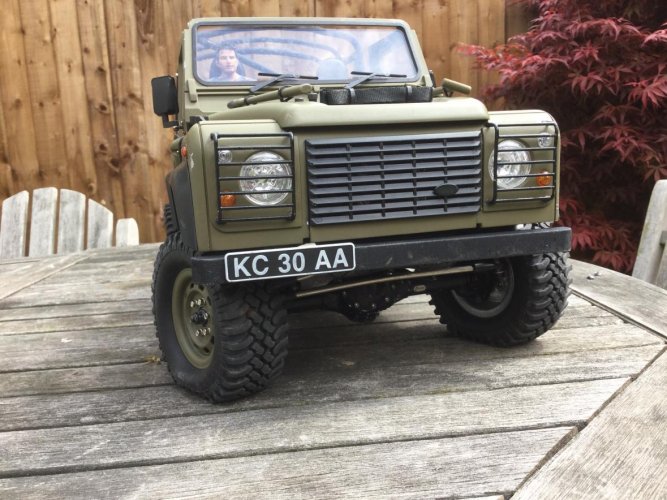
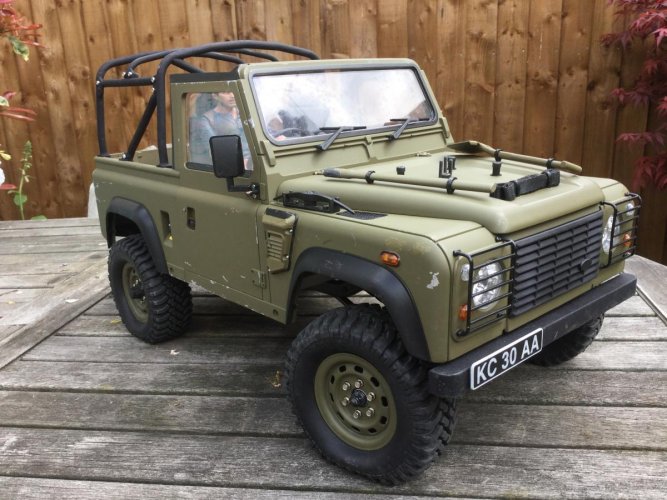
Having done some decent testing, i've been filling out some of the detail. Some accurate accessories for the bonnet, number plates, driver, some better detail on the dash, wooden bench seats in the back. Most of these parts are all 3d printed and available in my Shapeways shop if you are building something similar.
Trying to get things in shape for the uk G6 in a couple of weeks. Theres always more to do, but very close to what i want now.
Trying to get things in shape for the uk G6 in a couple of weeks. Theres always more to do, but very close to what i want now.
Attachments

Last edited:
Similar threads
- Replies
- 2
- Views
- 2K
- Replies
- 2
- Views
- 1K