• Welcome to RCCrawler Forums.

    It looks like you're enjoying RCCrawler's Forums but haven't created an account yet. Why not take a minute to register for your own free account now? As a member you get free access to all of our forums and posts plus the ability to post your own messages, communicate directly with other members, and much more. Register now!

    Already a member? Login at the top of this page to stop seeing this message.

scale tricks thread

Turn down TLT shocks

How to: Turn down TLT shocks

syco133 said:
I am working on a scale tlt build and was wanting to run the turned down tlt shocks but I wanted to do it myself and save cash for other things so here is what I did to turn them down.

First thing you need is a drill press a file and the tlt shocks
1.JPG

The second thing you need to do is chuck the small end into the drill press like this.
2.JPG

The next thing is to turn the drill press on and use the file to remove the aluminum from the shock body.
3.JPG

What I did was watch the shock body and keep removing material till the main body was level with the small end then when it was I removed the shock and chucked it back into the press so that I could turn down the small end just enough to remove the gold.
4.JPG

5.JPG

Here is a stock shock VS the turned down shock.I will use sand paper to do a smooth finish on them later on.
7.JPG

Here all all 4 shocks done and ready to be installed.
8.JPG
 
Want to add some scale accessories to your build?

Try www.dejouxminiatures.com They have a huge assortment of items.

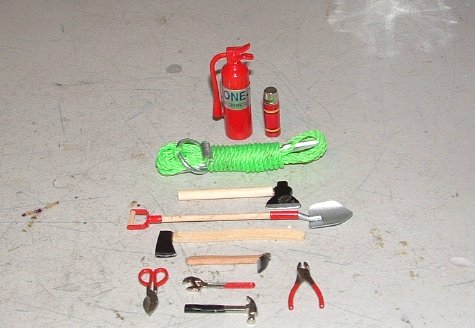
I use picked up a shovel, axe, fire extinguisher, thermos, and some assorted hand tools.


Attachments

  • Scale items and Austin at Halloween 001.jpg
    Scale items and Austin at Halloween 001.jpg
    76.7 KB · Views: 15,828
i dont see it here yet and i dont have pics....


for the f-350 high lift or any other pick-up body


run down yo your local skate shop and buy some grip tape and there ya go "line x" or "rhino lining"


i have yet to try this but its an idea...btw grip tape does wear down but after long use and abuse :) someone give it a try and take pics please :)
 
Last edited:
That'a what I used on my high-lift....only on the rear bumper (top portion).
I have some of the roll-on bed liner kit leftover from doing my real truck and am considering doing the bed of the high-lift.
 
High Lift leafs

High Lift leafs

Trikster said:
Figured this was an appropriate place for this information. Still shows "Order Pending" but at least they are going to be available. No need to drill/cut out the rivet.

Tower#
LXPMH0,1,2 ~ Leaf Spring A,E,B

Please move to where appropriate if this isn't its home.
 
I found a few other sources for scale items like wiring, carpet, tools and other stuff.

http://www.detailmaster.com/ - Lots of cool detail items here
http://www.seltd.net/ - Lots of cool stuff here
http://www.micromark.com/ - Hand tools to help in building scale equipment
http://www.gardentrucking.com/welcome.tpl?cart=11654255451847775 - Lots of scale items, mostly for trucks or trucking
http://scalemodel.net/ - Search engine for scale or diorama items
http://www.build-a-rama.com/ - Scale Military items like jerry cans and field equipment

I'm going to buy some of the items from Detail Master and Scale Equipment to see what their actual size is and determine if they will work out well.
 
rust

for those ragged rigs, you can mix a little turn signal amber and insignia red model paint (about 2:1) and it gives you a nice rust color. also if you use one of those old model brushes you forgot to rinse the paint out of so its nice and crispy, dab it in your "rust" then dab it on the body, accessory, wheels, etc. it will leave a raised texture like rust coming through. if wait until its almost dry then drag the brush (with no paint on it) through it you can streak it. thats how i did it on mine (though its not scale) www.rednekcrwlr.blogspot.com you can also use the tip of a small soldering iron to burn through the body to simulate rust holes.
 
Easy Wheel Wells 101

First you will need 2 stock TLT tires (one for each wheel well).
courier052.jpg

Cut the tire in half like so. Set aside the other half you will be using that later.
courier053.jpg

Take one of your half and cut it up the center to your desired width.
courier054.jpg

Next grab your other half and cut the center tread out. This is to fill in the back of the wheel well...Trim it down and CA it to your wheel well..."thumbsup"Almost done I told you this was easy.
courier057.jpg

I then used my Lexan scissors to trim out the lip that is left..You dont have to but it gives it a nice touch.

There you have it Easy Wheel Wells 101 hope this helps some...This is the final product mounted on my courier.
courier058.jpg

I think it adds a nice scale touch...:wink:
 
Need some shackles? Old bike chains work great. Just take a few links apart and the clean up nicely with some grinding/polishing "thumbsup"
 

Attachments

  • shackle.jpg
    shackle.jpg
    80.3 KB · Views: 14,560
  • shackle2.jpg
    shackle2.jpg
    86.8 KB · Views: 14,900
C channel frame straightening

Heres a good way to get that steel c channel frame looking good. After you make your bends and cut in half, I take a drillbit that will fit inside the c channel, heat it up a little with the torch, then roll one end of the bit through your bends you made in your frame to straighten them out. Take your time, but makes a nice touch to your frame. If its a very sharp bend, you may not be able to work it all out without distorting your frame somewhat....
 
want all sorts of small scale acessories? go to Michaels to where the memory boxes are and you'll find small stuff galore. it may be a tad bit small for a 1:10, but having a small camera or a small map on the dash of your rig is always a nice touch!
 
bed liner

Heres is a bedliner I laid down on an associated baja toyota body. It is the anti-slip stuff for outdoor stairs. I am sure it comes in black as well, but not where I got this stuff. It was easy to apply, it is just like a sticker, just cut, peel, and stick. I had to cut it in half to get around the spare but it wasn't to hard. I traced something to get the circle for the spare then cut it out real slow like. looks good I think, if I come across some of the black stuff I might swap it out.


-a
 
Snoop around youre LHS and you'll be suprised what you'll find. In the bracelet section i found some pretty scale chain $.60 ft, These little I-hooks used for attaching charms to the chains, and little bells that make perfect LED light buckets.

Also in the train section i found some fiber optic cables and they come with or W/O a light block, i opted to go without the block cause it is a minature lamp and not a LED. Instead i cut them to length and bundled them to a good diameter and shrink tubed them, then used a lighter to melt them together and to remove any rough edges from cutting them. once the're together slip a section of shrink tubing over the led and the optic cable and viola 5 lights 1 led"thumbsup"

Pics
100_0063.jpg

100_0067.jpg

100_0068.jpg

100_0069.jpg

100_0065.jpg
[/quote]
 
GPS decal

I made this with paint for use on my Bruiser. Thought someone else might like it:
 

Attachments

  • gps.JPG
    gps.JPG
    2.7 KB · Views: 13,886
i have found zipzaps, looks like a 1/8th scale car in the bed of some trucks...mainly the ones with a 12+ wheel base.

i found some at big lots for 5 bucks each, when i finish my bed i will throw some in there with some double sided tape holding them down
 
Snap-On makes these cool scale model toolboxes.. not really for inside a rig but cool nonetheless. the tools inside the drawers are awesome, the diagnostic scanner especially..

I got one on ebay awhile back for a christmas gift for my mechanic..I think it's 1/8

toolbox2.jpg
 
Back
Top