• Welcome to RCCrawler Forums.

    It looks like you're enjoying RCCrawler's Forums but haven't created an account yet. Why not take a minute to register for your own free account now? As a member you get free access to all of our forums and posts plus the ability to post your own messages, communicate directly with other members, and much more. Register now!

    Already a member? Login at the top of this page to stop seeing this message.

Mini Super

question. where are you getting plastic gears for the tranny? was looking at starting to create a parts pile and didn't see the plastic gears.

also, would the stock steel locker not work with axial driveshafts? you said the mt locker needs tangs that are bigger than axial shafts?
 
question. where are you getting plastic gears for the tranny? was looking at starting to create a parts pile and didn't see the plastic gears.

also, would the stock steel locker not work with axial driveshafts? you said the mt locker needs tangs that are bigger than axial shafts?

The plastic gears are under the 1/10 Mad Crawler MOA crawler parts. A lot of the parts here are the same as the Mad Torque. The small 2nd and small 3rd gears shown there will work for you too. Get them at the same time.

1/10 Exceed RC Mad Crawler Part & Upgrades

I measured the tang in the MT locker, it's somewhere in this build. I believe it's 5mm wide.

Once you cut Axial shafts down to length, they're only 4mm. Therefore, cutting a 5mm tang on them is impossible.

The RCBros locker is only 2mm wide. That's why I bought their locker and the stock Berg 4th gear to match it's bolt pattern.

The MT locker bolt pattern is different. When my plastic gears show up, I'll be tossing out the 4th gear and only running the 3rd and 2nd.

Still a significant weight savings because the Berg 4th gear is lighter than the MT 4th. Coupled with the plastic gears, should be a significant weight savings.

Can't remember the Berg 4th part number, but it's in a photo next to the RCBros locker. Page through the build and you should be able to find it.

I haven't confirmed the measurement of the OFNA universals. I am certain they are larger than the Axial shafts. I just remember them being bigger and more bada$$ when I put a set in my sportsman.

I doubt they are more than 5mm, and therefore still would not work with the MT locker. It's essentially useless, and not worth buying.

A couple posts back, I put new bearings in the cases. I had to order the bearings for the ends of the tubes (right next to the case). The stock bearings are too big to hold a 4mm Axial shaft steady.

They were only a couple bucks. 4x8x3mm or 4x10x3mm. I can't remember exactly. The width is 3mm for the stock bearing. Whatever the O.D. of the tube's bearing seat measures, you need to get an I.D. of 4mm to hold the Axial shaft once it's been cut.

I don't have the invoice here, and don't want to tear the rig apart to check it for you; but it's one or the other listed above. You'll have time during the build process to get the right bearings ordered.

Also, now that I've been through the process, there's no need to custom order 3mm wide bearings at all. There's room between the case and the tube bearing to run a 4mm wide bearing, which is likely the same bearing that the VP knuckle uses, on the outside. Traxxas or Axial bearings I already had on hand.

I never checked it. Just took the measurements of the stock bearings, and ordered new 3mm wide ones. Hindsight....
 
Go to page one of my build.

Eric Dlux posted a link.

Read it all the way through.....lots of good info there.

No need to re-work all the work Erik has already done.
 
Lol... I do "like" my BC's...

EDIT: Incase you wondered how I got so close on the tire size or selection of foams.. ;)
b0a3e20b86126caf7ab740ad58b5d4f2.jpg

Jesus, Troy.

I'm trying to plan a pin cut for my tires, and looking at your tires for advice.

I took the rig for a quick burn, and it was significantly worse than the previous Sedonas.

Are you certain these tires would pass PA inspection?

They look bald! Hahaha
 
The plastic gears are under the 1/10 Mad Crawler MOA crawler parts. A lot of the parts here are the same as the Mad Torque. The small 2nd and small 3rd gears shown there will work for you too. Get them at the same time.

1/10 Exceed RC Mad Crawler Part & Upgrades

I measured the tang in the MT locker, it's somewhere in this build. I believe it's 5mm wide.

Once you cut Axial shafts down to length, they're only 4mm. Therefore, cutting a 5mm tang on them is impossible.

The RCBros locker is only 2mm wide. That's why I bought their locker and the stock Berg 4th gear to match it's bolt pattern.

The MT locker bolt pattern is different. When my plastic gears show up, I'll be tossing out the 4th gear and only running the 3rd and 2nd.

Still a significant weight savings because the Berg 4th gear is lighter than the MT 4th. Coupled with the plastic gears, should be a significant weight savings.

Can't remember the Berg 4th part number, but it's in a photo next to the RCBros locker. Page through the build and you should be able to find it.

I haven't confirmed the measurement of the OFNA universals. I am certain they are larger than the Axial shafts. I just remember them being bigger and more bada$$ when I put a set in my sportsman.

I doubt they are more than 5mm, and therefore still would not work with the MT locker. It's essentially useless, and not worth buying.

A couple posts back, I put new bearings in the cases. I had to order the bearings for the ends of the tubes (right next to the case). The stock bearings are too big to hold a 4mm Axial shaft steady.

They were only a couple bucks. 4x8x3mm or 4x10x3mm. I can't remember exactly. The width is 3mm for the stock bearing. Whatever the O.D. of the tube's bearing seat measures, you need to get an I.D. of 4mm to hold the Axial shaft once it's been cut.

I don't have the invoice here, and don't want to tear the rig apart to check it for you; but it's one or the other listed above. You'll have time during the build process to get the right bearings ordered.

Also, now that I've been through the process, there's no need to custom order 3mm wide bearings at all. There's room between the case and the tube bearing to run a 4mm wide bearing, which is likely the same bearing that the VP knuckle uses, on the outside. Traxxas or Axial bearings I already had on hand.

I never checked it. Just took the measurements of the stock bearings, and ordered new 3mm wide ones. Hindsight....


I really appreciate all the input. thinking i'm going to be putting in orders for the parts tonight. mine is going to take a long time to get going (too many other in-process builds) but I think this will be a fun rig to bring along to comps to use on the downtime between runs.
 
one other question. are you running a bearing at the ends of the tubes inside the c-hubs? after cutting them down I didn't see you putting bearings in. just curious.
 
one other question. are you running a bearing at the ends of the tubes inside the c-hubs? after cutting them down I didn't see you putting bearings in. just curious.

No.

The three rigs I have, running high angle steering universals up front (and this one rear) have no bearings at the end of the tubes.

They just don't seem to be needed.

Most modified XR steering axles that I've seen built, just do away with that outer bearing, with no ill effects.

I honestly cannot believe the beatings I've seen guys give their rigs, and the beatings I've given my own trying to recover from some deep, dark hole in the earth.

High horsepower rigs that do pirouettes mid-air.....brutal, really.

The dual bearings in the knuckle seem to keep things in check, outside.

The lockers, themselves, keep the inner shaft in check.

The only reason this rig runs the inner bearing is the locker design.

It's meant for Berg shafts that have a round tip at the end of the shaft, similar to stock MRC shafts, to keep it centered in the locker.

My Sporty and MRC modified shafts don't have room to move side to side in the locker. Just cutting the "tang" is good enough to make them work.

This particular locker is 2mm wide; but much wider side to side.

The inner bearing should keep it from wandering back and forth, binding, and chewing the aluminum locker to bits.
 
Freakin sweet!

One more 12" unlimited rig.....can't wait.

wish I had the funds to go full bore into this. going to take awhile and I may have to look at some cheaper options. i'm thinking this is my parts list:

chubs - topcad or boom racing aluminum (hoping I don't need the clamping VP version)
knuckles - stock plastic
servos - solar d772
motors - used 45t motors out of my 2.2p rig (i'll upgrade that rig)
esc - BR minis (this is the expensive electronics part)
shocks - whatever I can find cheap in for sale section
wheels and tires - unknown right now; forgot the vendor but has lightweight dish 2.2 non-beadlock wheels set up for VP hubs

most everything else i'll work to fabricate myself if possible. have a MT4 radio to use. have to figure out how to do dig mixing and 4 wheel steer.

looking forward to starting the work but I know my wallet isn't going to like it! :)
 
Not that it matters at all, but I'm still trying to figure out this RCBros "3mm wheel weight" thing.

The half weights in the earlier photo "needed" to be tapped. It's brass, I realize, so there wasn't much resistance; but they did not spin "freely" on the tap, the way the brand new weights did.

I've had those half weights for some time now.

Here's a picture of my mini as it sits, rocking super lame 4-40 screws from the hardware store.

Chris figured out you could just tap Shift Hub's 4-40 hole to 3mm, instead of tapping the extra holes that are setup for 3mm tapping.

This helped avoid confusion on which dang holes were which.

Of course, I applied that to the brass weights, after the fact.

Now, nothing I have uses 4-40. Well, except the mini cuz it's already built; but I'll be changing that next time it's apart....of course.

20150512_191139[1].jpg

It's just blowing my mind.....lol

Am I alone thinking this? Won't be the first time I was way off base....
 
Not that it matters at all, but I'm still trying to figure out this RCBros "3mm wheel weight" thing.

The half weights in the earlier photo "needed" to be tapped. It's brass, I realize, so there wasn't much resistance; but they did not spin "freely" on the tap, the way the brand new weights did.

I've had those half weights for some time now.

Here's a picture of my mini as it sits, rocking super lame 4-40 screws from the hardware store.

Chris figured out you could just tap Shift Hub's 4-40 hole to 3mm, instead of tapping the extra holes that are setup for 3mm tapping.

This helped avoid confusion on which dang holes were which.

Of course, I applied that to the brass weights, after the fact.

Now, nothing I have uses 4-40. Well, except the mini cuz it's already built; but I'll be changing that next time it's apart....of course.

View attachment 318000

It's just blowing my mind.....lol

Am I alone thinking this? Won't be the first time I was way off base....

Are the wheels your using 1.9 or 2.2? I just ordered a set of weights from Will for a MRC pro that I bought from Winnerone. Now I'm not sure they will fit my 1.9 wheels. I just finished the XR10 front conversion and after reading your build thread I thought this would be the best way to add weight.:idea:
 
wish I had the funds to go full bore into this. going to take awhile and I may have to look at some cheaper options. i'm thinking this is my parts list:

chubs - topcad or boom racing aluminum (hoping I don't need the clamping VP version)
knuckles - stock plastic
servos - solar d772
motors - used 45t motors out of my 2.2p rig (i'll upgrade that rig)
esc - BR minis (this is the expensive electronics part)
shocks - whatever I can find cheap in for sale section
wheels and tires - unknown right now; forgot the vendor but has lightweight dish 2.2 non-beadlock wheels set up for VP hubs

most everything else i'll work to fabricate myself if possible. have a MT4 radio to use. have to figure out how to do dig mixing and 4 wheel steer.

looking forward to starting the work but I know my wallet isn't going to like it! :)

On a budget, you're on the right track.....except:

Seriously consider contacting Erik Dlux.

You may be able to get tubes that will fit existing knuckles of whatever brand. I realize he makes his parts to fit VP since they are the standard in the industry; but others will work.

You'll save money buying something awesome the first time, vs buying whatever you can afford once, and then what you need the second time.

I'm a builder.....true....but I've got a lot of time into these tubes. If I paid myself to build them, Erik's tubes would be cheaper, even custom tubes would be cheaper from him, likely.

Hand cutting these tubes, checking with the dial indicator, cutting/sanding, checking again, sanding some more, checking again, etc....it's not fun....acutally it was fun because it was brand new; but then I had to do it all over again, and then not....

I bought the clamping style knuckles because I knew there would be no ribs to hold them steady. This seems important to me.

Your knuckles are responsible for resisting the actual force the motor puts into the tires/resistance of the earth. They will try to turn.

During my shakedown run, two knuckles moved....even with the clamp feature. Of course, I don't have them bolted to the tubes yet, since I'm still finalizing some things.

There's a lot of force there....

The down side to the stock knuckles (I assume you mean XR10) is the factory plastic arms aren't zero ackerman (which is a good thing, depending who you talk to). Your outside tire will steer further than your inside tire. This isn't a bad thing necessarily.

The mounts on the other side of the knucle that use the aluminum steering arms are really low on the knuckle. They'll have your tie rod very low, in the rocks, or into the case when you steer. I've mocked them up; but would never actually want them on a competition rig.

Not trying to dissuade you...I want you to build a rig. I'm just trying to save you money, cus that's what I've been trying to do myself.

Truth is, it's an expensive rig; but only where it needs to be.

I only had about $150 into this rig at about page 5 of this build, then it got real....
 
Are the wheels your using 1.9 or 2.2? I just ordered a set of weights from Will for a MRC pro that I bought from Winnerone. Now I'm not sure they will fit my 1.9 wheels. I just finished the XR10 front conversion and after reading your build thread I thought this would be the best way to add weight.:idea:

Well it depends on a lot of things.

Winnerone23 doesn't mess around when it comes to building rigs. What you purchased may be setup to run competition stuff.

On this rig, this build specifically, they are 2.2 wheels.

That said, my mini runs RCBros knuckle weights. It's not unusual.

I have VP knuckles on my mini with 1.9 wheels and the RCBros weights.

If you have the XR conversion, chances are you have what you need to make them work.

Some pictures would help us help you...post up.

Better yet, start a build thread. We'll all help out; or give you a hard time...lol
 
Last edited:
Well it depends on a lot of things.

Winnerone23 doesn't mess around when it comes to building rigs. What you purchased may be setup to run competition stuff.

On this rig, this build specifically, they are 2.2 wheels.

That said, my mini runs RCBros knuckle weights. It's not unusual.

I have VP knuckles on my mini with 1.9 wheels and the RCBros weights.

If you have the XR conversion, chances are you have what you need to make them work.

Some pictures would help us help you...post up.

Better yet, start a build thread. We'll all help out; or give you a hard time...lol
Actually it was a new pro, don't think it was ever run.
That is good to know on the 1.9s, I have a lathe , and could turn them down but didn't want to do that. I have been taking photos with the idea of starting thread, guess I should as Nike would say "JUST DO IT ". Thanks for the info."thumbsup"
 
Last edited:
I take all input. Your suggestion for seeing if Erik can make up some tubes is reasonable. Once I start mocking things up I'll have to see what he could make up. I like how up made up the link/shock mount and have the servo mounted. Maybe he can make something up.
 
My used servo deal only came with one clamping style horn, and it just kept coming loose.

So I finally picked up another one and reworked the steering a bit.

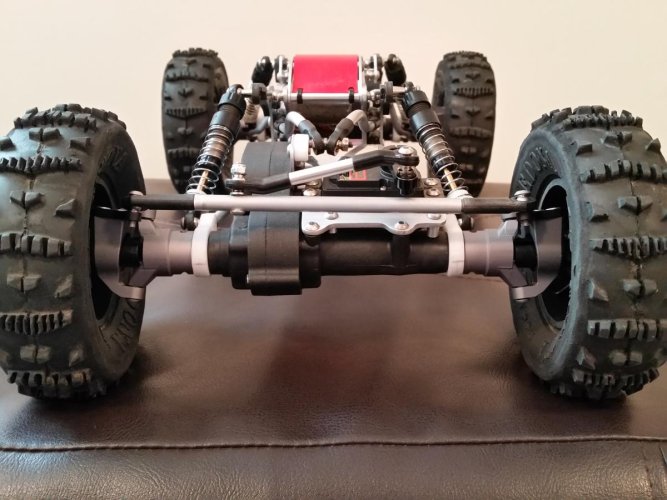
Here's how it looked before.

20150426_125441.jpg

I didn't like how high the drag link sat.

It was taking quite a beating during recovery.

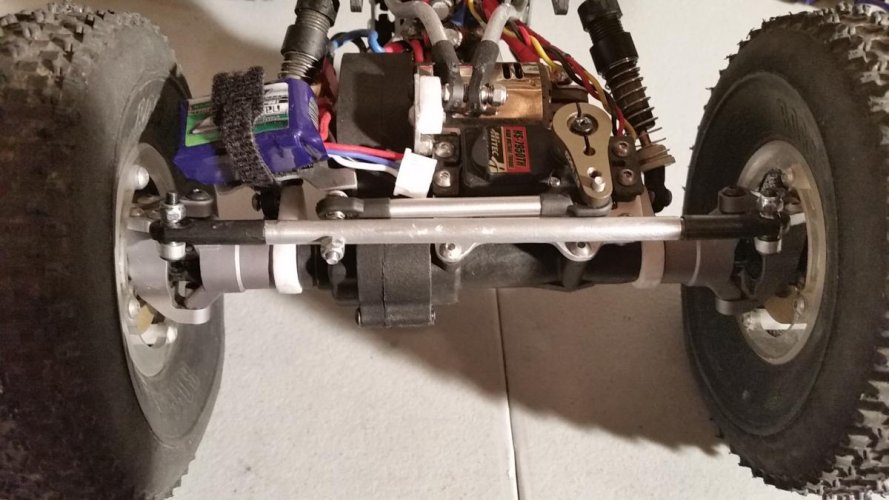
20150516_225741.jpg

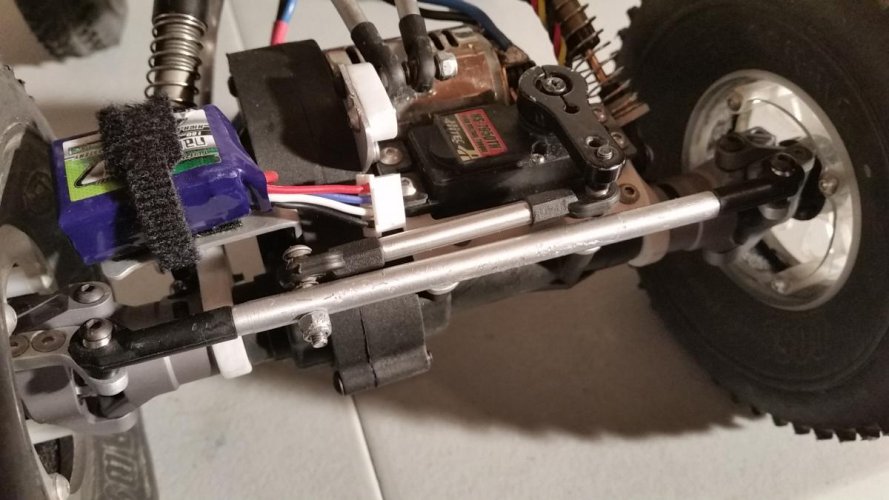
I had some RCBros extended arms on hand.

They made just enough room to get the drag link behind the tie rod.

20150516_225811.jpg

Out back, the zero caster knuckle position had more room.

So I did the same.

20150516_225931.jpg
 
Plastic gears came in.

Shaved an ounce off the rear axle.

View attachment 318363

Gonna run them and see how they hold up.

View attachment 318364

Have you gotten the plastic gears installed yet? I got my parts in (mad torque cases, berg gear, rcbros locker and plastic gears) but the tranny has a lot of binding. It seems to be the small third shaft (the one with the 42t gear) that is causing the issue. When I install the locker/gear and second shaft (40t) they spin fine. When I add the third shaft (with or without the 42t gear) I can barely get it to spin. Did you notice the gearbox being tight? Did it break in over time?
This is simple enough I don't think I assembled it incorrectly.
 
Back
Top