• Welcome to RCCrawler Forums.

    It looks like you're enjoying RCCrawler's Forums but haven't created an account yet. Why not take a minute to register for your own free account now? As a member you get free access to all of our forums and posts plus the ability to post your own messages, communicate directly with other members, and much more. Register now!

    Already a member? Login at the top of this page to stop seeing this message.

B-MOW's BF VP Bundle Build - VS4-10 Style

The truck has a front bumper, still need to make a rear one.

Well, my Phoenix Portal has front and rear bumpers (VPS10161, pg. 25) that use those dropped frame sections front and rear for assembly. If I chop the front and rear frame sections I will lose the assembly points. I understand that the loss in front could enhance its crawling ability but since I want the bumpers in both places I kind of need the dropped frame sections. Please let me know if I have somehow misinterpreted any part of this.

So, I think I will chop the RP frame front and rear where it extends beyond the dropped sections. I may add the VP frame sections even though they may not serve much of a purpose. Maybe remove the paint and clear coat so they are silver like the RP frame. We'll see.
 
VS4-10 Phoenix.jpg

Had the frame posted on page 6 and finally got it together somewhat. By retaining the stock dropped front and rear sections I pretty much removed any advantage to the RP straight frame idea, so not sure what I really accomplished. Frame is heavier and the shock towers are cool, but I have those available as single pieces that can be added to the stock frame. It was fun to do it though. Now I've gotta put some thought into how to do the Phoenix non-portal. I want to use the RP frame again but without the butchering. Having trouble thinking through the body mounting without the dropped sections cuz I would like to use the body stock. I can ditch the bumpers no problem but just have to figure out how to get it on without clips.
 
RPRC Chassis.jpg

Dilemma resolved but will have to use body clips. RPRC has body mount brackets (I haven't got magnetic mounts to work for me yet).
 
Just an FYI - Team KNK makes some single-bolt post mounts, too:

https://www.amainhobbies.com/team-knk-aluminum-body-mounts-black-knkabm002/p768823

knkabm002.jpg
 
Dilemma resolved but will have to use body clips. RPRC has body mount brackets (I haven't got magnetic mounts to work for me yet).

Those RPRC mounts are the same body post brackets that I am using. GSpeed Chassis sells nearly the exact same mount. I use them on all of my GSpeed builds.
 
Those RPRC mounts are the same body post brackets that I am using. GSpeed Chassis sells nearly the exact same mount. I use them on all of my GSpeed builds.

I think they are going to work really well with this build. I may have to add a bracket for the rear mounts, like one that spans across the bed with the two mount holes in it. I want to use the stock body just without the bumpers and the RPRC mounts will probably be inboard - don't know yet.
 
Avocado Truck.jpg

Used stainless frame instead of blue. Undecided on bumpers but happy with the Avocado Truck build so far.
 
Thanks to @smog for his latest build, he has inspired me to tackle a project that I've been wanting to complete for over a year now.

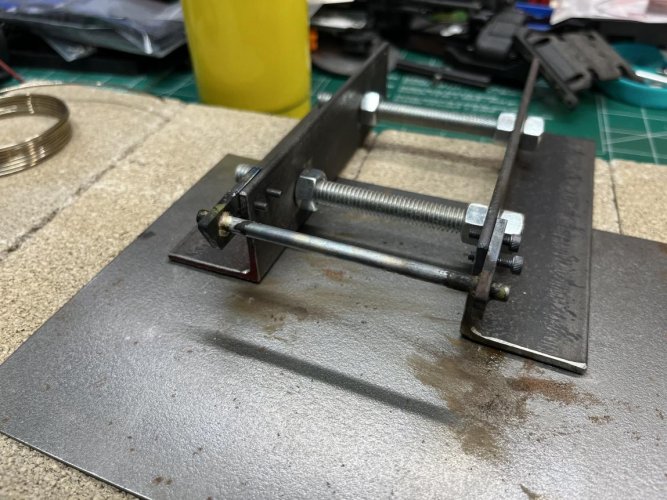
So I believe it was last year sometime, I made a jig to silver solder a set of bumpers for this build. Today was the day that I finally tacked this project head-on and got'er done! Looking back on how easy this really was, I wish I would have finished this sooner.

These bumper tabs came from Scale Metal Supplies and the rod I purchased at my local Menards. I've had them installed since I built this rig and they have been waiting on the builder to finish them!:roll:

These aren't the prettiest joints, but they'll do and I might possibly even throw on some black paint to cover up the ugly. Or maybe just let them weather naturally.

IMG_4026.jpg

IMG_4028.jpg

IMG_4029.jpg

IMG_4030.jpg

IMG_4031.jpg

IMG_4032.jpg


Here's a couple shots showing the approach and departure angles of the bumpers. Standing on both bumpers without a prop.

IMG_4033.jpg

IMG_4034.jpg

Now that this build is almost complete, I'll be getting it out on the rocks this Spring for the first time.
 
I like the natural look, goes good with that body. Cant wait to see how it performs

Sent from my SM-A516V using Tapatalk
 
I like the natural look, goes good with that body. Cant wait to see how it performs

Sent from my SM-A516V using Tapatalk

That's what I was originally thinking. A few dents and scratches on the body and let the bumper get some rusty weathering. It should all blend together in the end.

Of course though, it does need to get off the shelf and out in the elements in order for all of this to happen!:lmao:

They look great. Nice job.

Thanks man, appreciate as always!"thumbsup"
 
It's hard to believe that I started this build back in November 2022 and have yet to get this out on the rocks. But...I can now officially say that this rig is complete. Yes I did say complete. No further additions or upgrades are planned. Well, I do still need to add a winch, but that can wait.

Enough money spent and too much time sitting idle. It is time to get this out on some real rocks and get'er fine tuned. So far short runs here and there on the basement carpet and manmade indoor obstacles have proven that this will be a great performer with little to no major changes needed.

The last of the touches to this build happened last night. I've been wanting to add a set of lights to this to compliment the front teardrop headlight housings. I added an Associated XP Head and Tail Light Kit. A simple kit with clear LED bulbs for the front and red LED's for the rear.

For the rear, I mounted the red lens on the back of the bed beside the tailgate. The stock position on this body for these taillights are supposed to be under the tailgate. I previously cut that section of the body out so that I could lower the body down onto the rear bumper.

IMG_4244.jpg

IMG_4248.jpg

IMG_4247.jpg

IMG_4245.jpg

IMG_4246.jpg


I've thought about adding a roof rack to the top to help protect the body. I recently purchased a servo from NSDRC and while I was shopping I added one of their roof racks to my cart. I initially had planned on using this on new build, but after looking at the size, I figured it would look better on this rig. It is carbon fiber, is SORRCA legal and comes with a winch pulley attached to it.

IMG_4242.jpg


The next change was replacing the wheels and tires. I was really digging the look of the previous combo, so a change was needed. After watching a recent Crawler Canyon tire review, I knew that I had to try out a set of these knock-off JConcepts Tusk. These clones are packaged by Globact and have the Mix Racing logo on the side of the tires. These are super soft and pliable and sticky. I inserted a set of silicone inserts similar to the new Injora inserts, but these are made wider to fit in wider tires.

The inserts I have pictured are the firmer blue inserts. I used the dark green softer inserts in these tires. I wrapped these tires around a cheap set of wide titanium colored Amazon wheels. It's hard to tell in the pics, but the titanium color matches nicely with the color of the body.

IMG_4249.jpg

IMG_4250.jpg

IMG_4251.jpg

IMG_4243.jpg

The plan now is to get this out on the rocks ASAP. That is as soon as the weather gets better. Winter has made a full return this week here in Ohio, so I'm shooting for the following weekend to give her a drive.
 
This is a great looking rig buddy, I’m sure it will be great on the rocks


Sent from my iPhone using Tapatalk
 
Back
Top