-
Welcome to RCCrawler Forums.
It looks like you're enjoying RCCrawler's Forums but haven't created an account yet. Why not take a minute to register for your own free account now? As a member you get free access to all of our forums and posts plus the ability to post your own messages, communicate directly with other members, and much more. Register now!
Already a member? Login at the top of this page to stop seeing this message.
You are using an out of date browser. It may not display this or other websites correctly.
You should upgrade or use an alternative browser.
You should upgrade or use an alternative browser.
Ummm...
- Thread starter durok
- Start date
ah. did i have to do that? i think i did. easy enough with a dremel. or heck even a file is quick work.
ironically i was just watching a GCM vid on youtube. Chris said in the comments, "the [ascender] chassis is really versatile in the fact you can mount the servos all kinds of ways". and he goes on to mention under or over.")
ironically i was just watching a GCM vid on youtube. Chris said in the comments, "the [ascender] chassis is really versatile in the fact you can mount the servos all kinds of ways". and he goes on to mention under or over.
Thanks Chris!
I stared at some pics and did rotate mine to match, what bottoms out for me is the steering link directly on top of the servo horn where it screws on.
Panhard just BARELY clears, exactly like yours... It's plenty of travel, should be fine.
That's where mine bottoms out too - bottom pic - on the steering link hits the servo horn. Shocks are pretty much bottomed out there anyway, so it's fine.
The K10 RTR with WB2 has the servo mounted sideways, and the panhard bar hits the top of the servo on that one - can't get around it. Doesn't affect crawling though, seems to be fine.
The servo mounted on top of the crossmember seems like a good fix for all of it if you can make it work. I'd have to look closer at that.
ah. did i have to do that? i think i did. easy enough with a dremel. or heck even a file is quick work.
ironically i was just watching a GCM vid on youtube. Chris said in the comments, "the [ascender] chassis is really versatile in the fact you can mount the servos all kinds of ways". and he goes on to mention under or over.
Yep, just that typically plastic servo cases break right at the mounting tabs...
For now, rather keep the reinforcement ribs and drive as is, really don't think it's going to limit travel noticeably.
Used my new soldering iron today - I still am not very good, but at least I put 3.5mm bullets on the motor and ESC - first on the original electronics to test my (limited) abilities, and then on the HW 1080 and the HH Trailmaster 550.
Kept getting the damn shakes... but it was nice using an adjustable temp iron, compared to the last time some 10+ years ago. I quit before moving on to my Bomber electronics (Mamba Monster X & HH PP3500kv), I'll be using 6.5mm bullets there.
I also need to convert 5 LiPos to XT60+ connectors to match the HW, and eventually the Bomber ESC battery connector from Deans as well. However, 2 of my 3S batteries are those Venoms that come with adapters, could at least do a test run using those...
Yeah i am hit and miss on soldering too.
Do you have a helping hands set? I found most of my problem was just a good setup and for a long time i was really struggling without helping hands.
Fast forward past a half dozen lightsaber builds with led control circuit cards, and a couple rc repairs/modifications, and i am at least average or hafway decent 15 years later.
Last night i had my tt01 drifter propped on its side and replaced the tamiya battery connector with a deans plug, without taking the esc out of the car. Soldering iron one hand, adult egg nog in the other, jammin out to some old school hip hop like it was just another day at the office lol
All impossible if not for my trusty little helping hands.
You will get there. Shaking hands... i got that if i was nervous, dehydrated, tired, or trying to remedy all that with a red bull lol... i wont pry and im very familiar with hepa laws so... no questions here. I just hope with practice and some muscle memory and training your hands, that your dexterity will improve. Heck with all those betteries you have to convert, you should get at least noticably better! Just dont forget to slide the heat shrink on before you solder! Lmao!
I wouldnt mind a nice temp controll iron though. I am still on the $10 radio shack (rip) heat stick!
Yesterday I realized that my 2 cheap Venom 3200mAh 3S LiPos have EC3 adapters, not XT60... So, I am going to have to control my medication-induced tremors well enough to do them, the 2 SMC 4300mAh LiPos, my charger leads, and my Mamba X and Mamba Monster X ESCs. I watched a couple vids on soldering LiPos, 'cause I'm a little paranoid about that. I also ordered my final upgrades a little early - a new K10 cab, RC4WD Raceline Monster black center-silver beadlock 1.7" wheels and RC4WD Goodyear MT/R 1.7" in the scale 4.19" outer diameter size. Free shipping, 10% off (except the Vaterra body, cuz Horizon) from HobbyZone because that's who had the tires in stock (supposedly). Hard to find 1.7" wheels I wanted, really would have liked to go SSD - especially the black Steel Trail, but no go - and I am wanting to reduce the wheel and tire diameter just a bit to make it slightly more scale and challenging to drive. The Bomber is hopefully going to be my rolls-over-everything rig, wanted the Ascender to be a very different drive.
I managed to do OK on the motor tabs (I think...)
I'm planning out the paint for the new cab that's coming, still have a bottle of old Parma FasKolor FasSky Blue paint... it's a very light blue, trying to decide between it and buying a can of Tamiya Corsa Grey... Think I'll do the hood, and maybe the roof, in black again. Still may cut the grille on the new one, have a slightly different material to fill the void with... not going to screw up the windows, obviously, this time... will have window masks! Going to matte clearcoat the exterior also, and back the main color with black as well. I'll either scuff and repaint the original aluminum plates in black again, or make slightly modified ones from diamond plate from RC4WD... I could cover where the spare mounts and install some scale gear, maybe a toolbox or something too.
If I cover the fuel cell area, I may route a length of fuel tubing from inside it out one of the side panels with a fixture of some sort on the end...
... (continued)
I despise soldering, especially LiPo connectors... why is the battery connector so much more hateful than the ESC connector?
No run today, wasted the whole day soldering and still only finished half what was planned.
Hopefully, I didn't ruin any of the cheaper 3 LiPos I did... I will only buy LiPos that come with XT60s already installed in the future.

I test fit mine afterwards, they all will work - I'm just frankly scared to run & charge the batteries as even though I never crossed terminals (wires) there were a couple occasions where there was a tiny spark... all packs are out on concrete patio in LiPo sack.
(Edit: I just read a couple threads on this, apparently it's not uncommon, so I'll just make sure and hook them up first time outside)
Thanks for that pic, found the item ("Mr Jig") for $10 plus $7 shipping on fleaBay... kinda slow shipper.
(2nd Edit: Ordered on Amazon - and realized I had built up $8 in Prime Rewards, so got it coming for $8 shipped, 2 days...)
Saw this and chuckled out loud:

Maybe I need one?
(Edit: I just read a couple threads on this, apparently it's not uncommon, so I'll just make sure and hook them up first time outside)
Thanks for that pic, found the item ("Mr Jig") for $10 plus $7 shipping on fleaBay... kinda slow shipper.
(2nd Edit: Ordered on Amazon - and realized I had built up $8 in Prime Rewards, so got it coming for $8 shipped, 2 days...)
Saw this and chuckled out loud:
Maybe I need one?
Last edited:
Didnt know you were in such a hurry! Lol i was going to offer to do it if you sent me you packs and connectors.
It never occurred to me that soldering a lipo pack could make it go boom.
Making custom lightsabers, i have more than once soldered directly on the ends of an 18650 battery with zero catastrophic results. Maybe i got lucky? I was careful not to expose it to much heat, trick is tinning the wire and heating it off the surface of the batt, then quickly touching it on the surface, like a tac weld, finishing the connection with more soldering on top of whats there.
Anyway sounds like you got it. Its just tedious!
And me likey what you have on the way!!!
Lastly, lmao @ doctor octopuss there hahaha
Being the procrastinator that I am, anything I'd have to box up and send out would be seriously keeping me from getting out there and driving this thing... I haven't been out in ages, not since performing any mods.
Getting an itchy trigger(throttle) finger!
The main thing is not to let the tip of the iron cross from the exposed positive connector and the negative connector, which can be hard to do when the stinkin' third hand doesn't want to firmly grasp the connector, the solder doesn't want to flow, and my hand is shaking. I could easily have truly shorted the LiPo and popped the whole pack...what was happening instead was a drop of solder would fall from one connector down to the next, there'd be a tiny"pop" and I'd be on the verge of throwing it all out the friggin' window.
Happy-happy-joy-joy.........
That thing looks like a better version of what I use. The more hands the better when soldering in my opinion. All I want to be holding in my own hands is a soldering iron and solderI test fit mine afterwards, they all will work - I'm just frankly scared to run & charge the batteries as even though I never crossed terminals (wires) there were a couple occasions where there was a tiny spark... all packs are out on concrete patio in LiPo sack.
(Edit: I just read a couple threads on this, apparently it's not uncommon, so I'll just make sure and hook them up first time outside)
Thanks for that pic, found the item ("Mr Jig") for $10 plus $7 shipping on fleaBay... kinda slow shipper.
(2nd Edit: Ordered on Amazon - and realized I had built up $8 in Prime Rewards, so got it coming for $8 shipped, 2 days...)
Saw this and chuckled out loud:
Maybe I need one?
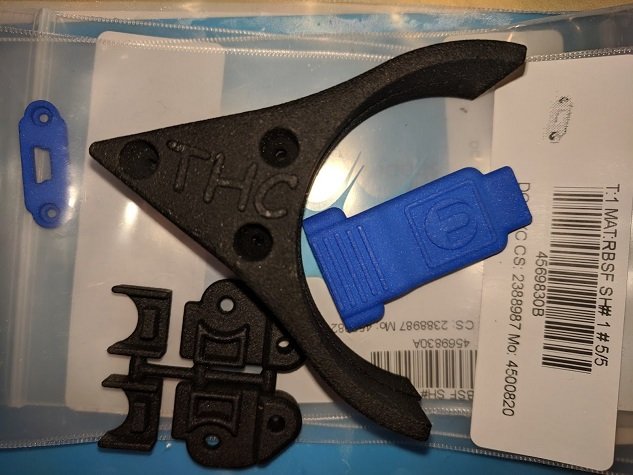
My Shapeways order came in, JC Auto Design RULRs out of "Black Premium Strong & Flexible" nylon (hope they are stronger than standard, paid the $6 upcharge for the material upgrade). Also got a nifty blue hard-shell case for my Castle Link (from UninterRC), and a Thumb Steer 2.0 (The Hoyfab Crawlers aka "THC" - with design input from our own mikebecher!) for my FlySky GT3C.
Installed the RULRs, would have been far easier if I had spare bolts in the right sizes - as it was I had to remove some that were extra long, cut them down to size, and then move some others around - probably have cut half-a-dozen down in length on this vehicle so far. I could trim a lot more if I was bored. If I ever completely dis-assemble this rig, I'm measuring every bolt required and cutting them all to exact lengths - it's the only thing I find annoying about the factory RTR build. Way too many extra-long bolts. OK, I think I made my point. Long-term insomnia is starting to make me a cranky sonofagun.
Soldering jig arrives Wednesday, 1.7" wheel & tire setup w/replacement K10 cab may take a week, but I did get confirmation. Still mulling various paint schemes over in my head...
Might not be able to run this thing until the weekend, and I'll be binding the radio, setting endpoints, programming ESC, all that crap for the first time in over 10 years. And everything's different now! Radios & ESCs have way more features than the mid-range JR FM transmitters & Novak ESCs with the one-button programming. Hopefully I'll be blasting this thing up some dry rocky creekbed walls and shooting video since I got the "ThumbSteer" thing!
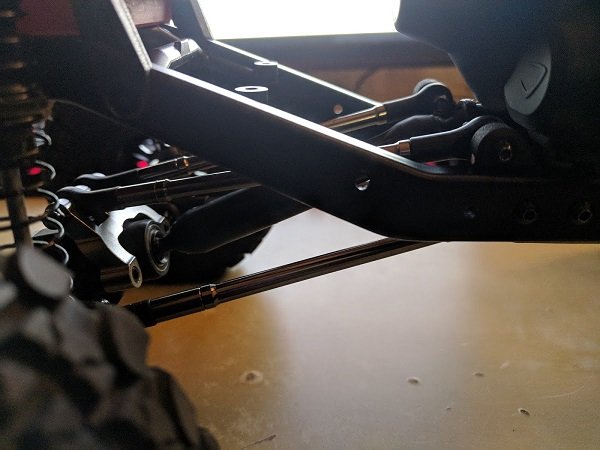
Attachments
Last edited:
Sounds like a bit of a refresh is coming up! I am curious to hear how significantly the Link relocation affect the torque twist.
Thumb steer...a bit like learning to ride a bicycle with no hands? lol...it will be handy. For shooting video and drinking beer...
Thumb steer...a bit like learning to ride a bicycle with no hands? lol...it will be handy. For shooting video and drinking beer...
Natedog
I wanna be Dave
That's a nice blue, backed with black should be good, also like teal blue and sea foam green. Looking forward to your smaller tired 1.7" wheel truck wiht new body!
I have Harbor Freight third hand with magnifier and it's kinda pita to use, the octopus looks way better. The Jig Is Up has been my main soldering aid.
The Jigs Up - Home
Those RULRs look well made, like to hear how they work for you.")
I have Harbor Freight third hand with magnifier and it's kinda pita to use, the octopus looks way better. The Jig Is Up has been my main soldering aid.
The Jigs Up - Home
Those RULRs look well made, like to hear how they work for you.
Similar threads
- Replies
- 9
- Views
- 4K
- Replies
- 49
- Views
- 12K
- Replies
- 7
- Views
- 2K