• Welcome to RCCrawler Forums.

    It looks like you're enjoying RCCrawler's Forums but haven't created an account yet. Why not take a minute to register for your own free account now? As a member you get free access to all of our forums and posts plus the ability to post your own messages, communicate directly with other members, and much more. Register now!

    Already a member? Login at the top of this page to stop seeing this message.

Turtle's Modified XV-01

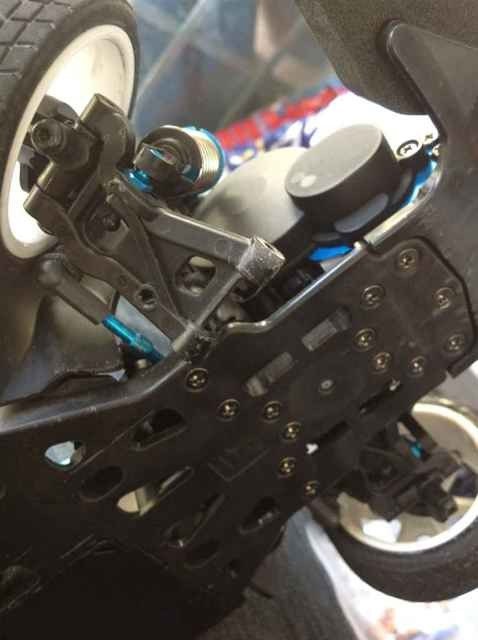
Im curious if you or anyone else has done any modding to stop rocks jamming under the front arms. The chassis does have the small cut outs but, i get a rock jammed under there everytime, and it has popped the whole arm off. I assume the alloy blocks help keep the pin in better, but that doesnt help with the pebble jams. I was considering cutting out the chassis but, dont want to go right to that.

I don't really have that problem or have had it. But I have a suggestion.

What if you ran Associated chassis protector over the whole front end and hanging over the A-arms.

In this photo I run the associated chassis protector not only over the holes, but it also hangs off the chassis. I think it helps quiet a bit.

_MG_9795small_zpsf7407a1a.jpg
 
Thats perfect, i go crazy with the chassis protector also. But if you look at your photo the 4 oblong holes directly under the arms... The first drive a took with my new XV01, i got a rock stuck under there between the arm and chassis.. It gnarled up the arm a bit and broke the front toe block and popped the arm out. Geeezzzz. I had to order the aluminum blocks, which i knew i would.
ImageUploadedByTapatalk1363530470.852333.jpg

Ps TURTLE, the pivot ball ends you used up front? Which are those? I did the same for the steering on my TB01..... I stole them from an old Xray T1.. Which has some great turnbuckles, ball studs and ends (ive been picking from that thing for a year now)
 
Thats perfect, i go crazy with the chassis protector also. But if you look at your photo the 4 oblong holes directly under the arms... The first drive a took with my new XV01, i got a rock stuck under there between the arm and chassis.. It gnarled up the arm a bit and broke the front toe block and popped the arm out. Geeezzzz. I had to order the aluminum blocks, which i knew i would.


Ps TURTLE, the pivot ball ends you used up front? Which are those? I did the same for the steering on my TB01..... I stole them from an old Xray T1.. Which has some great turnbuckles, ball studs and ends (ive been picking from that thing for a year now)

Sorry missed your question. On the other topic: What if you made small mud flaps that attached to the front of the A-arms to keep rocks from kicking up?

The pivot balls I used are Traxxas I think, which ever ones are really short and 3mm. :ror: I can't remember exactly what they are as I grabbed them out of a big bin of misc. rod ends I had. They are very distinct looking I could tell you if I saw them...

Scratch that I think this is them. I can check the car tomorrow to double check.
TowerHobbies.com | Traxxas Rod End Ball Screw Connector B/E
 
I haven't been messing with the XV-01 too much, but I needed some bling. :lmao:

So I ordered these up, they also have serrations on the back to help keep them tight.
_MG_1246small_zps62ecd849.jpg
 
So I have wanted to do a night rally for a while now. About a year ago I picked up a ABC Hobbies Light pod. Well today I finally cut it out and started painting. It is made for a Mitsubishi Lancer, but fits this body pretty well.
_MG_1270small_zps761dbd7e.jpg


The lens are still drying but this gives you a pretty good idea.
_MG_1265small_zps834c516b.jpg


_MG_1264small_zpsdeeea633.jpg

It comes with the lower ones as well, but I will probably just run the body lights and the four central lights.
_MG_1258small_zps2b2ec286.jpg


_MG_1256small_zps205d497e.jpg


_MG_1255small_zps8f249891.jpg


_MG_1252small_zpsda160871.jpg


_MG_1251small_zps9d0fd50a.jpg


Next up is too finish painting the light buckets, then wire some lights up! I will also probably do a dedicated body for the lights so I can leave them on all of the time.
 
How are those light kits mounted? Ordered the VW body but won't be here for a week or so. Was going to see how to mount headlight buckets in that body as well as my mini's

Im not 100% sure, but the way it is set up I think you can either run screws through the body or shoe goo them in place. For these photos I just put a small dab of shoe goo on the back of them so I could see what they look like.
 
I've got the same set of pods too. Was also looking at the Evo 3 body it was designed for, but they wanted $60- for it :cry:. Now that my Evo 7 is a shelf queen, might need to paint and wire them up for that.

Turtle - Do you wire up your own LED's? I'm sure there's a good 'How to' somewhere, but feel free to take us through the steps if you have time"thumbsup". Last custom set I had for my SCX10, I paid about $30- for them off ebay.
 
Last edited:
Turtle - Do you wire up your own LED's? I'm sure there's a good 'How to' somewhere, but feel free to take us through the steps if you have time"thumbsup". Last custom set I had for my SCX10, I paid about $30- for them off ebay.

Sometimes. With this I probably will. When I do I will do a tutorial."thumbsup"

Wiring is my least favorite thing to do so I will probably put it off for a little while. :ror:
 
If that's an offer to build them, I'll send you a PM when I'm ready.

My immediate problem, is that I may have lost the little inner lexan pieces that form the bucket to mount the LED. Not where they should be :evil:.

TURTLE - How did you get your masking so perfect? Yours better not have come with masking stickers - mine didn't.
 
how many leds, what color,and how big.. esc conection or 9v battery..

Is that an offer? :mrgreen:

My immediate problem, is that I may have lost the little inner lexan pieces that form the bucket to mount the LED. Not where they should be :evil:.

TURTLE - How did you get your masking so perfect? Yours better not have come with masking stickers - mine didn't.

At least these light pods are pretty inexpensive.

Umm... I used Tamiya masking tape (the best stuff I have used for RC bodies) push it firmly on. Then I noticed there is a little lip on the lexan. I pushed it firmly into the lip with my finger nail so I could see it pretty well in the tape. Then I took a sharp exacto knife and slowly followed it around until I make the complete circle. They aren't perfect, but good enough.

It would have been nice if it came with a mask, but it really wasn't that bad.


BTW- the light buckets are all done, I just need to wire the lights in and paint a new body for this setup. I coated the inside of the lights with shoe goo, it holds them together and should keep most of the dirt from getting into the lens.
 
Is that an offer? :mrgreen:


.


BTW- the light buckets are all done, I just need to wire the lights in and paint a new body for this setup. I coated the inside of the lights with shoe goo, it holds them together and should keep most of the dirt from getting into the lens.

I just gotta order more leds but yeah for a small price I'll wire u up a set.. it may take a week or so but I just gotta know info.."thumbsup"
 
Well I got the light pods all done, still need to work on the LEDS, but no big deal. Too cold for night driving now anyway.
_MG_1723small_zpscd6bf08d.jpg


And simply because I could I got a couple more parts in. :ror:

Install will be sometime tomorrow.
_MG_1726small_zps10fe9d1c.jpg
 
Back
Top