• Welcome to RCCrawler Forums.

    It looks like you're enjoying RCCrawler's Forums but haven't created an account yet. Why not take a minute to register for your own free account now? As a member you get free access to all of our forums and posts plus the ability to post your own messages, communicate directly with other members, and much more. Register now!

    Already a member? Login at the top of this page to stop seeing this message.

Project Dragon Slayer GOM

mewalsh100

I wanna be Dave
Joined
Oct 31, 2012
Messages
2,263
Location
Medina
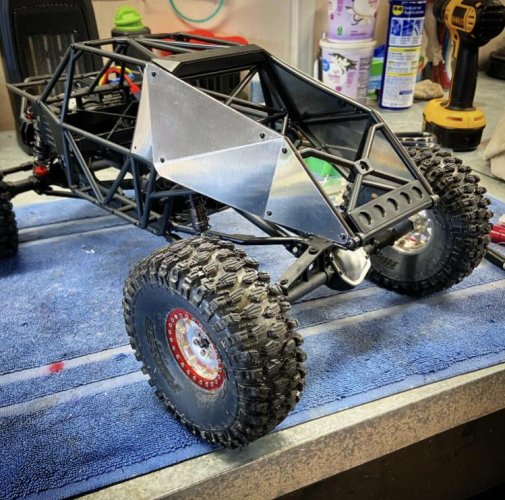
So, I got to work laying up some templates today and playing around with different configurations for the rear side panels on the GOM. I kept my laptop open so I could keep scoping out pics of Campbell's 1:1 rig. It's definitely going to take some "artistic license" and interpretation to create panels that give the GOM a more Dragon Slayer feel. The cage design of the GOM and shock locations won't allow for a full blown duplication. But, once it's complete and in the Black and Green Monster livery, I don't think there will be any denying the resemblance. (solid front axle vs IFS not withstanding)


I ended up bringing the panel forward to the rear, vertical pillar of the side window. I also made them in one piece to fill that middle void that the GOM panels leave, and that does not exist on Campbell's 1:1. (This is also where the exhaust exits will reside per Campbell's rig). Lastly, I ditched the kicked up rear number plate area in favor of following the cage line - also a nod to the 1:1. Fabricating this panel was more difficult than I initially suspected just due to the geometry and bends. All in all, I'm pleased with this first version. I still need to clean up some edges and clean up some of the radius's. I won't be completely sold until I can see both sides installed and get a look at it from a number of angles. "thumbsup"
 

Attachments

  • g2.jpg
    g2.jpg
    179.7 KB · Views: 1,431
I got the 2 rear panels and passenger door panel complete. Still need to do the driver's door panel, and I may revise the roof panel again. I'm definitely liking the rear panels.
 

Attachments

  • gommp1.jpg
    gommp1.jpg
    127.8 KB · Views: 1,763
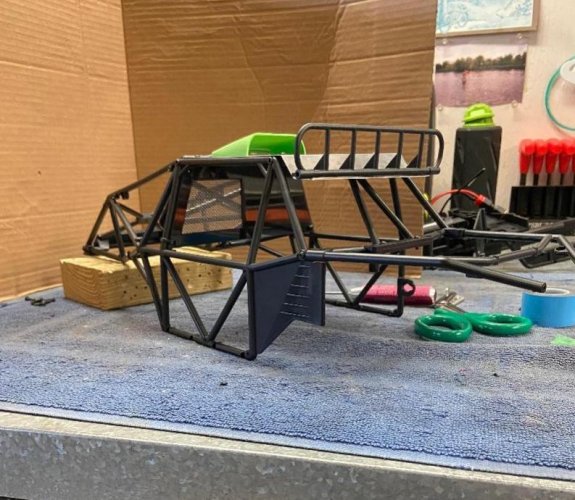
Waiting on the GOM interior, seats, and some other stuff for the Dragon Slayer cabin. I really liked this mesh pass through on the 1:1, so I made a bulkhead out of ABS and used stainless mesh insert to mimic it as closely as possible. I also plan on going single seat in the GOM just like the real rig. it's going to require bending up some more aluminum to make what would be the passenger seat area look more like Campbell's 1:1 rig.

I also utilized some UDR radiators for "cooling" duties. Again, had to use a bit of license here. The radiator on Campbell's rig seem to sit vertically. The GOM cage was not going to allow that without some extensive cutting and hacking. I'm waiting to mount it until I get the rear chase light installed. I want it to sit up as close as possible to that."thumbsup"
 

Attachments

  • Int Copy.jpg
    Int Copy.jpg
    79.8 KB · Views: 1,565
  • BulkheadCopy.jpg
    BulkheadCopy.jpg
    104.2 KB · Views: 1,262
  • Rad.jpg
    Rad.jpg
    166.9 KB · Views: 1,241
I like it! I need to do some work on my GOM. I'm thinking of chopping the fins so that it's flush with the cage lines. I really need to get mine out for a good run again, but I bent my rear axle last time I went out, and I haven't gotten around to installing the replacement yet.
 
Thanks soze! I've liked the looks of the GOM from the first time I saw it. I don't run my other 2.2's much any more, but I'm glad I finally scored one of these bad boys. (it was too good a deal to pass up) Having fun with this project, but can't wait to actually run this thing and see what she'll do!
 
Mike it is looking great and nice work on the panel fab that is a tough area todo in the rear!


Thanks Brandon - That means a lot to me coming from you!


I appreciate you helping me out with the hood. I just could not get the dimension I wanted out of it. I set your hood on it yesterday and the fitment and look is killer! Thanks again for turning it around so quickly and for the seasoning! I rubbed it on to a steak this morning that I'm gonna grill up tonight!"thumbsup":ror:
 
Huge fan of the Campbell's and was bummed to see Bailey get taken out of the lead at KOH this year by a water pump pulley of all things!

Awesome job on this! I'll be following along.

Biggest reason I bought a bomber was due to how big of a fan I am of KOH, and Randy's a pretty cool dude!

I would buy a Campbell RC vehicle (Gawd I wish I could afford a 1:1!) in a heartbeat.
 
Last edited:
Huge fan of the Campbell's and was bummed to see Bailey get taken out of the lead at KOH this year by a water pump pulley of all things!

Awesome job on this! I'll be following along.

Biggest reason I bought a bomber was due to how big of a fan I am of KOH, and Randy's a pretty cool dude!

I would buy a Campbell RC vehicle (Gawd I wish I could afford a 1:1!) in a heartbeat.

No doubt - was a bummer for Bailey. It seems it’s always some small component like that. RC version will have to do for me until I win the lottery!:lmao:
 
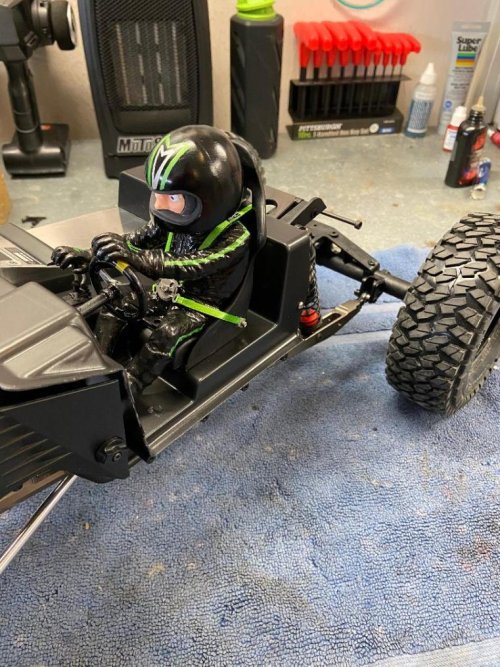
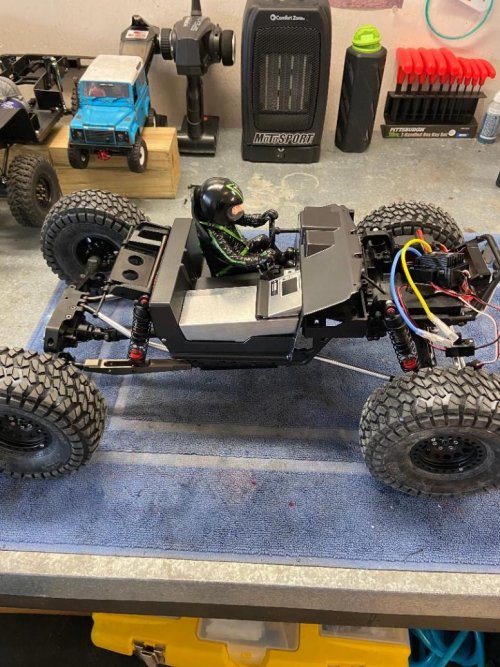
Finally got time to make some more progress on the "Dragon Slayer" GOM. Interior is pretty well wrapped up. Pleased with how the aluminum console area turned out. After reviewing a bunch of different driver options, I decided to go a bit whimsical with Wild Willy. He fits perfectly in this interior. So much so that I gotta think G-Made had that in mind. I did bring the seat forward about 1/4" over the factory marked holes in the floor plan. This allows the seat to clear the rear bulkhead I made for the cage. The other benefit is it allows Willy's feet to rest squarely on the front kick panel of the interior versus dangling mid-air. Still a ways to go, but it's been a fun project so far!"thumbsup"
 

Attachments

  • GI4.jpg
    GI4.jpg
    171.2 KB · Views: 1,119
  • GI3.jpg
    GI3.jpg
    170.7 KB · Views: 1,119
  • GI2.jpg
    GI2.jpg
    174.3 KB · Views: 1,155
  • GI1.jpg
    GI1.jpg
    170.7 KB · Views: 1,133
This is coming along VERY nicely... "thumbsup"
 
This is coming along VERY nicely... "thumbsup"

Thanks durok. Appreciate it!

Ironically, I sold the Baja Rey TT build to a guy that happens to know the Campbells. He screen shot me some texts he sent them about this build and they’re diggin it. I asked him if they’d be willing to sign it when it was done and they were totally down. “Small world” stuff I guess, but pretty darn cool!
 
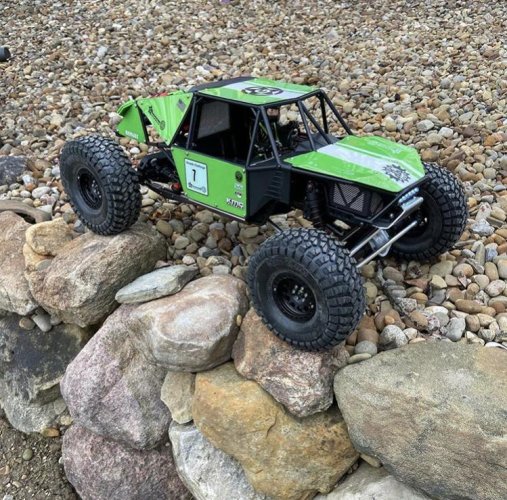
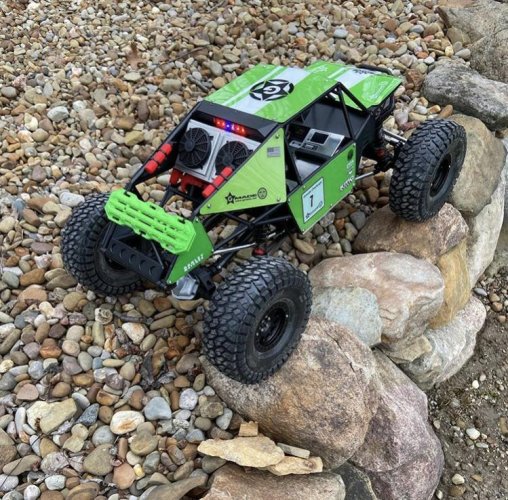
Waiting for the weather to warm up to spray the aluminum panels I made for Project Dragon Slayer. Also waiting on the sponsorship decals. In the meantime, I went ahead and sprayed up the lexan panels for runners I can beat on without cringing.:lmao: Hard to tell since it was overcast, but there's a real nice pearl I laid in with the bright green. I still have some other little details to wrap up, but I got a chance to shake her down pretty quick. Fun little rig, but as expected, it just eats up everything on my backyard course. No worries though, I've got some real big stuff about 20 mins up the road where I can let'r stretch her legs."thumbsup"
 

Attachments

  • GrGom1.jpg
    GrGom1.jpg
    158.2 KB · Views: 1,071
  • GrGom2.jpg
    GrGom2.jpg
    157.2 KB · Views: 1,072
tempted to sell my enduro and grab a GROM. there has been a sort of resurgence lately?

dragonslayer is looking incredible, GREAT work on those panels! great details on the interior too. the harness looks like the real deal.
 
tempted to sell my enduro and grab a GROM. there has been a sort of resurgence lately?

dragonslayer is looking incredible, GREAT work on those panels! great details on the interior too. the harness looks like the real deal.


Thanks Shinchu! It's definitely a fun rig and something you don't see out on the trails very often. "thumbsup"
 
Back
Top