• Welcome to RCCrawler Forums.

    It looks like you're enjoying RCCrawler's Forums but haven't created an account yet. Why not take a minute to register for your own free account now? As a member you get free access to all of our forums and posts plus the ability to post your own messages, communicate directly with other members, and much more. Register now!

    Already a member? Login at the top of this page to stop seeing this message.

Shop Holmes

what CAM software are you using? I use CamBam (yea that's the name) for at home and it is pretty easy to program up a grid and make a series of holes that way.

Nice Taig setup, time to rig it with an air blast or mist unit and your set "thumbsup"
 
Those are pretty cool arm stands. I had a plastic one bruce from speed merchant made me out of orange acrylic, but it didn't have engraving on it....thats pretty cool.

Looks like a pretty cool little mill.

Who is finger painting arms though?:mrgreen:

Later EddieO
 
Not sure what CAM program I have now, it is some UK based version I am running a trial version on.


Thanks Eddie, you are one of the few that could appreciate a tightly packed arm stand :) It will get scratched up in a hurry on the bench, but I have a pretty photo for posterity! The finger painting is my work, obviously done by a professional jumping bean :mrgreen: I got a rainbow of markup dyes and have been modifying arms for giggles when I get bored, the two dyed ones in the pic obviously not machined yet.


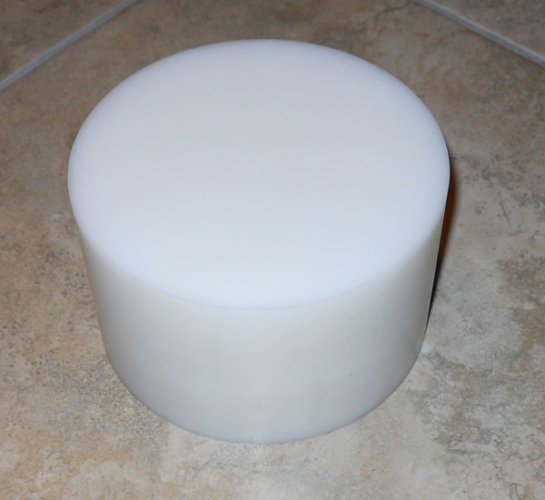
Squared up a hunk of acetal last night before bed, it will become tooling for machining custom motor cans. It was a bit annoying since I couldn't find my 3/8" shank bits or my fly cutter and had to use an 1/8" bit. The throat of the machine isn't quite big enough for the entire chunk so I'm trying to figure out the best way to get the next operation done to keep it accurate. The best method I can think of would be mounting it to my rotary and doing it 1/2 at a time. I'm doing the operation FOR an accurate mount to the rotary though, so it feels like a chicken before the egg problem.
 

Attachments

  • Delrin-Chunk.jpg
    Delrin-Chunk.jpg
    36.5 KB · Views: 1,518
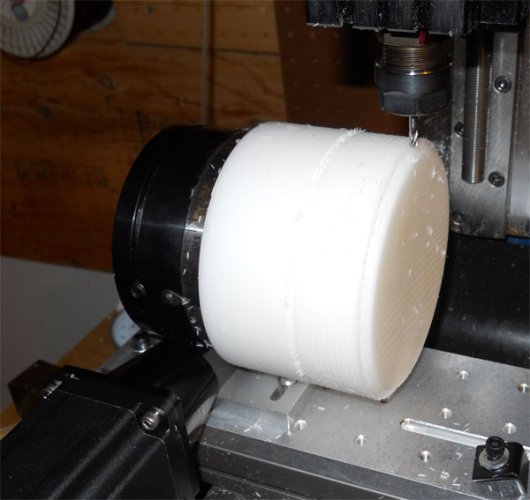
Made some progress at the home shop before I had to go to work this morning. While I was pondering the best way to cut the part, I just went ahead and started it. I indicated Zero at the center of the workpeice and drilled a reference hole for recentering later. I will just turn it around and indicate it parallel to X with the ribs that are already cut. Easy enough, although not as fancy as using the rotary to index the part.

The goal is to have the tool self center into the rotary table. If I cut the ribs tight enough it should key in with no play "thumbsup" At least that is the hope :lmao: It will save a lot of time if I can pull it off!


Can't wait until I get free enough to do this for 4+ hours each day without working overtime. I REALLY dig machine work! I wasn't so good (patient) on the manual machine, but the CNC is downright addictive! I'll probably move the machine to the work shop in a few months once I get some spare space and time.


PS, I left enough material on the hunk just in case I mess up. I can cut it down and start again!
 

Attachments

  • Motor Can tooling.jpg
    Motor Can tooling.jpg
    122.2 KB · Views: 1,518
You've banged out plenty of parts already. I'm just excited still while it's new :lol:

Get to fixing Harley!


Thanks Badd! I've been scheming up for a long time, now it is time for action!
 
Did some more work after work today :???: :mrgreen: I'll call it play so it doesn't seem hard 8)


After flipping the Delrin hunk 180 and re-indicating the part parallel to the bed travel within 0.0005", I reset X and Y to the part center. I then restarted the program to cut the "back" of the hunk the same as the front. Should be straight enough for what I need. "thumbsup" Went to the hardware store and got the bolts and bits I needed to fit it up proper and give it a little test run.

Drilled and tapped the backside for the draw bolt, then bolted it up and faced the outer side down. Unbolted the fixture and rebolted it on the same location to test the ability to refixture without indication. Dial showed no more variance than the surface finish gave, about +/- 0.00025". I would say it was exact, but that's a bit strong of a word for anything.


Now that I made the part, I need to make a brass or lead hammer to take it off. It fits tight!! If you give a mouse a cookie... Also need my VAC line hooked up to the head. I'm tired of holding it there.


Started the operation of cutting it down to an even 4" round before running the next program, and got tired before doing the final pass. Started work at 7am, finished at 9pm. I reckon thats enough for today. I'll try to get to bed early so I can get a few more hours in tomorrow morning before work. I have 600 friggin spokes to be made tomorrow, I'm counting the days until I can unload that work. Standing in front of THIS machine is more fun than THAT machine :ror:
 

Attachments

  • Delrin-chunk-2.jpg
    Delrin-chunk-2.jpg
    48.6 KB · Views: 1,409
Got the diameter of the tool blank turned down to an even 4.001" this morning before heading to the shop. I had a solid hour of b2b phone time that interrupted things a few times, but that's what having a business entails! Re-indicated and zero'd the machine and ready to press start when I get home tonight.

After banging out a few motors I'll start work on a few machines I have. The big power winder needs some new heads made for it and I can punch out 5 blanks at a time, then modify them as new armature styles come about.
 
Very cool...a 4th axis is definitely on my list. Maybe by the end of the year I'll have to spend off some profits for tooling.
 
considering ordering one of these to get some use out of this keling stepper motor kit ive had laying around. Are you pleased with the Taig so far? I'm a little concerned with rigidity, ive been spoiled with 40-taper my whole career..
 
The taig won't do more than an 1/8" cut in steel, but for light work it is rigid enough.


Got the tooling cut up last night. On the final pass the machine lost Z axis by 0.010" and overcut. Tool is undersized now and junk. :x I was having too much beginner luck!

Found my 3/8" bit today and started again this morning. Recut the back side on a fresh hunk of material and it doesn't fit. The CAM showed it all being done in one pass with no finishing, so I don't know whats up. I'm going to recut it with an 1/8" bit I suppose, or else lop off the backside and just bolt a new face into it.
 
It's pretty crushing when you scrap a multi-day part on the final operation, I feel your pain.

Glad to see there seems to be a recent increase in hobby machining on the boards. I'm knee deep in converting a mill to CNC. It will be 4 axis as well;-)
 
It did bum me out pretty bad. I had about 5 hours of machine time into it and plenty of computer time. I'll try again tonight. Maybe start from smaller material so I can do it all in two operations.
 
That sucks man. I feel ya. The other day, I was working on a proto-type set of tubes for the venom axles, and I was literally at the last finishing pass on it, and somehow it jumped out of the live center, and got eaten alive. I think I might have moved something the wrong way. I was pretty pissed. Luckily, since I figured out all the measurements already, it took me no time to make a replacement. Still frustrating though.

Keep up the good work. Someday, maybe I will be smart enough to mess with CNC some. Just manual mode is more than enough for me at the moment. Need to perfect that first.
 
It did bum me out pretty bad. I had about 5 hours of machine time into it and plenty of computer time. I'll try again tonight. Maybe start from smaller material so I can do it all in two operations.

Consider yourself lucky, my last screw up at work cost 10-12 hours of work and $1100.00 block of material. The boss was none too happy.

I've been machining for 20+ years and still learn things almost every day.
 
I love learning every day, so maybe this is a great after hours past time for me :lol:

I THINK the Z axis lost sync because I rammed it against the bump stop and didn't realize it. Since I don't have DROs or limit switches yet I didn't catch it, even though I saw the first cut going into the block when I knew it shouldn't have been.


No updates right now, but I did get the tool cut out the second try and I've been running the machine getting the bugs out of my Gcode. I'll post some pics of the work we are sending out after a few more hours of machine time.
 
Very cool...a 4th axis is definitely on my list. Maybe by the end of the year I'll have to spend off some profits for tooling.

Yes please, I could really use your help on something that could put some $ in both of our pockets, but you do need 4 axis "thumbsup"
 
Back
Top