• Welcome to RCCrawler Forums.

    It looks like you're enjoying RCCrawler's Forums but haven't created an account yet. Why not take a minute to register for your own free account now? As a member you get free access to all of our forums and posts plus the ability to post your own messages, communicate directly with other members, and much more. Register now!

    Already a member? Login at the top of this page to stop seeing this message.

#16 1/8 Marksman TC8 x Tundra Stepside!

I can't speak for Ferp, but I used the stock links, just switched rod ends at the axle side front and rear. The Redcat stock ones are way wide. Haven't had any issues.

20200910-092255sm.jpg
You the man!

I actually did that same thing just so everything can be bolted on and even though I have the panhard aligned decently, I'm getting binding on the stock servo setup. I have an aftermarket aluminum piece that relocates the servo stored somewhere that I didn't use on my Gen8 4Runner build so I'm gonna toy around with that later on.

I was surprised it bolted on and alignment was pretty good, I just moved the links back to the stock middle settings on the chassis.
 
Boom Racing order came in. Their lead time was about a week which is pretty good (I don't recall it being this fast before). Zero offset 5 bolt hubs (unfortunately these wheels can't be had in 6 bolt) compared to the stock 4mm. The pins are incorporated into the hub which eliminates the hex, cool. Also bought some scale hardware from them. Just need to chop the axle shafts to fit scale lockers/covers over the wheel nuts.

9fd59faa6cf55875b6ac78e46673db47.jpg

2df3430fb3c924643a145fe0d4a687bd.jpg


I'd say this is scale off-road tire fitment right here.

02a1db4cf0094cff2cf1c4d02056ff94.jpg


To fit the rears on with the new hubs, I had to hollow out the holes in the hubs slightly larger (3/16") to fully seat onto the pins. And since the hubs are very narrow, the unthreaded axle shaft becomes more exposed which you can't bolt the wheel on without a spacer. Boom Racing provides them with their wheels, but that also meant I had to grind down the shaft up to the pin holes. Not a problem. And the fronts were untouched for the AR60s.

9de453adc028503d9d9039a79adfabf7.jpg

4202a6a5ad401473553b0f1cd3920fa1.jpg

2c24898bf8e6db23e4d8bc2f20c294fb.jpg

e1b283450c3085b0a043dd744491461f.jpg


Just check out that new steering angle. Looks so good.

f2f4eac39d8a54a9381ff81196c3246c.jpg

8b444a56005acf90286e082c68856988.jpg


Here's some reference pics of the AR60 with panhard setup.

As mentioned in the previous post somewhere, the stock links were reused and oddly enough they work good enough. I had the front lower links in the last hole settings before the axle swap, but then moved them to the middle holes. This made up for the slightly wider mounting positions on the 60, but the ball ends also had to be swapped out to prevent binding (I had some circular ball ends laying around). And same thing for the upper link.

ad876ee02a5474b214287a00a8bccc8b.jpg

64f40d5533dd60491b4c90ab9a6c1470.jpg


With the aftermarket aluminum servo relocation mount, it freed up room for articulation although the drag link is a tad shorter with this setup. No complaints, and the servo mount is also now more stout than stock.

9d43c26c35f211ff4a78c0e93886b933.jpg


Here you could see the panhard mount, as the link is mounted in front of it rather than the intended in-between. This prevents from having to use a bent link to clear the truss, but also helps better alignment to the chassis mount.

b4e67135afde34ceaf2871ebfcb22f1a.jpg


Still used the leaf shackle which is perfect.

383f189e31dd183ed0da7606eb44bfbc.jpg


Next:
Modify front flares
Electronics (stock setup makes for nice spares)
2spd conversion
Hack up inner fenders
Lights
Paint/details
 
This is cool. I like how it is coming together. Nice fix for the panhard link and mounts."thumbsup"
 
I was going to say something about the front and rear axle ratios thinking the Redcats are pretty off compared to the Axial, but hell - I'm totally wrong. The Redcat axles are 2.91 - perfect if you've got the stock ratio in the Axial (2.67) It's just a slight bit of front OD. That works out well.

Truck looks great! Love the wheel and tire combo.
 
This is cool. I like how it is coming together. Nice fix for the panhard link and mounts."thumbsup"

I need more time! Haha [emoji106]

I was going to say something about the front and rear axle ratios thinking the Redcats are pretty off compared to the Axial, but hell - I'm totally wrong. The Redcat axles are 2.91 - perfect if you've got the stock ratio in the Axial (2.67) It's just a slight bit of front OD. That works out well.

Truck looks great! Love the wheel and tire combo.

I forgot to mention that as well. The 60 is overdriven, and one revolution left the rear somewhere in the 10 o'clock area. This is definitely going to be more of a trail truck and maybe even tow rig, and I might just play around with the stock 60 gears back in it.
 
As of Sunday morning around 4am to visit Sacramento RC Fest, she's tuned and a runner! Here's the parts I installed.

I wanted to go with a Hobbywing AXE R2 550 3300kv before this event but went with what was on hand at the LHS. Trusty Mamba X to go with what I had in the parts bin, a Holmes Puller Pro V2 2700kv.


a9bd6247278f8b5e1bcc7eb7c834bc88.jpg


Stock vs 2spd transmission. It pushes that battery tray back an inch or so, so I figured using this shorty style 3S 4200mah lipo would play a small weight bias part.

As for the 2spd kit install, in my case and given the time crunch I used the Gen8 slider trays that is included. I did not have to swap out the skid. There's 2 little pockets in the kit skid that I couldn't find out why they are there but not necessary for me.

01e91642c8ffdcf2d3c8d1ac2d139de2.jpg


And a few trail shots. As far as capability, it's pretty damn good with taking the stock bumpers into consideration! Stock Pro-Line foams did help on some hooks but I think I want to experiment with some CI dual stage 4.5's. And this long wheel base played a HUGE part in tackling lines that one would think otherwise. Absolutely in love with this rig and I think I want to throw a tow hitch on it to make it an official tow rig. 2spd also made it fun blasting around and seeing the suspension absorb bumps etc. I haven't touched the stock shock oil but it performed great so no reason to swap.

635190519c73626b4638228a720cd6cf.jpg

b3bcf61ec2b1e65279fa3acf6e9dc63e.jpg

50f22fa82570bdf76dbae91bb0dfe9ec.jpg

a5d48fba3043f9c083ff247419d2ccb0.jpg


To do list:
- cut down axle shafts to cover wheel nuts (too long)
- chop up inner fenders front & rear
- Full Size Invasion decals
- hitch
- Crawler Innovations 4.5 dual stage foams
- light kit
 
Looking good Goro, look forward some more mods and updates.
Appreciate it man! I remember you sent me those 4Runner pieces and I need to touch on that build soon.

Well, ladies and gentlemen, this rig is an official tow rig! This body was made to find it's way to myself and the more I drive this thing with other 1/10s makes me love the size of it since it's a full size. I think I'm gonna grab a Vanquish plastic bumper set and trim down the rear bumper to create my own receiver (kinda like how I did the TRX4 bumper on my 80 series build), and another H-Tech drop hitch. In the picture I just bolted my old hitch directly to the Marksman bumper with some spacers.

As for the rig on the trailer, that's my GSpeed V4 build that I need to update it's thread badly.

694e87f558261914b9d81964d2ed601a.jpg


Aftermath of it's 2nd outing. 2nd gear runs through lightly muddy puddles. It needs a bath!

0bc20079daeadd8840fcc7084f546c3f.jpg


If you haven't noticed, it's sitting lower. The front spring collars are set at half instead of max height, rear cantilever links to the axle are installed on the lower links mounts instead of the stock shock location. This is the initial look I was going for, but even though the sidehilling capability is better, the ground clearance was absolutely missed. Rear bumper was snagging on everything. So next I will tighten the rear spring collars all the way down to see if I can get close to what the height was before (without moving the shock links back to stock) and put the fronts back to max height. Also threw on limiter straps to prevent the axle from dangling too far.

26334615da11699b5acbecb6177aabca.jpg
 
this is a good looking rig
I would reinforce the front and rear bumpers if ya plan on keeping them
oh and I already stole your panhard bar mount idea lol works good I had to do a bit of trimming though but it works good

 
Last edited:
this is a good looking rig
I would reinforce the front and rear bumpers if ya plan on keeping them
oh and I already stole your panhard bar mount idea lol works good I had to do a bit of trimming though but it works good

Hell yeah Ferp. I like how you modified it to be secure with the frame.

I was thinking on trying to snag another body for spare stuff like the bumpers. And when I do give this a paint job, it'll be a total refresh so all the scratches will be gone.
This is a great build. Nice job! "thumbsup"
Thank you Jato!
 
EDIT: I'm trying to sort/fix this post.

Alright let's go RCC. 4 months or so of updates. I've been enjoying the crap outta this rig.
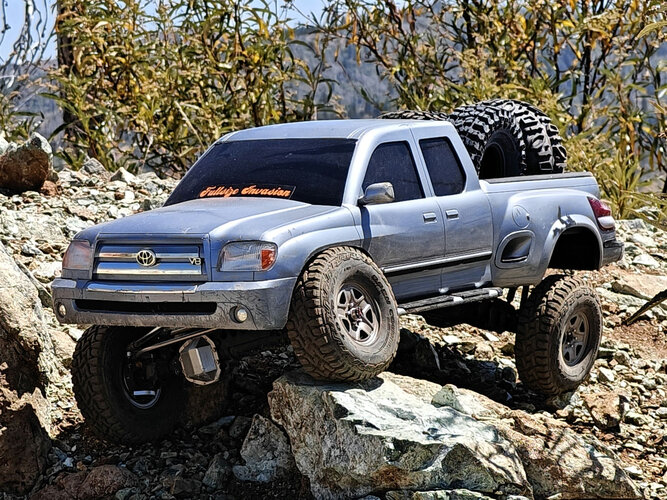
Summary of updates:
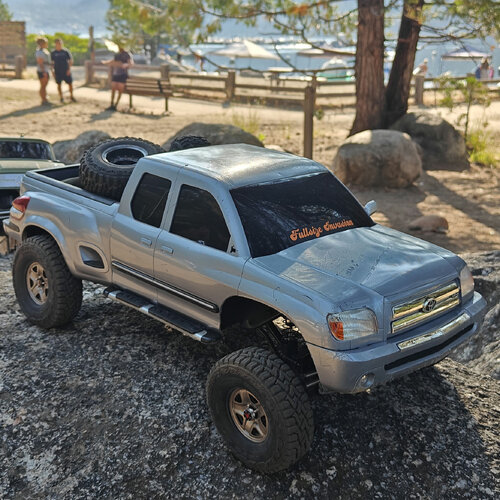
- Fullsize Invasion officially on the windshield
- Inner fenders hacked up and installed
- Stub axle shafts shortened for scale locking hubs
- Front Pro-Line big bore shocks (50wt)
- Rear HPI Venture White springs
- Element sway bar
- Injora steel driveshafts
- Hardcore RC panhard/drag links (steering link on the way)
- Servo mount forward to clear 550 can
- HW Axe V2 3300kv 550
- 12t pinion
- NSDRC RS450b servo
- Bracing for leaf shackle on panhard mount
- VP orange C hubs/knuckles
- GRC LEDs for fog lights
- MyTrick RC rectangular style headlights/DG1 controller
- RC4WD D rings & clamps in bed
- GRC roof rails shortened
- 1/16" ABS custom Thule style fairing
- RCCRAWLER.COM homemade stickers
- VP Yokohama Geolandars 4.5"
- Crawler Innovations dual stage foams (F/med - R/firm)
- Injora TE37 reps
- OGRC brass rings 105g each (front only)

To do:
- 4Runner printed mirrors
- LURC scale hardware
- Clear windows for custom interior???
- Spray bedliner
- Custom printed functional toolbox


Onto descriptions and story telling.

I was so hyped when I finally received these stickers lol.

IMG20240719191310.jpg


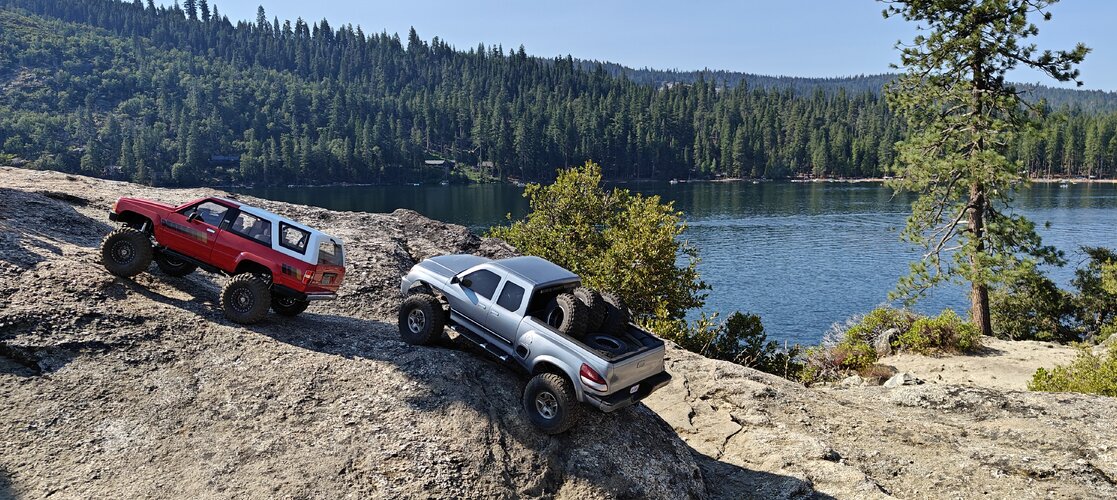
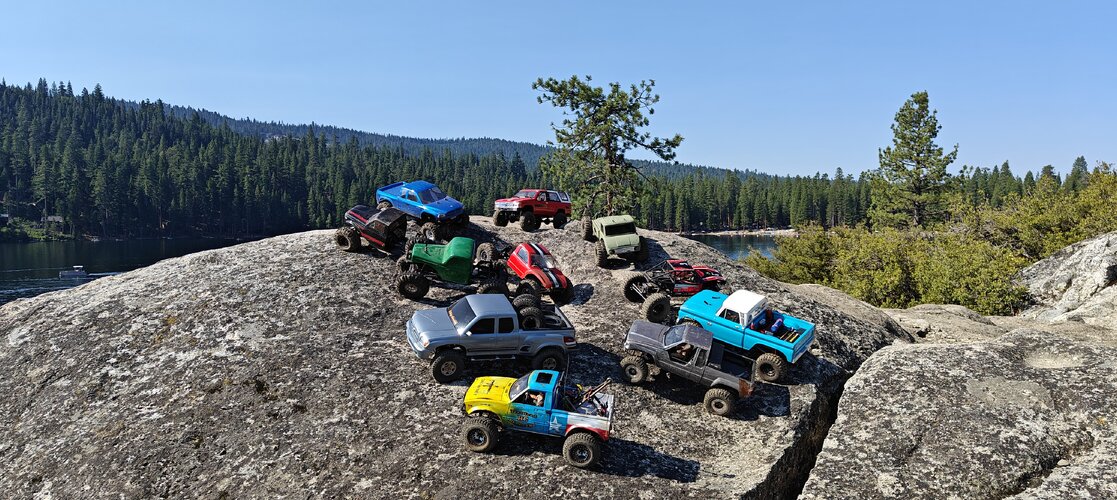
Visited Pinecrest Lake with some Knights Ferry Scale crew. With the full set of Pro Builds in the bed while trailing, it was fun seeing them move around.

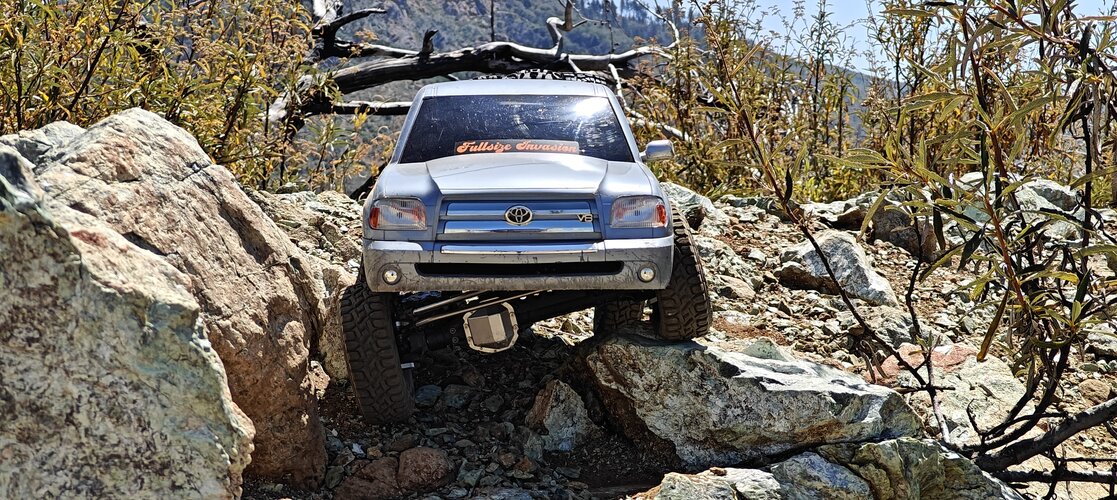
For some reason I can't insert the rest of the attached photos, so pictures 1, 2 & 3 are from Pinecrest. After that group shot, I decided to descend straight ahead to the left off the rock. The truck was going to tip so I caught it, but a wheel escaped the bed and down the rocks it went, bouncing out of view into trees and eventually the water which was far out of reach. So somewhere near the shoreline or bottom of the lake is a wide 5 spoke Boom Racing Pro Build wrapped in a Dick Cepek Extreme Country tire. I've completed the set since then.

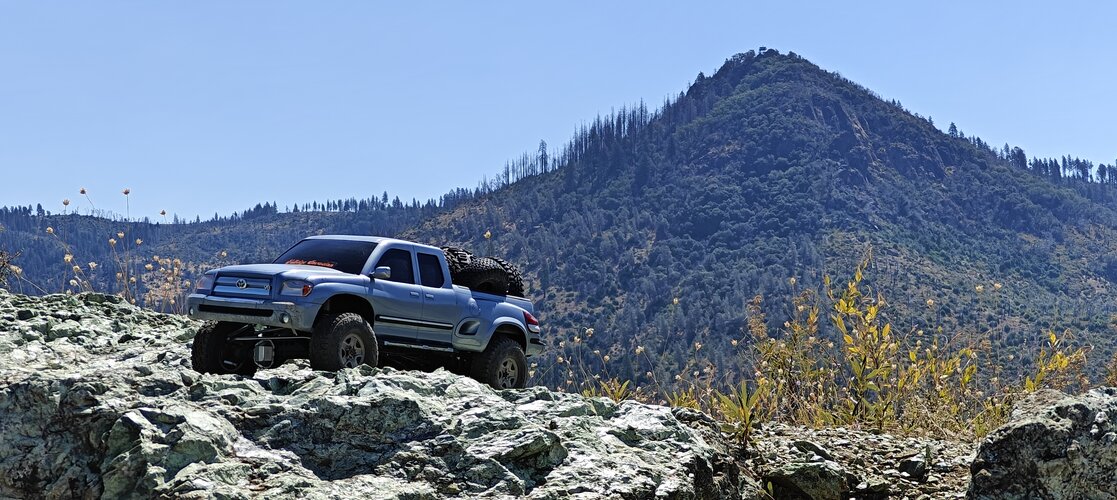
Moving on to the last 3 are from the following day, up in Magalia with the Butte County Scalers. Threw some empty tires in the bed this time.
 

Attachments

  • IMG20240720081427_1.jpg
    IMG20240720081427_1.jpg
    599 KB · Views: 2
  • IMG20240720091838.jpg
    IMG20240720091838.jpg
    5.6 MB · Views: 3
  • IMG20240720092133.jpg
    IMG20240720092133.jpg
    5.2 MB · Views: 4
  • IMG20240721110212.jpg
    IMG20240721110212.jpg
    2.4 MB · Views: 4
  • IMG20240721115819.jpg
    IMG20240721115819.jpg
    3.2 MB · Views: 3
  • IMG20240721115924_1.jpg
    IMG20240721115924_1.jpg
    458.5 KB · Views: 3
Last edited:
Here's the MyTrickRC headlight install. Just glued them into place in the light housings.

IMG20240723232422.jpg


GRC fog light install was just as simple. Cut the holes out of the bumper, trimmed the light housings down to diameter and glued them in as well. Both head and fogs came out awesome. I have the fogs on one channel for on/off, and the headlights are on another channel which can switch between off/low/med/high.

IMG20240726002119.jpg
IMG20240726002053.jpg
IMG20240726205656.jpg
IMG20240728132946.jpg
IMG20240728150909.jpg
IMG20240728150844_1.jpg
IMG20240728151109.jpg
 
So because this Tundra crawler tow rig has "stock" wheels, it's only fitting to buy some new wheels for it. 1.9 Injora TE37 reps seemed fitting for daily driver appeal and it just so happened that Yokohama Geolandars became available in 4.5 so I had to grab those. (Roboslug insert installed)

IMG20240902022813.jpg


Because of the wheel style and offset, I wanted these to fit as close to the steelies did as far as offset went but still run brass knuckles. The knockoff DLux knuckles are huge and there's no way these wheels would fit without them looking like they're on 2" 1:1 wheel spacers, all poked out. That led me to swapping out the knuckles to the VP Wraith style and swapped out the C hubs also. (Roboslug inserts installed at this time)

IMG20240904012901.jpg
IMG20240904012732.jpg


The less aggressive VP knuckles allowed the wheels to fit a little closer in, but not near enough to my liking. I created a thread which I'll follow up on about modifying these knuckles to allow the wheels to be inset more but took a simpler route with running brass rings in the wheels instead. I always try to avoid adding weight in the wheels but in this case an exception was made to achieve what I wanted.

Before running the brass rings, I ran the wheels with .350 VP hubs and 6mm brass hexes on an outing, attending Scale Challenge West #8 at Donner Ski Ranch. August, summer storm hit, rain wind and some snow while doing a 200 gate trail. I wasn't fully prepared, wearing a thin hoodie, jeans and waterproof boots. By the end of the trail, I was completely damp down to the socks and snapped these pictures shivering. Said my farewells, loaded up and made the drive home. Luckily didn't get sick! (CI foams installed during this run)

IMG20240824115806_1.jpg
IMG20240824120928.jpg
 
Further on the Roboslugs, I bought 2 med and 2 firm, since they offered a set in 4.5s. The firms seemed OK, but the mediums had a lumpiness to them. It might be just this specific sizing, but they were not great at all. Working under last minute times, I cut up some McDonalds straws and stuffed them in like so. Under testing, the lumpiness seemed to have gone away.

IMG20240903221923.jpg


Here's pics of panhard bracing, rear suspension setup, cut up inner fenders, electronics.

IMG20240904012808.jpg
IMG20240904013635.jpg
IMG20240904014528.jpg
IMG20240904013030.jpg
IMG20240904013842.jpg


Here's with the Roboslugs installed and the complete look and the added GRC roof rails. They make the tires look more true rather than squared up with the stock foams. But you could see how the wheel fitment looks, as they look like they've got huge wheel spacers on scale wise. These pics were in preps for the next morning, so I never got to test this setup out beforehand. Unfortunately the tire and insert combo caused a lot of tire twist which sorta buzzkilled the content for this thing. As far as the straw trick went, I cut them nearly the same width as the inserts. I think they would be more effective if they were cut at 3/4's their size or a little less.

IMG20240904020022.jpg
IMG20240904020336.jpg
IMG20240902230711.jpg
 
These pictures are trash with the tires but here they are. Knights Ferry Scalers meet at Rock City at Mt Diablo.

IMG20240907081311_1.jpg
IMG20240907084007.jpg
IMG20240907085438.jpg


I took the thin outer foams of the CI foams and cut them to fit the diameter of the Roboslugs, gluing them into place, to see if it could prevent the tire twisting as it would help fill the tire. Short testing outside showed they weren't twisting but the front mediums still had the lumpy ride since I didn't have the straws in. Maybe 4 firms would be the solution with those. I do also have some 3BRC Anti-foams in 4.5 but those seemed way too soft so I didn't bother trying those. Fast forward to today, and they have a new set of CI foams. They are super consistent for this rig's weight.

IMG20240912210406.jpg


And here's pics of the modified knuckles with no brass, and a couple rig pics of the much more correct wheel fitment. First pic, you can see the arm for the steering link needs some shaving from the wheel.

IMG20240914144523.jpg


Here's how shallow Boom Racing pin hubs mount.

IMG20240914141718.jpg


Knuckle arm shaved.

IMG20240914170218.jpg


Corrected fitment.

IMG20240915232320.jpg
IMG20240915232704.jpg


If you made it this far in the updates, last but not least, y'all know I had to represent the RCC fam.

IMG20240917005307.jpg
 
Tundra is looking really good Goro.... roof rack looks dope on top and the improved stance fitment is on very proper
 
Man, that rig is awesome! I need to go out on a ride with you all once.
You're more than welcome to message me if you want to join us some day! The outing with the Knights Ferry group was the first Saturday of September. They did say they wanted to hold another meet there again before the end of the year (they're based in Modesto). I can let you know when that happens if you want and if you're familiar with Mt. Diablo.
 
Back
Top