• Welcome to RCCrawler Forums.

    It looks like you're enjoying RCCrawler's Forums but haven't created an account yet. Why not take a minute to register for your own free account now? As a member you get free access to all of our forums and posts plus the ability to post your own messages, communicate directly with other members, and much more. Register now!

    Already a member? Login at the top of this page to stop seeing this message.

Pinched Cherokee Wraith

OldMoparsRule

Newbie
Joined
Jul 12, 2009
Messages
40
Location
San Diego
I bought a Wraith a year or two ago, and have loved it. At about the same time, I bought a Cherokee body, and have always wanted to make the two of them work together. I did not want to cut the Cherokee body down a lot...my goal was to try to keep it as realistic looking as possible, while maintaining as much of the Wraith Chassis, etc. as possible.

The result was a pinched front end, and lengthened rear wheel wells. The Wraith was a kit, and I have not changed anything on the kit, except removed 2 of the braces for the front bumper.

Here are the pics:


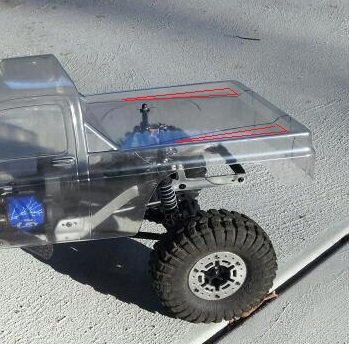
I made the rear fender flares out of the fronts and rears cut in half and joined in the middle. The tire is very close to centered in the wheel well.

You can see the seams where I pinched the Lexan almost an inch in the front. I should have taken in progress pics...

Thank you!

OldMoparsRule!
IMG_2655.jpg
 
is that a lexan body? How did you do the work to it?


I'm not sure what the OP used but there's a ZAP glue for Lexan, I used it to pinch the rear of a Prol-Line 1980 Chevy pick-up (3248-00) although I did add a couple of 2mm screws as well.
Works great, hangs on terrific, I painted mine first & then glued, doesn't touch Tamiya solid colors, makes a mess of but still glues metallics. (this was a comp body that'll probably only last 12months so the paint being a bit messed up wasn't a big deal to me)

I cut mine through with a hobby knife & a steel rule (carefully, mind the fingers) along the lines on top of the bed where I wanted to keep it, so there is still bed cover attatched at the edges of the tray (kinda marked in red in the clear body pic), then tucked that part under the centre piece.

You can see in the pic where it's about to roll over where the silver is discolored where it's been attacked by the glue. Where is on the red the paint is still fine.

TowerHobbies.com | Zap Adhesives Poly Zap 1/2 oz
 

Attachments

  • 20140621_092409-1-1.jpg
    20140621_092409-1-1.jpg
    58.3 KB · Views: 697
  • 936091_613476512103465_1997301218935147316_n.jpg
    936091_613476512103465_1997301218935147316_n.jpg
    107.8 KB · Views: 748
I'm not sure what the OP used but there's a ZAP glue for Lexan

I used a Lexan adhesive on the initial joints. All of the joints have additional pieces of Lexan glued under the joint for strength. I used rubber bands, clothes pins and vice grips to hold everything together while the glue was drying. Once everything was adhered, I lathered e6000 over everything. I have it on the pinched joints, on the pieced together grill and header piece. I followed the same process on the rear fender flares.

Once everything was dry, I painted over the inside with rust colored primer, and then green on the outside. I did try to fill in some small gaps with body filler, but sanded most of it off as I doubt it would have lasted with the flex of Lexan.

Just like a 1:1, the first scratch is always the hardest...

Thank you!

OldMoparsRule!
 
Last edited:
Back
Top