• Welcome to RCCrawler Forums.

    It looks like you're enjoying RCCrawler's Forums but haven't created an account yet. Why not take a minute to register for your own free account now? As a member you get free access to all of our forums and posts plus the ability to post your own messages, communicate directly with other members, and much more. Register now!

    Already a member? Login at the top of this page to stop seeing this message.

Dinky RC Tandem Trailer

CarterFab

Metal shaper
Joined
Dec 6, 2008
Messages
3,519
Location
Hog Eye, Texas
Here is the new Dinky RC Tandem Trailer.
http://new.dinkyrc.com/index.php?pa...ategory_id=16&option=com_virtuemart&Itemid=63
I've been wanting a Carter Fab & Machine hauler but could never pull the trigger on one of the steel versions. Always seemed a bit pricey and are obviously very heavy. I had just purchased material to build my own when Dinky brought this gem to the table.
All ABS construction keeping weight considerably lighter than the steel versions. It's very well thought out and I will be showing here how I modified mine to my desires. There will also be a line of trailer accessories coming out for it including fenders.
Out of the shipping box, I'm not sure if they all come assembled or if I got special treatment for buying the first one. The deck size is 10.500"x22.250" and the forward 2 holes in the floor can be boxed in for storage. I brought this up to Matt so we will see. Either way, it's a super easy mod if you wanted since the trailer is ABS.
peneze7a.jpg


You'll need to install the trailer jack. The base is shaped like a foot. Haha. And it actually does screw up and down making it functional.
5y2ajavy.jpg


The ramps must be fitted by the customer but this is for your own good. They are left about .015"-.020" oversize on their assembled thickness so that you can adjust how tight they fit under the trailer. I did this by assembling the ramps and then using a bench top belt sander to fine tune them. Took about 10 minutes for both pieces carefully checking fit as I went.
(Pics Coming) sorry

I added a Tractor Supply tool box to the tongue of the trailer. You will have to bolt the box down through the bottom and also through the back side of the box through the front frame rail. This needs to be done because the top plate of the tongue actually provides a lot of rigidity to the front end that you will lose when you cut it. You can mount the tool box on top or in the bed of the trailer if that concerns you.
e8uhysu6.jpg


I also through a Proline faux winch on with a Warn sticker kit to dress up the scaliness a little.
eha7ytaz.jpg


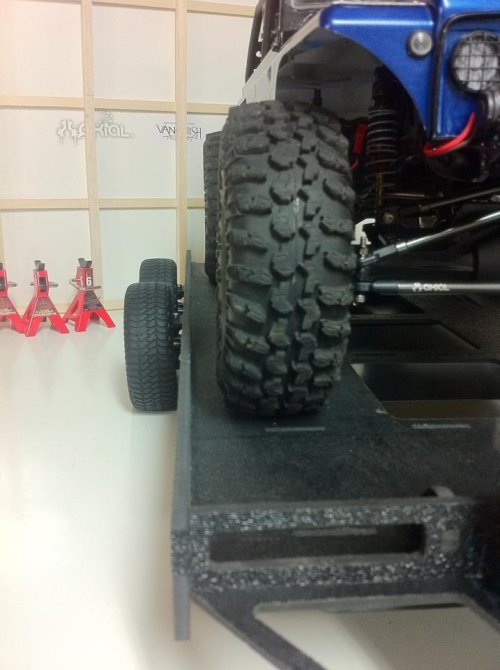
I chose to use items from RC4WD for the rolling stock. I used the 1.55 Desert King tires and 1.55 Landies Vintage stamped steel bead locks. Chose this setup for 3 main reasons: scale appearance, size, and the weight of the trailer when loaded will put a lot of stress on the tires wanting to separate from the wheels while turning sharp.
azesadys.jpg


And don't forget your hitch, made for the SCX-10 and TF2.
he9e9ape.jpg
 

Attachments

  • ImageUploadedByTapatalk HD1358397780.663976.jpg
    ImageUploadedByTapatalk HD1358397780.663976.jpg
    53 KB · Views: 3,615
  • ImageUploadedByTapatalk HD1358397789.522019.jpg
    ImageUploadedByTapatalk HD1358397789.522019.jpg
    101.9 KB · Views: 3,665
  • ImageUploadedByTapatalk HD1358397798.394345.jpg
    ImageUploadedByTapatalk HD1358397798.394345.jpg
    52.4 KB · Views: 3,573
ok i like it but i saw on there website it requires more parts?? can you cover that?? and also do you have to assemble the hole thing??
 
ok i like it but i saw on there website it requires more parts?? can you cover that?? and also do you have to assemble the hole thing??

The parts required are the stock plastic axial Scx10 knuckles(4), bearings for the knuckles, king pin bushings(4), outer stubs from stock dog bone Scx10 axle shafts(4), and wheels and tires of your choice.
On the tire choice, I recommend something in the 3.75" range to keep it more scale for a car hauler, RC4wd has a few options there as far as tread choice. You can also use your stock pull off Scx10 tires and wheels but it will probably not clear the fenders when they are released.
As far as assembling the trailer, that I'm not sure as mine came as shown in the pic leaning against the no it was shipped in. I did have to assemble the ramps and install the trailer jack.
I will have pics of the ramps and there storage position tonight.
If the normal kits come completely unassembled, don't fret. The parts are cut to fit right with each other an its basically like a jigsaw puzzle. You can also personalize yours by simply turning the parts over revealing the smooth gloss black side instead of the textured flat black.
Mine has not been glued together yet and it's pretty solid as is(recommend gluing joints before towing under load).
I ordered my axle parts from RPP Hobby.
 
Even with buying the extras, it still came in right at the price of the metal car hauler produced by another manufacturer that has a much smaller floor.
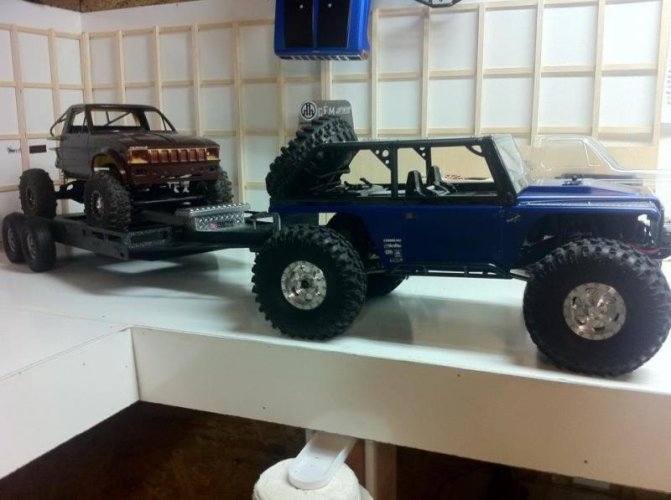
Much more to come so stay tuned, mine will be able to haul my Southern Comfort buggy when all said and done, basically modifying it exactly like my 1:1 crawler hauler.
 
I've been eyeing this for a couple of weeks now. Waiting for dinky to release the fenders and I'm pulling the trigger on one! Seems like a great product!
 
Here are the ramp pics and undercarriage pics as promised.
F194AE2C-EEA6-4B6F-B299-2500E8DE316F-7967-00000A3D53C93ABF.jpg

82AC622B-599E-415E-9CBB-D17946C98402-7967-00000A3D50D7A510.jpg

2A4070E0-F40D-4CF6-A4AF-427B690D47A2-7967-00000A3D4A97814A.jpg

Here you can see all the structural bracing and the holes for routing you wiring for lights. Also the storage slots for the ramps.
B6212646-0C8A-4AB1-B377-579E04764FCA-7967-00000A3D439EEDD8.jpg

Here are the 2 different surface options you can choose and this goes for all the panels, not just the ramps. You can also see the "puzzle" style assembly on the right that helps lock the parts together. I use regular CA glue for final assembly. Also, the sides of the ramps(raised edges) that add the structural integrity as well as lock them in place when used for loading, are the parts that need to be fitted for your preference.
5088F678-6DF8-4A09-9809-45931583FDF7-7967-00000A3D4DAEF692.jpg

Here is the sander I used which was very easy and quick.
BE0476AA-86A3-41C9-ACB0-C4075FB5711A-7967-00000A3D5689F7BF.jpg
 
Those tires are sweet! Might use them on mine.

Yes, every trailer will be pre-assembled.

Be sure to glue before towing under load.
Use a small rubber mallet to reassemble.
 
Good news Ty!
Man I can't wait to get my fenders and do my personal mod to be able to haul the buggy. Gonna look sweet and make for some great video.
 
Can't wait to get my order out here in Australia. The woodsman trailers are great, these look to be even more detailed
 
Matt makes some great products. I got the last all steel crawler hauler he made and it is a work of art. He had told me he had something in the works for the trailers and this looks like a great alternative. Affordable, light, easy to assemble, and it looks great! You will have a blast adding all the scale details to it.
 
Last edited:
Got my ABS from tapplastics.com today. Ordered it pre cut width and 36" long, 2 times. Then I got my heat gun, razor, dremel, drill, and tape measure and got to work.
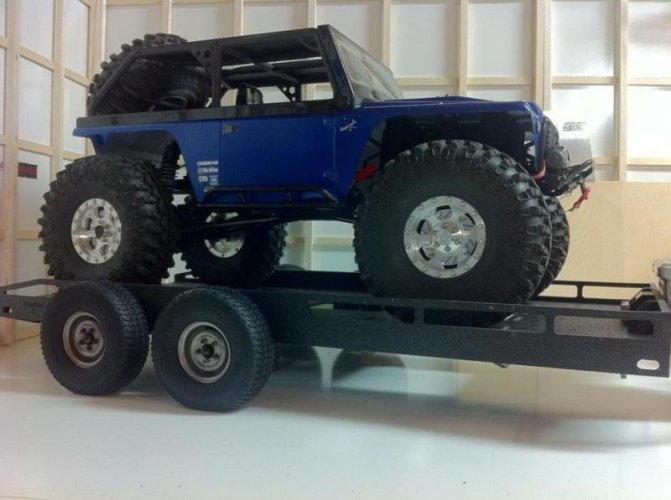
I wanted the trailer modified similar to my 1:1 crawler hauler so that it could also haul my buggy,
68901C08-70F9-4E2F-B8D1-9901E4782DAA-9199-00000B942372DDBE.jpg


I started with the strips and made small relief cuts on the under side where the bends would be. Put the strips in the vice and applied heat. They bolt to the trailer using a couple of the stock holes for the production fenders, and also built supports for the extended areas that bolt to the sides of the trailer frame.
C8F8594D-5103-454F-A23F-DAF63EBE026C-9199-00000B90DA16C6B0.jpg

Next I will remove portions of the top rails so the bed will be 3" wider for the larger rigs.
Here is a similar width truck
3E93A495-79E7-45B8-98B3-0271538872CB-9199-00000B90D462ED31.jpg

33276DAD-C6BB-40C5-A4F4-F47FD4867A76-9199-00000B90CF747709.jpg
 
Got my trailer deck finalized just in time, as I broke the rear steering ram on the buggy,
395F76D2-A705-48B5-8E16-FE8964181F12-10892-00000EE7C4AC0048.jpg
.
Now the buggy fits nice and flat on the trailer and don't have to drive over the rails,
DB27CDA2-1B3F-4031-81B2-91ACE96AA72C-10892-00000EEA66174E70.jpg
.
It will also hold my short course trucks too.
Also got it glued together at the seams so will be ready for a test run this weekend when the little man shows up, just need to get my buggy fixed now.
 
Any chance you could post a pic or three of how the knuckles and stub axles mount up? I could prob figure it out when the parts show up but would be kinda cool to know beforehand. Thx for any help in advance"thumbsup"
 
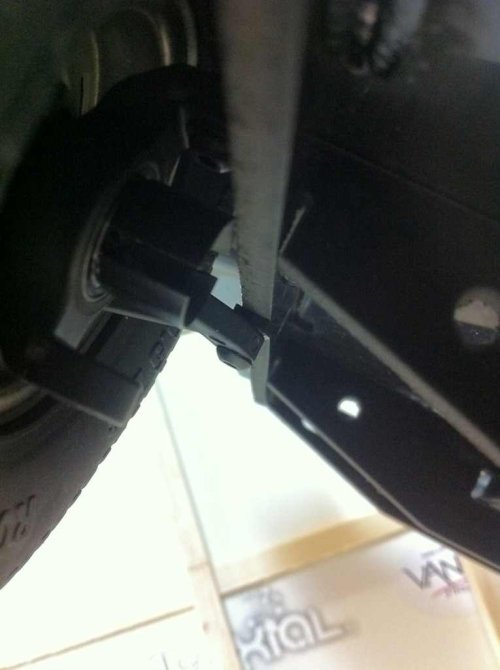
They are really easy and almost self described when you get them in hand, but no problem. I didn't remove the wheels I didn't have time this morning but I'll talk you through it with the pic I took.
When you get the trailer, there are 4 tabs(2 each side) that stick out with holes in them. This is where the upper kingpin bolt attaches.
On the underside in the frame rail of the trailer there is are holes drilled and tapped for where the steering arm bolts in. There are 4 small delrin washers, one will go between the steering arm and trailer when bolted together. ImageUploadedByTapatalk1359032882.907615.jpg
You can see both mounting bolts in that pic.
Need anything else just ask and I'll see what I can do.
 
That about handles it...thanks a lot! Can't wait to get mine and great job on yours. Very much appreciate the post"thumbsup"
 
Back
Top