This will not be an exact step-by-step tutorial for someone with no mechanical experience. However, for someone with a bit of experience, it should walk you through it pretty well. I have replaced or rebuilt differentials on several of my RC's. The internals of this one are pretty similar to other 1/8th scale planetary differentials. However, getting to it sure it not as easy as it is on my Associated RC8.2e or my Thunder Tiger MT4-G3. Those come out with just four or five screws. I had to remove 20 screws from the DHK Maximus to get the differential out. However, I used a battery powered driver to remove them all and it went pretty quickly. When I did the reassemby, I replaced the original course thread steel Phillips head screws with new fine thread stainless steel hex head screws. I used screws from the RCScrewz screw kit (part number DHK005) that I wrote about in a different thread. I am pretty happy with that screw kit. Since there were so many screws to replace, I used my battery powered driver to run the new screws most of the way down, then finished them by hand.
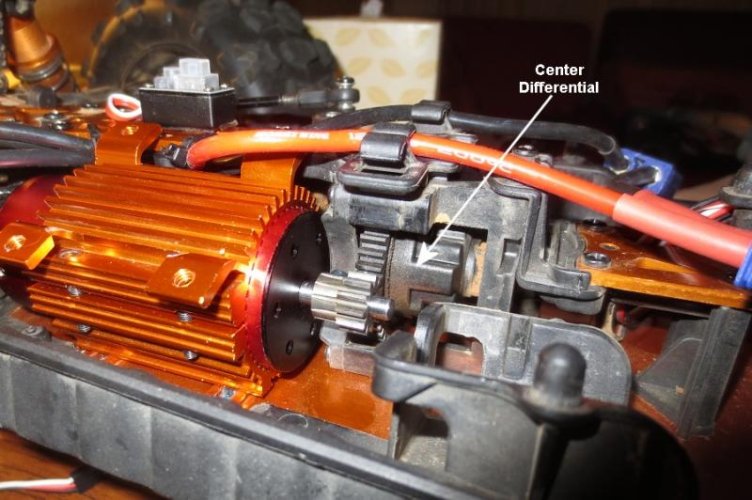
As you can see in this photo, the center differential is pretty tightly packed in there:
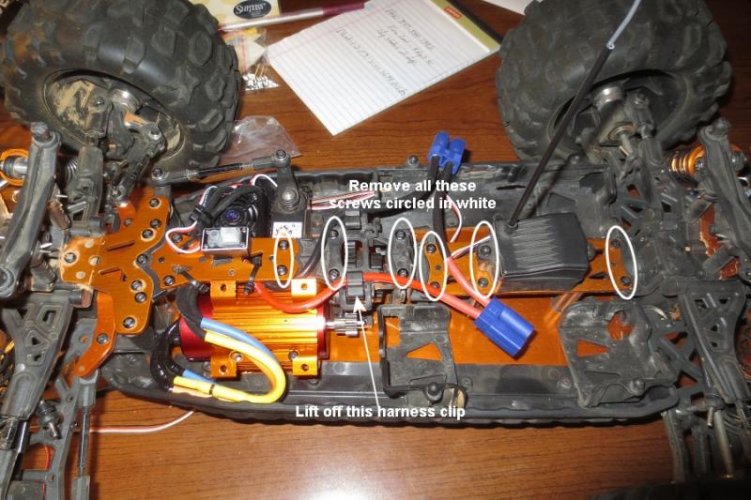
To begin the process, remove the 12 screws circled in this picture. The harness wire clip is the first item to lift off:
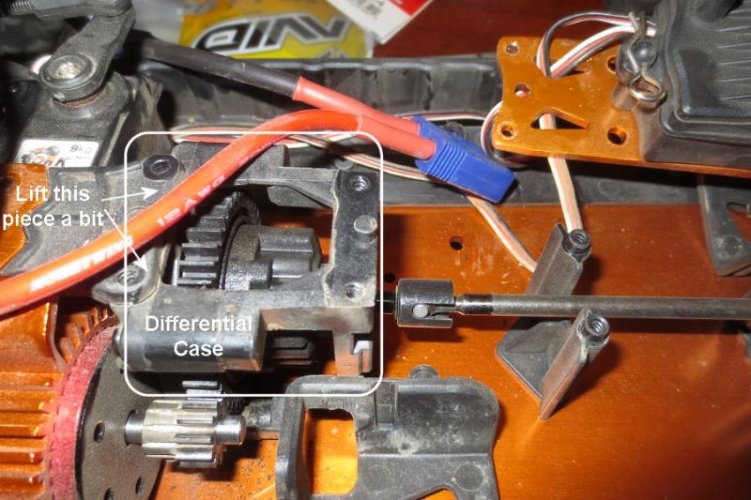
Lift up the aluminum back brace with the receiver box on it and set that aside. Then lift up and remove the L-bracket shown in the picture below:

Turn the chassis over and remove four screws common to the bottom of the center differential cage. Even though it's not shown in this photo, I also recommend removing the four screws common to the two rear drive shaft protectors. It will make reassembly much easier:
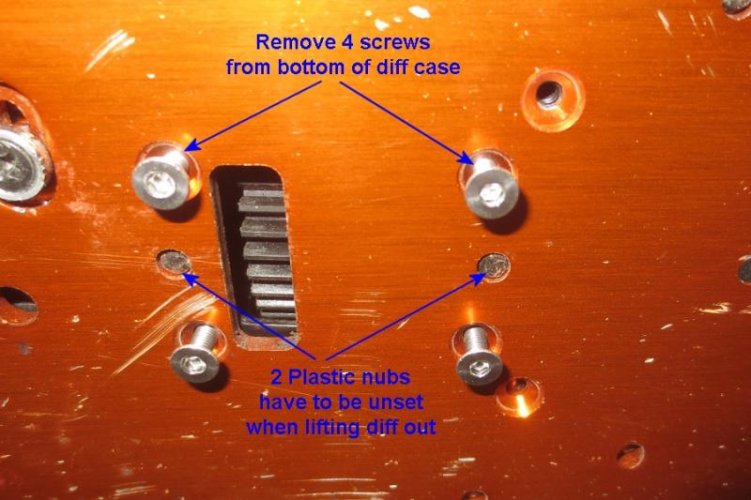
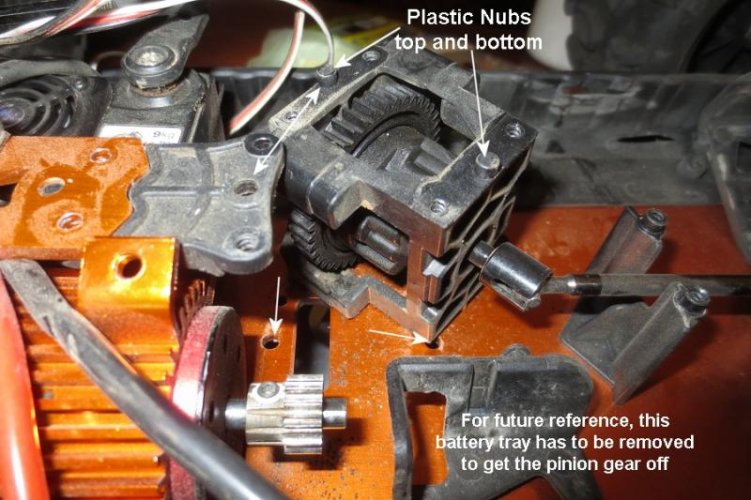
The center differential cage has two plastic nubs on the bottom and two on the top that help with location. Because of those nubs, you can't just slide the cage sideways. You need to lift it up to disengage the bottom nubs while also lifting the top front retainer to release that nub. Twist the differential cage sideways as shown in the second picture below to release the front driveshaft from the front outdrive:

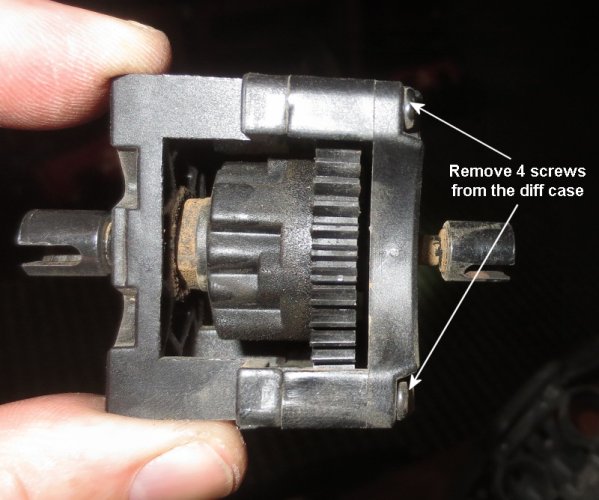
Remove the four screws holding the differential cage together, then carefully slide the cage over the outdrive. The bearing inner diameter just barely fits over the outer diameter of the outdrive. Pull the second half of the cage over the other outdrive the same way:

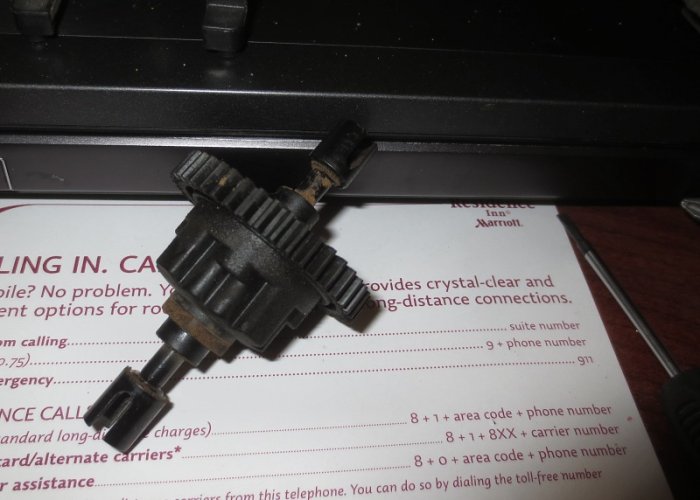
Remove four small screws holding the spur gear to the differential housing and pull it apart. The spur gear piece on the right is usually one-piece on other 1/8th scaler RC's, but it has an adapter on this DHK Maximus:
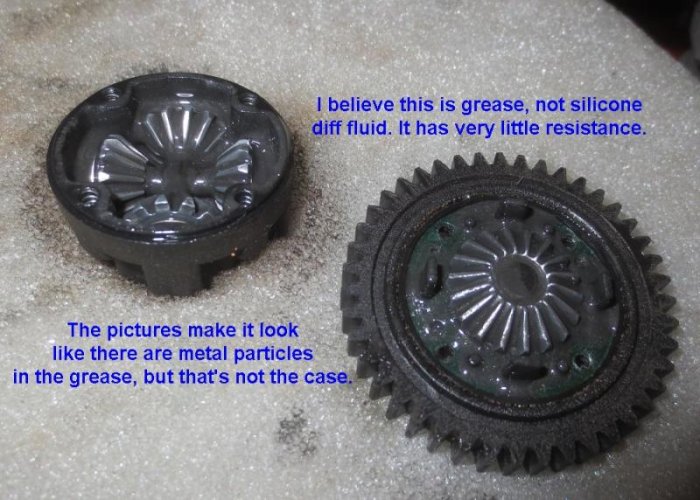

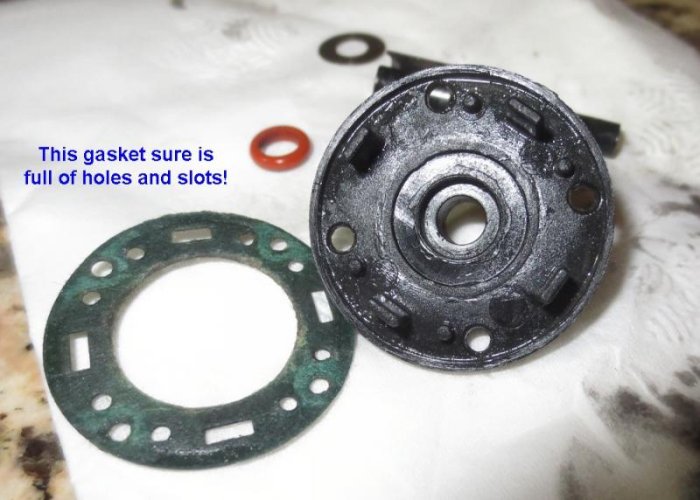
Compared to the gaskets on other 1/8th scale RC center differentials, this one is very perforated. It seems like it would be very prone to leaks. Only time will tell:
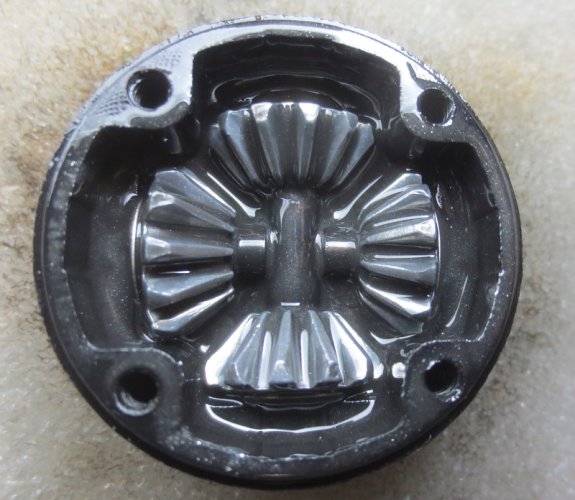
Once you are inside the diff housing, things look normal. Pull all the bits out and clean them off:
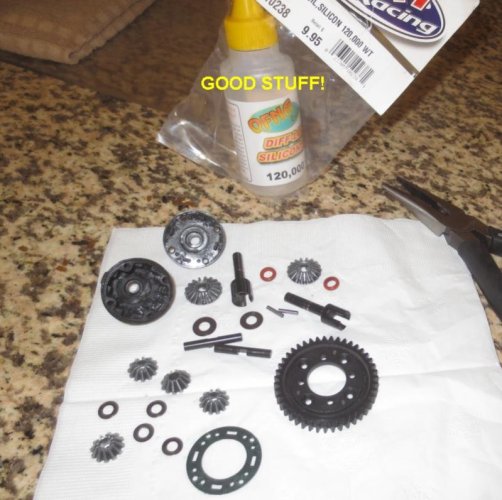
With all the pieces clean and laid out, it looks pretty much like any other planetary style differential:
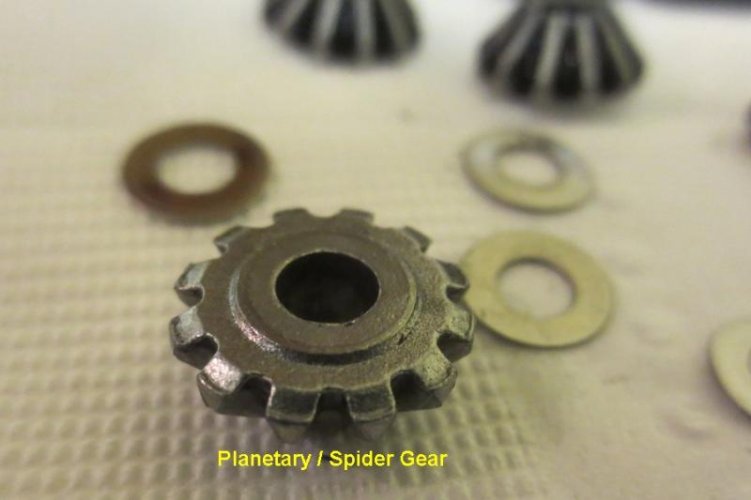
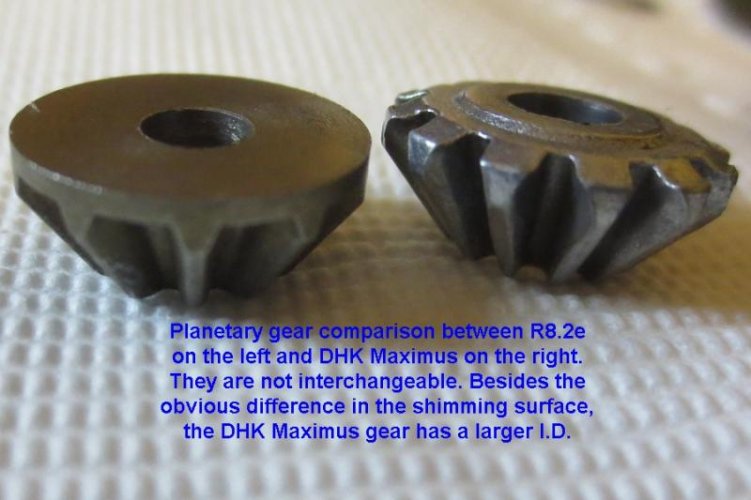
The spider gears have a ridge around the outer surface that is different from the very flat surface on my Associated trucks. I don't know if that's good or bad. It's just different. The difference in shape and inner diameter mean that the spider gears from the Associated differential cannot be used on this DHK differential:
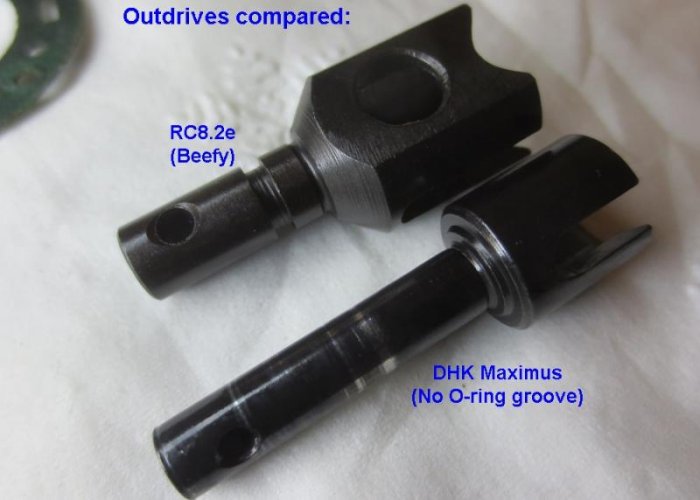
The next two pictures compare the DHK Maximus outdrive to the Associated outdrive. It's not as beefy and does not use an o-ring on the shaft. However, if time proves that the DHK holds up well, then this is not an issue. I'll keep you all posted:
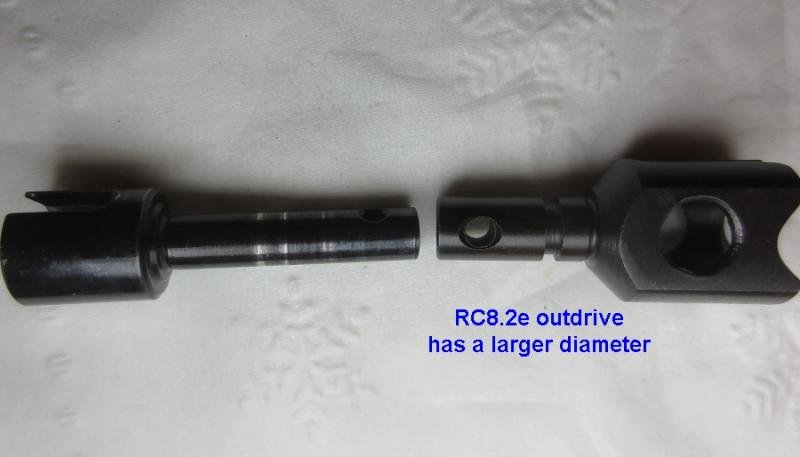
There's a huge difference between the Associated and DHK differential outdrive bearings. However, the DHK bearings both rolled smoothly, so I cleaned them, oiled them and used them over again:

I reassembled the planetary gears with new OFNA 120,000 wt silicone locking differential fluid. I did not have any extra washers that were the right size for spacers, but the single spacer behind each gear that came from the factory provided a good gear mesh:

Re-attach the spur gear and its adapter to the differential case. Wipe off any fluid that spills or squeezes out:

Slip the two halves of the center differential cage over the outdrives and screw them together with four screws:

If you did not previously remove the two rear driveshaft protectors, you should do that now. You need to be able to swing the rear driveshaft out of the way so you can move the center diff cage into position. That is easier said than done since the top and bottom plastic nubs have to be eased into place at the same time:

Reassemble the driveshaft protectors, L-bracket, aluminum back brace and harness assembly clip. Don't forget to put the four screws into the bottom of the diff cage from under the chassis:
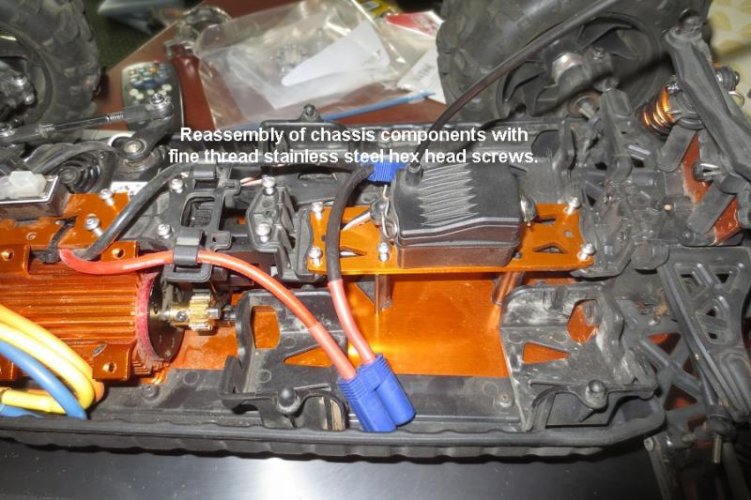

Success! Take it out for a run and have fun! It made a HUGE difference for my DHK Maximus. The front tires don't unload as much, it hooks up better on dirt and pulls wheelies easily if that is something you enjoy. If not, just dial back the punch. I run my punch at 7 of 9. Although it seems unlikely, the diff rebuild actually gained me four more miles per hour of top speed.
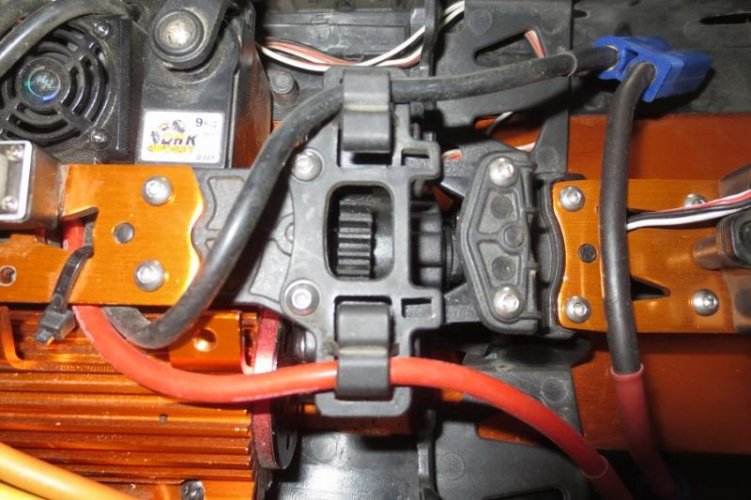
As you can see in this photo, the center differential is pretty tightly packed in there:

To begin the process, remove the 12 screws circled in this picture. The harness wire clip is the first item to lift off:

Lift up the aluminum back brace with the receiver box on it and set that aside. Then lift up and remove the L-bracket shown in the picture below:

Turn the chassis over and remove four screws common to the bottom of the center differential cage. Even though it's not shown in this photo, I also recommend removing the four screws common to the two rear drive shaft protectors. It will make reassembly much easier:

The center differential cage has two plastic nubs on the bottom and two on the top that help with location. Because of those nubs, you can't just slide the cage sideways. You need to lift it up to disengage the bottom nubs while also lifting the top front retainer to release that nub. Twist the differential cage sideways as shown in the second picture below to release the front driveshaft from the front outdrive:


Remove the four screws holding the differential cage together, then carefully slide the cage over the outdrive. The bearing inner diameter just barely fits over the outer diameter of the outdrive. Pull the second half of the cage over the other outdrive the same way:


Remove four small screws holding the spur gear to the differential housing and pull it apart. The spur gear piece on the right is usually one-piece on other 1/8th scaler RC's, but it has an adapter on this DHK Maximus:


Compared to the gaskets on other 1/8th scale RC center differentials, this one is very perforated. It seems like it would be very prone to leaks. Only time will tell:

Once you are inside the diff housing, things look normal. Pull all the bits out and clean them off:

With all the pieces clean and laid out, it looks pretty much like any other planetary style differential:

The spider gears have a ridge around the outer surface that is different from the very flat surface on my Associated trucks. I don't know if that's good or bad. It's just different. The difference in shape and inner diameter mean that the spider gears from the Associated differential cannot be used on this DHK differential:


The next two pictures compare the DHK Maximus outdrive to the Associated outdrive. It's not as beefy and does not use an o-ring on the shaft. However, if time proves that the DHK holds up well, then this is not an issue. I'll keep you all posted:


There's a huge difference between the Associated and DHK differential outdrive bearings. However, the DHK bearings both rolled smoothly, so I cleaned them, oiled them and used them over again:

I reassembled the planetary gears with new OFNA 120,000 wt silicone locking differential fluid. I did not have any extra washers that were the right size for spacers, but the single spacer behind each gear that came from the factory provided a good gear mesh:

Re-attach the spur gear and its adapter to the differential case. Wipe off any fluid that spills or squeezes out:

Slip the two halves of the center differential cage over the outdrives and screw them together with four screws:

If you did not previously remove the two rear driveshaft protectors, you should do that now. You need to be able to swing the rear driveshaft out of the way so you can move the center diff cage into position. That is easier said than done since the top and bottom plastic nubs have to be eased into place at the same time:

Reassemble the driveshaft protectors, L-bracket, aluminum back brace and harness assembly clip. Don't forget to put the four screws into the bottom of the diff cage from under the chassis:


Success! Take it out for a run and have fun! It made a HUGE difference for my DHK Maximus. The front tires don't unload as much, it hooks up better on dirt and pulls wheelies easily if that is something you enjoy. If not, just dial back the punch. I run my punch at 7 of 9. Although it seems unlikely, the diff rebuild actually gained me four more miles per hour of top speed.

Last edited:

