• Welcome to RCCrawler Forums.

    It looks like you're enjoying RCCrawler's Forums but haven't created an account yet. Why not take a minute to register for your own free account now? As a member you get free access to all of our forums and posts plus the ability to post your own messages, communicate directly with other members, and much more. Register now!

    Already a member? Login at the top of this page to stop seeing this message.

Axial XR10 Tips & Tricks

Brandon

Im Brandon
Vendor
Joined
Feb 20, 2005
Messages
8,156
Location
Colfax, CA
Hey guys, please use this thread to add your tips and tricks during the assembly or tuning of the XR10.

Here is one of my favorites: http://axialracing.com/wordpress/2010/08/17/5011/

15.jpg


By removing the section in GREEN on the gear case plate you can remove the entire gearbox from the front or rear axle without having to remove the axle shaft that travels through the gear case plate. Makes wrenching very easy "thumbsup"

UPDATE 9-17-10. IMPORTANT!!

Also, dont miss the other tips on the rear axle assembly: http://axialracing.com/wordpress/20...ar-axle-assembly-tips-tricks-and-precautions/

Another VERY important thing not to miss during the build is the installation of the rear axle plate (AX30559). Without this plate installed with the correct hardware the main support of the 5x8 bearing for the final gears is compromised. Immediate failure of the gears will occur without the hardware and rear axle plate installed! Please dont skip this step "thumbsup"

ax30559-must-install-small.jpg


UPDATE 9-23-10. XR10 SETUP SHEETS!

The XR10 Setup Sheets are now available: Click here!

image.jpg
 
Last edited:
Here's a couple quick tips that may be helpful to some, as long as you ignore my messy wiring. :ror:

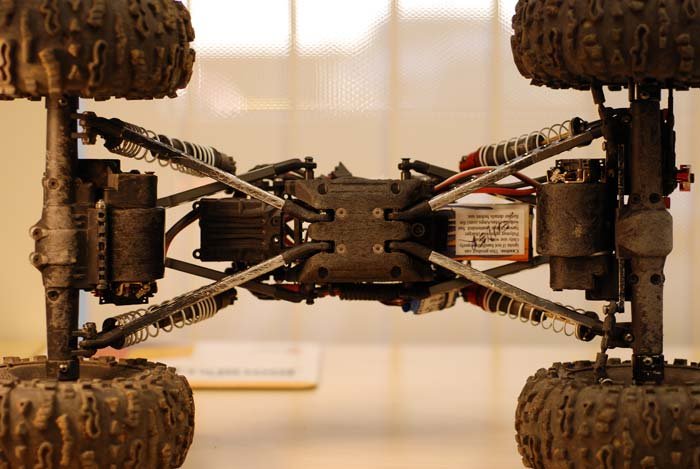
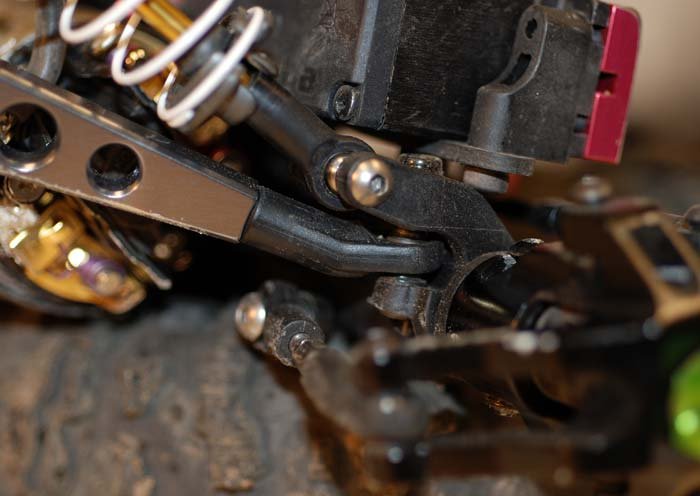
I switched to Axial's machined high clearance links (Part #AX30469) all the way around for a little more ground clearance. This is one of the best mods I have made so far. Only changes I had to make were adding the XR10 curved rod ends at the front axle, instead of the straight rod ends. This stops the high clearance links from interfering with the lower shock mounts. In the rear the standard rod ends work fine. I did however add a small plastic spacer to the rear, otherwise my wheelbase was a hair short. For a little weight savings you can run our 101mm 30* high clearance links for upper links (last few pictures). They weigh 1/2 as much as the machined high clearance links.

The other mod I made was to clock the motors up a bit to avoid snagging them on the rocks. All I did for this was add our offset rod ends from the AX10 steering (Part's tree #80005) to the upper links. This did two things, it clocked the motors up a little and added extra clearance to the upper links and motors. If you just clock the axles without the offset rod ends the upper links will hit the motors. I also installed 2 more long curved rod ends from the XR10 kit to the rear upper links at the chassis. I did this to clock the rear motor up even more then the front.
 

Attachments

  • XR10-Build-RCC-648.jpg
    XR10-Build-RCC-648.jpg
    38.3 KB · Views: 25,066
  • XR10-Build-RCC-651.jpg
    XR10-Build-RCC-651.jpg
    48.4 KB · Views: 25,370
  • XR10-Build-RCC-655.jpg
    XR10-Build-RCC-655.jpg
    36.4 KB · Views: 35,164
  • XR10-Build-RCC-662.jpg
    XR10-Build-RCC-662.jpg
    35 KB · Views: 23,514
  • XR10-Build-RCC-667.jpg
    XR10-Build-RCC-667.jpg
    29.9 KB · Views: 23,529
  • XR10-Build-RCC-1221.jpg
    XR10-Build-RCC-1221.jpg
    45.6 KB · Views: 26,011
  • XR10-Build-RCC-1223.jpg
    XR10-Build-RCC-1223.jpg
    43.5 KB · Views: 23,245
Last edited:
Great tips guys!

Hey Brad, I had one question about the machined links. Are they the same as old AX10 (3mm set screw), or new with 4mm set screw?

Here's a couple quick tips that may be helpful to some, as long as you ignore my messy wiring. :ror:

I switched to Axial's machined high clearance links (Part #AX30469) all the way around for a little more ground clearance. This is one of the best mods I have made so far. Only changes I had to make were adding the XR10 curved rod ends at the front axle, instead of the straight rod ends. This stops the high clearance links from interfering with the lower shock mounts. In the rear the standard rod ends work fine. I did however add a small plastic spacer to the rear, otherwise my wheelbase was a hair short.

The other mod I made was to clock the motors up a bit to avoid snagging them on the rocks. All I did for this was add our offset rod ends from the AX10 steering (Part's tree #80005) to the upper links. This did two things, it clocked the motors up a little and added extra clearance to the upper links and motors. If you just clock the axles without the offset rod ends the upper links will hit the motors. I also installed 2 more long curved rod ends from the XR10 kit to the rear upper links at the chassis. I did this to clock the rear motor up even more then the front.
 
Thanks Bender. Maybe with the reduced rig weight, we won't have to tap them for 4mm and run revo rod ends.

Also Bender, What are those motor guards you have on your XR10 made from? Looks like maybe ABS? I'm installing a pair of those Brood motors in mine too , (when my xr10 gets here), and was looking into something like that to protect them.
attachment.php


Thanks again for the tips and i'm sure this thread will be full of great advice within a few weeks

They are still 3mm. 8)
 
I build these motor skids for Becky. I had a friend Josh cut the delrin material to length on a lathe to get a clean cut. He cut them to length from the demensions I had on the ones I made for my berg. I then cut a slit length wise and trimmed out the necessary areas to avoid any contact with links. The material diameter is smaller than the motor diameter. This helps hold the skid in place. From there it was just snapping them over the motors. I did put a small piece of servo tape on one spot to prevent them from rotating when they drug across the rocks. It is definately a great upgrade/mod for your $60 a piece motors. I made sure on the lower section that the skid covered the tabs and the brush wire to prevent them from being cut.

014_025.JPG


013_025.JPG


Front Motor:

002_028.JPG


004_030.JPG


005_029.JPG


Rear Motor:

003_028.JPG


006_025.JPG


007_027.JPG


008_026.JPG
 
Thanks Bender. Maybe with the reduced rig weight, we won't have to tap them for 4mm and run revo rod ends.

Also Bender, What are those motor guards you have on your XR10 made from? Looks like maybe ABS? I'm installing a pair of those Brood motors in mine too , (when my xr10 gets here), and was looking into something like that to protect them.

Thanks again for the tips and i'm sure this thread will be full of great advice within a few weeks

The motor guards are just plastic Pactra rattle can caps that I cut to fit. "thumbsup"
 
Aluminum Link options from Axial

Upper link replacements:
Machined High Clearance Links: Direct Replacements
Bent 101mm Pipes: These are slightly longer and will require rod ends from AX80005. Works great for clocking the motors more than the High clearance links provide.

Lower link replacements:
AX30720 Threaded Aluminum Pipe 7x94mm: Stock rear lower links, these can be used front and rear. They require the use of AX80059 that has a built in through hole that is 4mm long to attach the link sleeves to the complete link assembly.
Machined High Clearance Links: These will also fit as replacement lower links. They limit the adjust-ability of the chassis due to their size, I would not recommend trying them if you are planning on running a center clearance of 3" or less. Also see post #2 for pics of these installed on Benders XR10
 
Here is a list of part numbers for all the upgrades for the XR10 plus some addition part numbers for other items that you may want to use:
Most of these upgrades have not been released yet, so you will have to give it some time and check back.


Wheels:
AX08062 2.2 VWS Beadlocks Wheels (Satin Chrome) (2 pcs) (Fits XR10)
AX08069 2.2 VWS Beadlock Rings (Black) (2 pcs)
AX08133 2.2 VWS Machined Beadlock Rings (Grey) (2 pcs)
AX30757 2.2 VWS Carbon Fiber Wheel Weight Lock (2 pcs)

Shocks:
AX30110 13mm Aluminum Preload Collar (2 pcs)
AX30111 Aluminum Shock Cap (2 pcs)
AX30218 Spring 14x70mm 2.07 lbs/in - Super Soft (Red) (2 pcs)
AX30219 Spring 14x70mm 2.47 lbs/in - Soft (White) (2 pcs)
AX30220 Spring 14x70mm 2.85 lbs/in - Medium (Green) (2 pcs)
AX30221 Spring 14x70mm 3.27 lbs/in - Firm (Yellow) (2 pcs)
AX30222 Spring 14x70mm 3.55 lbs/in - Super Firm (Blue) (2 pcs)

Carbon Fiber Upgrades:
AX30750 XR10 Carbon Fiber Chassis Set (2 pcs)
AX30752 XR10 Carbon Fiber Shock Mounts (2 pcs)
AX30753 XR10 Carbon Fiber F/R Servo Mounts and Steering Arm Set
AX30757 2.2 VWS Carbon Fiber Wheel Weight Lock (2 pcs)
AX30772 Carbon Fiber XR10 Electronics Plate
AX30774 Carbon Fiber XR10 Battery Plate

Axle Upgrades:
AX30760 XR10 Aluminum Steering Knuckles (Black) (2 pcs)
AX30762 XR10 Aluminum C-Hub Carrier (Black) (2 pcs)
AX30763 XR10 Straight Axle Adapters (Black (2 pcs)
AX30767 Machined 22T-48P Final Drive Gear
AX30768 Machined Lightweight 36T-48P Final Gear
AX30769 Machined 12T-48P Gear 1
AX30770 Machined Lightweight 36T-48P Idler Gear
AX30771 Machined 12T-48P Gear 2

Links:
Machined Hi-Clearance Links: 98mm in length
AX20465 (Green)
AX30466 (Red)
AX30467 (Blue)
AX30468 (Orange)
AX30469 (Grey)

Threaded Aluminum Pipe 101mm Bent Links: 3mm longer than stock
These are long than the stock uppers. They work well if you want to clock you motor up.
AX30449 Threaded Aluminum Pipe 6x101mm - 30° Angle - Orange (2 pcs.)
AX30519 Threaded Aluminum Pipe 6x101mm - 30° Angle - Grey (2 pcs.)
AX30454 Threaded Aluminum Pipe 6x101mm - 30° Angle - Red (2 pcs.)
AX30458 Threaded Aluminum Pipe 6x101mm - 30° Angle - Blue (2 pcs.)
AX30445 Threaded Aluminum Pipe 6x101mm - 30° Angle - Green (2 pcs.)

Lower Straight Links:
These are stock for the rear but will work for the front. If you do not use the skids that come in the kit you will need to use a 4mm spacer to make the them the proper length.
AX30720 Threaded Aluminum Pipe 7x94mm
Spacers:
AXA1304 4x6mm Spacer - Green (6pcs)
AXA1339 4x6mm Spacer - Red (6pcs)
AXA1346 4x6mm Spacer - Blue (6pcs)
AXA1353 4x6mm Spacer - Orange (6pcs)
AXA1416 4x6mm Spacer - Grey (6pcs)
<!-- / message --><!-- sig -->
 
Last edited:
Hello,

made some changes after a few packs:

front side machined upper links (nothing new :roll:):

4913651198_48589639c1_b.jpg


rear side 30° bended links allows more motor "swing" and clocked it a bit
(also nothing new):

4913045653_47c4158027_b.jpg


cut down batterie mount, better access to the ESC (if needed):

4913651452_ba2f4f012b_b.jpg


delrin steering link (now with Revo rod ends, less play):

4913651258_fcf989c7ca_b.jpg


Jato and Revo rod ends (40mm eye to eye, same as before, less play) and flat hat screws screwed in from "behind" and lock nut on the other side (more "saftey" against tread stripping in the link):

4913045991_bbbd165c29_b.jpg


cut down body (less "scratching" and more movement for the servo side):

4913651828_6c339d2caf_b.jpg


BTW, i limited the front shocks 10mm and set the rear a bit higher.

Greetings Frank
 
When installing the Machined lower links, be sure that you use AXA186 M3x16mm set screws. The AXA187 M3x20mm set screws are too long as pictured below.
 

Attachments

  • AXA187.jpg
    AXA187.jpg
    90.9 KB · Views: 22,144
Hello,

made a little change to my steering today:

4926651343_c8c5fa57dd_b.jpg


The new plate allows the servo more to travel, EPA before was 63 L/R now it is at 83 L/R,
the arm of lever has now 6mm more length:

4926651151_da24792ccd_b.jpg


4927246204_67fd2c9beb_b.jpg


that sounds not dramatically, but the 7954 stays only slightly warm and has a bit more power.

Greetings Frank
 
Bodymount with M4-Nylonscrew. No mo losing bodyclips...
Only necessary for the rear two mounts.

Uli
 
Bender...It looks like in this picture you are running 4mm hardware in these bloated rod ends. Are you forcing the hardware in there or are you drilling them and tapping them? Or are these NEW PROTO larger rod ends??? I have drilled and tapped the axial machined links and run Revo rod ends but never used axial rod ends. Also I have not tried to drill out and use 4mm or 8-32 in standard 30deg axial links however I know that the STRC 30deg links except being drilled and tapped well and hold up well too...fyi They are solid and weigh more than the axial units.

attachment.php
 
Back
Top